Love this? Save it for later!
Share the inspiration with your friends
“I wasn’t planning to bake bread that Sunday afternoon,” I confess. It started when the power flickered off unexpectedly—typical spring storm business—and my usual afternoon plans went out the window. I’d been meaning to try making artisan bread but honestly, the idea of kneading dough for hours always seemed like a chore. Well, with nothing else to do and a half-empty bag of flour staring at me, I thought, why not give this no knead crusty artisan bread recipe a shot?
The recipe came from a tattered cookbook I found tucked behind a stack of old mystery novels at a neighborhood thrift shop. The pages were smudged, and the handwriting a bit shaky, but the promise of “no knead” caught my eye immediately. I remember forgetting to set a timer and wandering off to answer the phone, only to be greeted by the most intoxicating smell wafting through the house when I finally checked the oven.
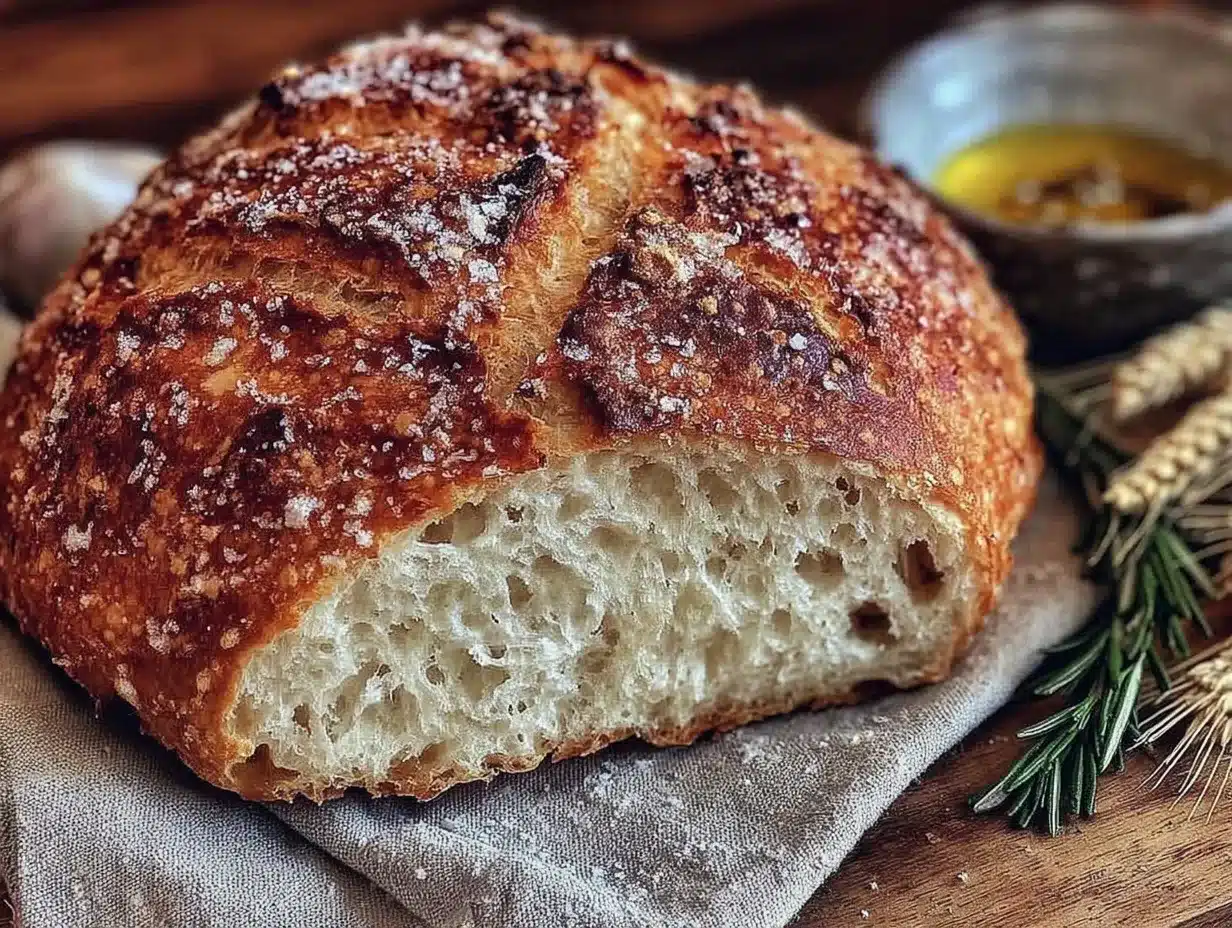
That first loaf wasn’t perfect—there was a little too much flour dusting the counter, and my hands were sticky with dough—but the crust? Oh, that crackling crust! It was everything I hoped for: golden, crunchy, with a tender, chewy inside. Honestly, it reminded me of those bakery loaves I’d always admired but never thought I could reproduce at home. Maybe you’ve been there, staring at a recipe wondering if it’s too complicated. Let me tell you, this no knead crusty artisan bread recipe is the kind that stays with you—it’s easy, forgiving, and downright rewarding.
Why You’ll Love This Recipe
I’ve tried my fair share of bread recipes, and this no knead crusty artisan bread recipe has become my go-to for good reasons. It’s perfect for anyone who wants the charm of homemade artisan bread without the sweat and muscle of traditional kneading.
- Quick & Easy: The hands-on time is minimal—just mixing and a bit of waiting. You get a fantastic loaf with less than 10 minutes of prep.
- Simple Ingredients: Flour, water, salt, and yeast—no fancy additives or special flour blends required.
- Perfect for Beginners: You don’t have to be a pro baker to succeed; I’ve seen complete novices pull off beautiful loaves.
- Crowd-Pleaser: The crusty exterior with that soft, airy crumb inside is always a hit at brunches or casual dinners.
- Unbelievably Delicious: The slow rise develops flavor that makes you close your eyes with the first bite.
What sets this recipe apart? The magic lies in the long, slow fermentation and the baking technique—using a covered Dutch oven to mimic a professional steam oven. That crust, that crumb, it’s all about patience and the right method. Plus, it frees up your day—you can prep the dough in the morning and bake fresh bread by dinner. Honestly, this recipe turns bread baking from a chore into a little kitchen adventure.
What Ingredients You Will Need
This recipe uses simple, wholesome ingredients to deliver bold flavor and satisfying texture without the fuss. Most are pantry staples, so no need for extra grocery runs.
- All-Purpose Flour – 3 cups (360g), unbleached preferred for better texture. I usually reach for King Arthur flour for consistent results.
- Active Dry Yeast – ½ teaspoon (1.5g). This small amount helps the slow fermentation develop flavor without rushing the rise.
- Salt – 1½ teaspoons (9g), fine sea salt works beautifully to enhance flavor.
- Warm Water – 1⅓ cups (320ml) at about 100°F (38°C), just warm enough to activate the yeast without killing it.
You’ll notice the ingredient list is intentionally short—no sugar or oil here, just the basics that allow the natural flavors of flour and fermentation to shine. If you want to experiment, feel free to swap up to half the all-purpose flour with bread flour for a chewier crumb or whole wheat flour for a nuttier taste (though you may need to add a little extra water).
Equipment Needed
- Large Mixing Bowl: A big bowl is essential for the dough to rise comfortably. Glass or stainless steel works fine.
- Wooden Spoon or Spatula: For mixing the wet and dry ingredients together. I often use a sturdy silicone spatula for scraping the sides.
- Dutch Oven with Lid: This is key for baking the bread with steam to get that crackly crust. If you don’t have one, a heavy oven-safe pot with a lid or even a deep baking tray with a water pan can work as an alternative.
- Kitchen Scale: Optional but highly recommended for measuring flour and water accurately. I learned the hard way that eyeballing flour can make or break your loaf.
- Kitchen Towel or Plastic Wrap: To cover the dough during its long rise and avoid drying out.
If you’re on a budget, a simple cast-iron pot or enameled casserole dish can substitute for the Dutch oven. Just be sure it’s oven-safe up to 450°F (230°C). Also, I’ve found that keeping your tools clean and dry helps dough stick less—trust me, it’s a sticky situation sometimes!
Preparation Method
- Mix the Ingredients (5 minutes): In your large mixing bowl, combine 3 cups (360g) of all-purpose flour, ½ teaspoon (1.5g) active dry yeast, and 1½ teaspoons (9g) salt. Stir these dry ingredients to blend evenly. Then add 1⅓ cups (320ml) warm water, and mix with a wooden spoon or spatula until a shaggy, sticky dough forms. Don’t worry about kneading—just make sure everything is combined. The dough will be quite sticky and loose, and that’s exactly what you want.
- First Rise (12 to 18 hours): Cover the bowl tightly with plastic wrap or a kitchen towel and leave it at room temperature for 12 to 18 hours. Ideally, somewhere between 68°F and 75°F (20°C to 24°C). You’ll notice the dough will bubble and expand—this slow fermentation is what builds the flavor and texture. If your kitchen is warmer, check it around 12 hours; if cooler, allow up to 18.
- Shape the Dough (10 minutes): Once the dough has risen and is bubbly, generously flour a clean surface. Gently scrape the dough out of the bowl onto the floured surface. With floured hands, fold the dough over itself a couple of times to form a rough ball. Don’t press too hard—it’s delicate. Cover with a towel and let rest for 30 minutes.
- Preheat Oven and Dutch Oven (45 minutes): About 30 minutes before baking, place your Dutch oven (lid on) into the oven and preheat to 450°F (230°C). This preheating step is crucial for that artisan crust.
- Bake the Bread (45 minutes): Carefully remove the hot Dutch oven from the oven. Transfer the dough ball into the pot—it should sizzle a bit when it hits the hot surface. Cover with the lid and bake for 30 minutes. Then, remove the lid and bake for another 15 minutes to deepen the crust’s color and crispness.
- Cool Before Slicing (at least 1 hour): Remove the bread from the Dutch oven and place on a wire rack. Let it cool completely before slicing to allow the crumb to set properly. I know it’s tempting, but cutting too early makes the bread gummy inside!
If you notice your dough is too sticky to handle, lightly flour your hands and work surface, but avoid adding too much flour, which can dry the bread. The dough’s texture should be tacky but manageable. Also, keep an eye on the crust color during that last 15 minutes of baking to avoid burning.
Cooking Tips & Techniques
One of the secrets to this no knead crusty artisan bread recipe is patience. The long fermentation time not only develops flavor but improves the dough’s structure without any kneading. Don’t rush this step!
When mixing, use a wooden spoon rather than your hands initially to keep things less messy and avoid overworking the dough. Remember, you want a loose, sticky dough—if it feels too stiff, add a teaspoon of water.
Preheating your Dutch oven is essential. I once skipped this step, and the bread turned out pale and lacked that signature crust. Also, baking with the lid on traps steam, which helps develop a shiny, crackly crust—don’t skip uncovering it for the last 15 minutes, or your crust won’t crisp up properly.
If you don’t have a Dutch oven, placing a metal pan with water on the oven’s bottom rack during baking creates steam to help the crust. However, the loaf might not rise as dramatically without the enclosed heat.
Finally, cool the bread thoroughly before slicing. The internal crumb continues to set as it cools, and cutting too soon can make it gummy. I’ve learned this the hard way more than once!
Variations & Adaptations
- Whole Wheat Twist: Swap half of the all-purpose flour with whole wheat flour for a heartier flavor. You might need to add an extra tablespoon or two of water to keep the dough sticky enough.
- Herb-Infused Bread: Stir in 1 to 2 tablespoons of fresh herbs like rosemary or thyme during mixing for a fragrant loaf perfect with soups or cheese plates.
- Gluten-Free Option: Use a gluten-free all-purpose blend with xanthan gum. Note that the texture will differ slightly, and the dough may be wetter—handle carefully.
- Different Cooking Methods: If you lack a Dutch oven, try baking the dough on a preheated baking stone with a pan of hot water underneath to mimic steam. Or bake in a heavy cast iron skillet with a lid.
- Personal Favorite: Once, I added a handful of toasted sesame seeds on top before baking—gave a lovely nutty crunch that my family loved.
Serving & Storage Suggestions
This artisan bread is best served warm or at room temperature. Slice it thick for breakfast with butter and jam, or thin for sandwiches. It pairs beautifully with olive oil and balsamic vinegar for dipping, or alongside soups and stews.
To store, keep the bread in a paper bag or loosely wrapped in a clean kitchen towel at room temperature for up to two days. Avoid plastic wrap, which traps moisture and softens the crust.
If you want to save it longer, slice and freeze in an airtight bag. Toast slices directly from the freezer for a fresh-baked feel.
Reheating in a 350°F (175°C) oven for 10 minutes helps revive the crust’s crunch. Over time, the flavors deepen, so day-old bread can be excellent for croutons or bread pudding.
Nutritional Information & Benefits
This no knead crusty artisan bread recipe is made from simple ingredients, keeping it wholesome and free from additives. One slice (about 60g) provides roughly 150 calories, 30g carbohydrates, 5g protein, and minimal fat.
The slow fermentation process can improve digestibility and nutrient availability, making it a better choice than many commercial breads. Plus, using unbleached all-purpose flour means you’re avoiding unnecessary chemicals.
For those watching gluten intake, this bread is not gluten-free, but you can try the gluten-free variation described above. The recipe is naturally low in sugar and fat, fitting well into balanced diets.
Conclusion
This easy no knead crusty artisan bread recipe is proof that you don’t need fancy skills or equipment to bake bakery-worthy bread at home. It’s forgiving, straightforward, and yields that perfect crust and crumb combo that makes every bite a joy. I love making it because it turns a simple list of ingredients into a comforting, soul-satisfying loaf that fills the house with warmth and aroma.
I encourage you to try it out, tweak it to your taste, and enjoy the process as much as the result. And hey, if you bake a loaf, drop a comment sharing your experience—I’d love to hear how your bread turned out or any creative spins you tried! Happy baking, friends.
FAQs About Easy No Knead Crusty Artisan Bread
Can I use instant yeast instead of active dry yeast?
Yes, you can substitute instant yeast in the same amount (½ teaspoon). It may speed up the rise slightly, so keep an eye on the dough to avoid overproofing.
Why is the dough so sticky? Am I doing it wrong?
The dough should be sticky and loose. That’s normal for no knead bread. Adding too much flour can make the bread dense, so resist the urge to add extra unless it’s unmanageable.
How do I get a crisp crust without a Dutch oven?
Place a pan of hot water on the oven’s bottom rack to create steam, or bake on a preheated baking stone. Covering the dough loosely with foil for the first half of baking can help retain moisture as well.
Can I add seeds or nuts to the dough?
Absolutely! Add about ¼ to ½ cup of your choice of seeds or nuts during the initial mixing. Just fold them in gently to avoid deflating the dough.
How long can I store leftover bread?
Store at room temperature in a paper bag or wrapped in a towel for up to 2 days. For longer storage, freeze sliced bread in an airtight bag and toast slices as needed.
For those interested in more easy bread recipes, you might enjoy my take on easy garlic parmesan breadsticks or the rustic charm of no knead bread with olive oil, both favorites in my kitchen.
Pin This Recipe!
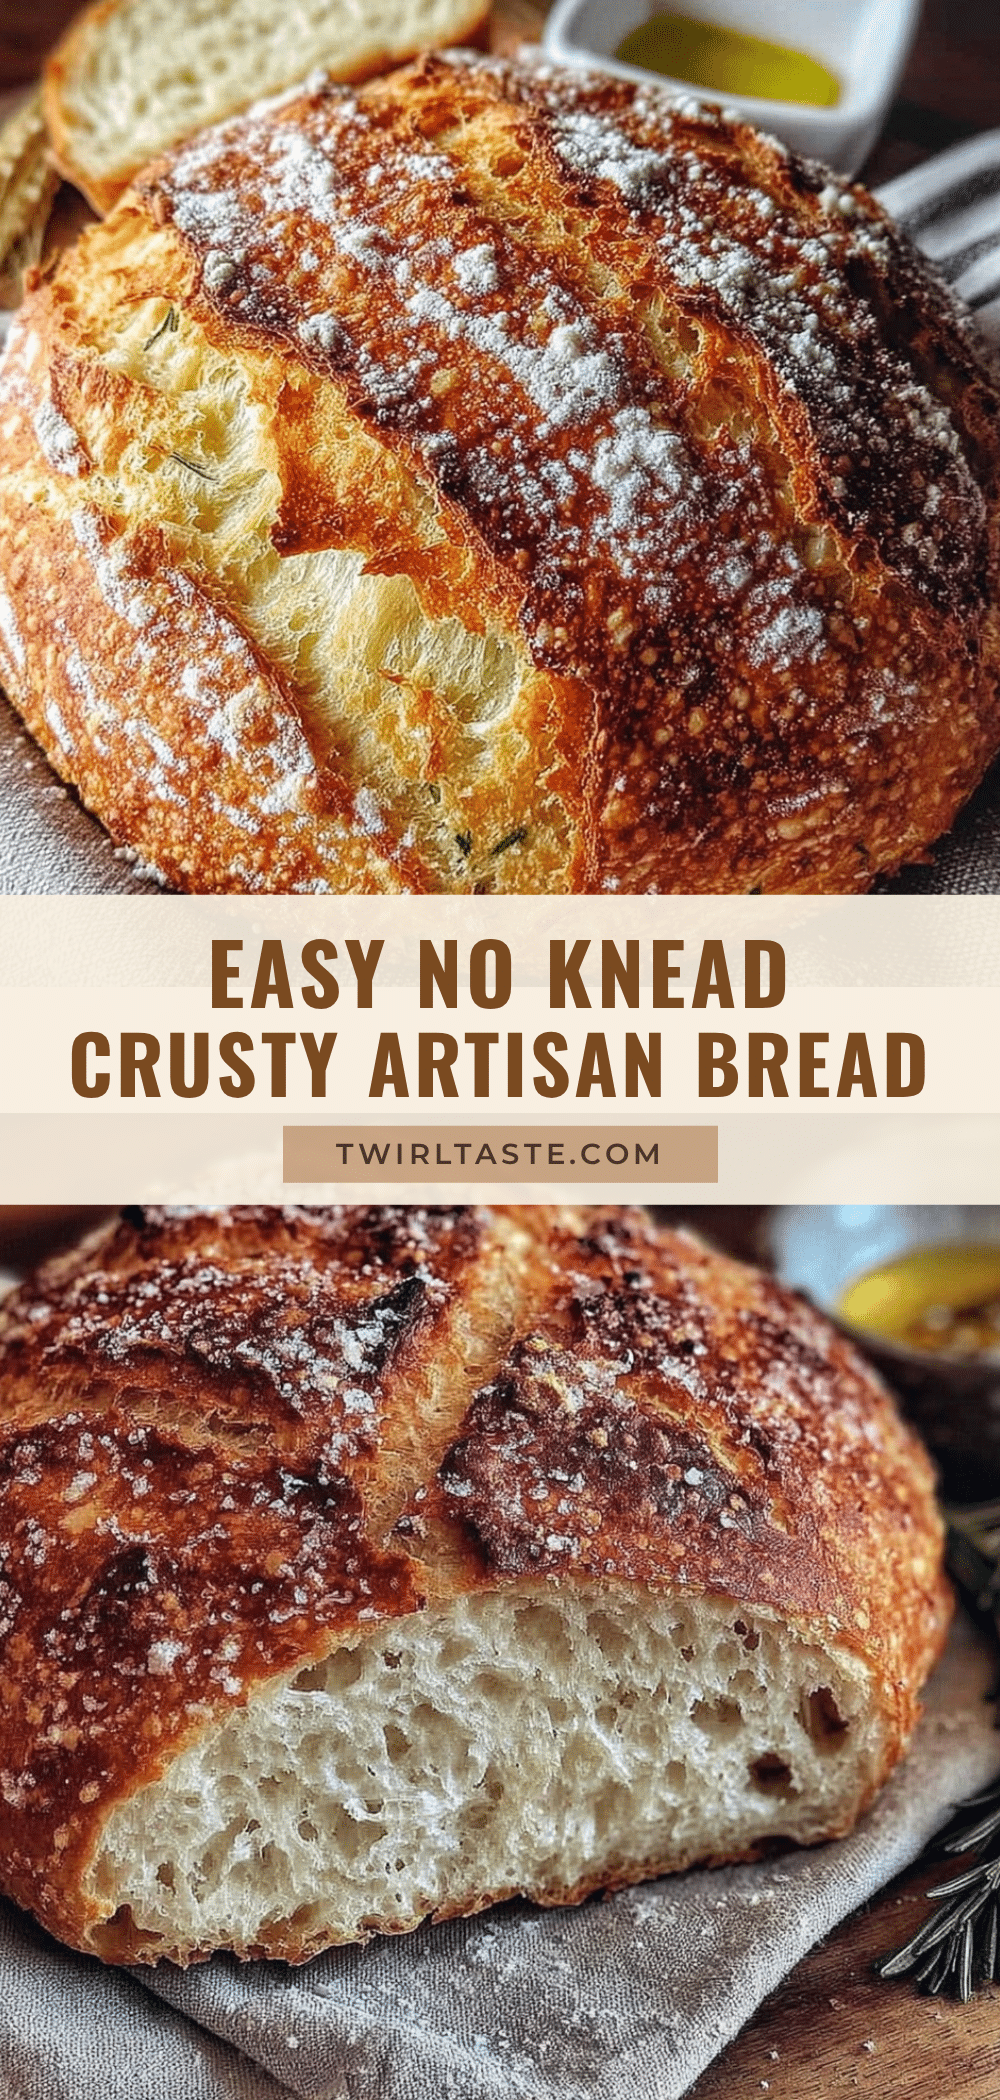
Easy No Knead Crusty Artisan Bread Recipe Perfect for Beginners at Home
This no knead crusty artisan bread recipe is perfect for beginners, requiring minimal hands-on time and yielding a golden, crunchy crust with a tender, chewy inside. It uses simple ingredients and a Dutch oven baking method to create bakery-quality bread at home.
- Prep Time: 5 minutes
- Cook Time: 45 minutes
- Total Time: 13 hours 50 minutes to 19 hours 50 minutes
- Yield: 1 loaf (about 8 servings) 1x
- Category: Bread
- Cuisine: American
Ingredients
- 3 cups (360g) all-purpose flour, unbleached preferred
- 1/2 teaspoon (1.5g) active dry yeast
- 1 1/2 teaspoons (9g) salt
- 1 1/3 cups (320ml) warm water at about 100°F (38°C)
Instructions
- Mix the Ingredients (5 minutes): In a large mixing bowl, combine 3 cups (360g) of all-purpose flour, 1/2 teaspoon (1.5g) active dry yeast, and 1 1/2 teaspoons (9g) salt. Stir these dry ingredients to blend evenly. Then add 1 1/3 cups (320ml) warm water, and mix with a wooden spoon or spatula until a shaggy, sticky dough forms.
- First Rise (12 to 18 hours): Cover the bowl tightly with plastic wrap or a kitchen towel and leave it at room temperature (68°F to 75°F / 20°C to 24°C) for 12 to 18 hours until bubbly and expanded.
- Shape the Dough (10 minutes): Generously flour a clean surface. Gently scrape the dough out of the bowl onto the floured surface. With floured hands, fold the dough over itself a couple of times to form a rough ball. Cover with a towel and let rest for 30 minutes.
- Preheat Oven and Dutch Oven (45 minutes): About 30 minutes before baking, place your Dutch oven with lid into the oven and preheat to 450°F (230°C).
- Bake the Bread (45 minutes): Carefully remove the hot Dutch oven from the oven. Transfer the dough ball into the pot. Cover with the lid and bake for 30 minutes. Remove the lid and bake for another 15 minutes to deepen the crust’s color and crispness.
- Cool Before Slicing (at least 1 hour): Remove the bread from the Dutch oven and place on a wire rack. Let it cool completely before slicing.
Notes
Use unbleached all-purpose flour for better texture. Preheat the Dutch oven to get a crackly crust. Avoid adding too much flour to the dough to keep it light and airy. Cool bread completely before slicing to prevent gummy texture. If no Dutch oven is available, use a heavy oven-safe pot or bake on a preheated baking stone with a pan of hot water for steam.
Nutrition
- Serving Size: 1 slice (about 60g)
- Calories: 150
- Sodium: 360
- Fat: 0.5
- Carbohydrates: 30
- Fiber: 1
- Protein: 5
Keywords: no knead bread, artisan bread, crusty bread, easy bread recipe, beginner bread recipe, Dutch oven bread, homemade bread