Love this? Save it for later!
Share the inspiration with your friends
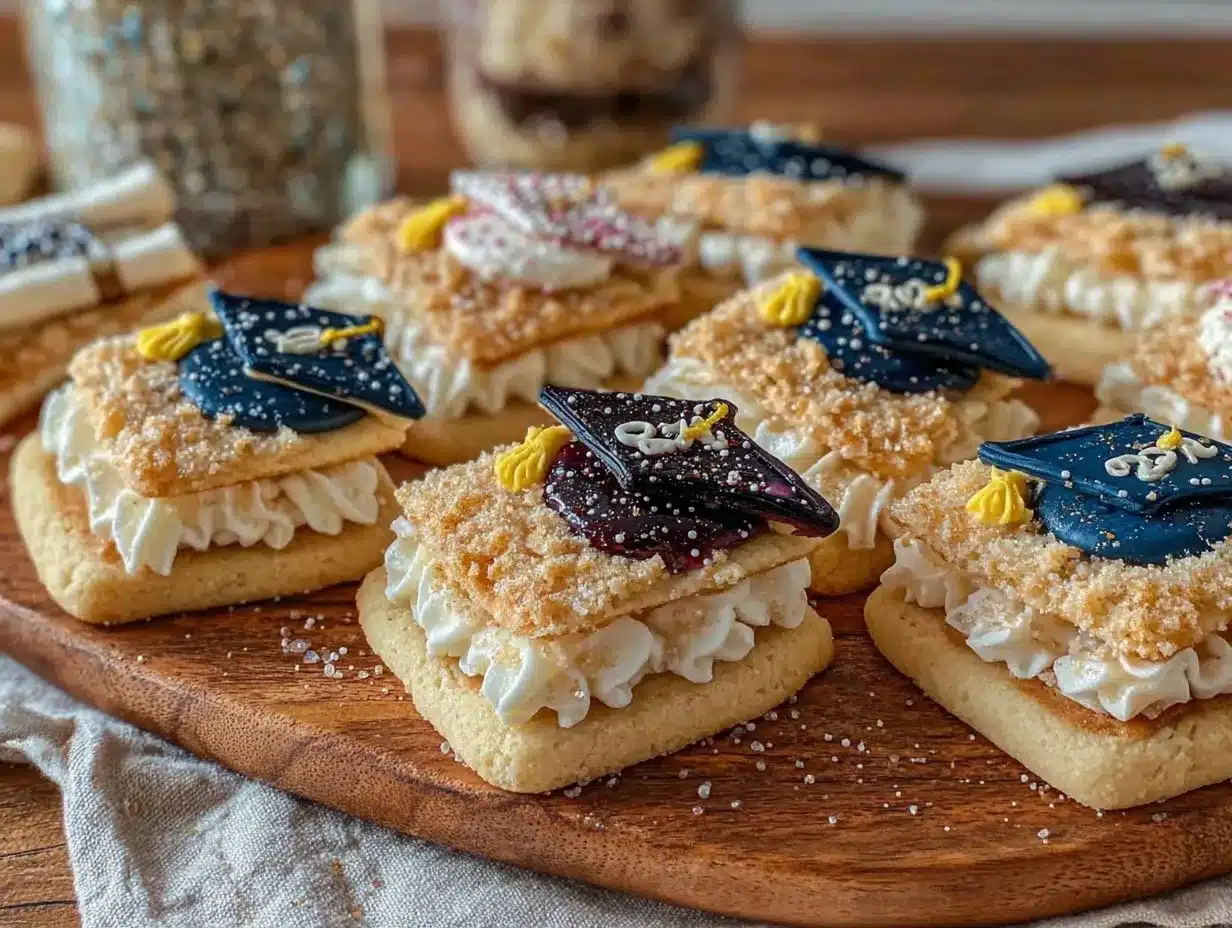
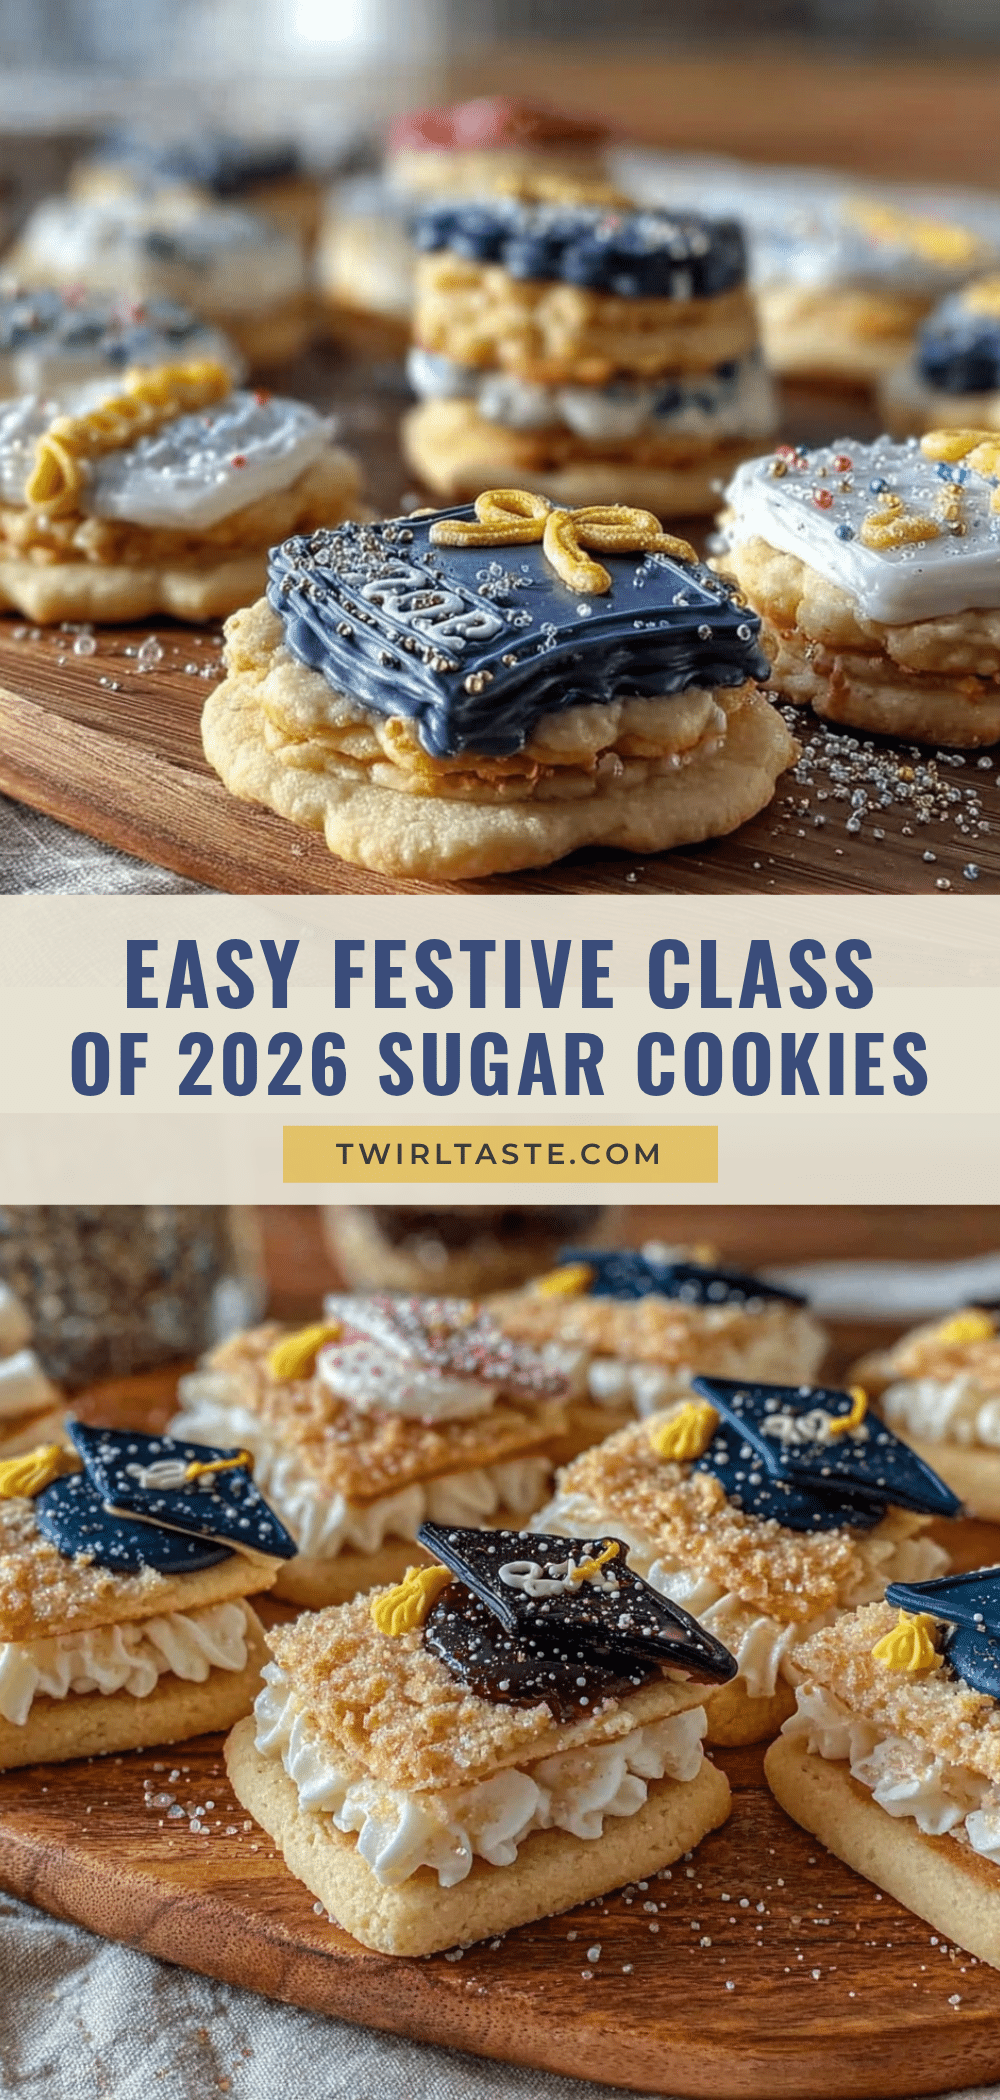
“I wasn’t even planning to bake that day,” I admitted to my friend as we stood in her kitchen surrounded by a chaotic mix of icing colors and cookie cutters. It was April 2026, and the local community center was hosting a last-minute graduation party for the Class of 2026. The organizer had called me just hours earlier, desperate for some festive treats. Honestly, I thought, how hard could sugar cookies be? Well, let me tell you, between the precise rolling, the temperamental royal icing, and my cat deciding that the flour bag was his new bed, those Perfect Class of 2026 Decorated Sugar Cookies for Graduation became more than just desserts—they turned into a labor of love.
You know that feeling when a simple idea spirals into a full-on project? That was me, mixing batches of dough and trying to perfect the gold accents on the tiny graduation caps. It was a mess, sure, but also the kind of sweet chaos that sticks with you. These cookies didn’t just celebrate the graduates; they celebrated resilience, patience, and a little bit of frosting-covered joy. Maybe you’ve been there—rushing to make something memorable, and somehow it ends up being your favorite creation yet.
So why do these sugar cookies still hold a special place in my baking repertoire? Because they combine the nostalgia of graduation day with the fun of decorating, the satisfaction of baking from scratch, and the smiles at the party that made every sticky finger worth it. If you’re looking for a treat that’s easy to make but packs a punch in looks and taste for your Class of 2026 celebrations, stick around. I’m sharing my tried-and-true recipe that’s been tested by time, friends, and yes, a very curious cat named Mr. Whiskers.
Why You’ll Love This Recipe
Having baked countless batches of sugar cookies over the years, these Perfect Class of 2026 Decorated Sugar Cookies for Graduation stand out for more reasons than just their festive theme. Let me tell you why this recipe is a game-changer for your graduation parties:
- Quick & Easy: The dough comes together in under 15 minutes, and baking takes just 8-10 minutes per batch—perfect for busy schedules or last-minute celebrations.
- Simple Ingredients: No need for fancy or hard-to-find items. Everything you need is probably already in your pantry or local grocery store.
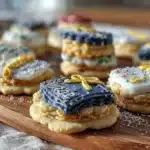
- Perfect for Graduation Parties: These cookies aren’t just tasty; their decorated flair makes them a centerpiece for any Class of 2026 event, school potluck, or family gathering.
- Crowd-Pleaser: Kids, parents, and even those who claim they don’t have a sweet tooth can’t resist these buttery, melt-in-your-mouth treats.
- Unbelievably Delicious: The balance between a crisp edge and soft center, plus that buttery vanilla flavor, keeps everyone reaching for more.
What sets this recipe apart? It’s the little details I learned through trial and error—like chilling the dough just right so it’s easy to cut, or mixing a bit of almond extract for a subtle depth that’s not overpowering. Also, the royal icing recipe I use dries with a smooth, glossy finish, ideal for layering your graduation-themed designs. Honestly, it’s the kind of recipe that makes you close your eyes after the first bite and smile because it tastes just like celebration.
What Ingredients You Will Need
These Perfect Class of 2026 Decorated Sugar Cookies for Graduation rely on straightforward, pantry-friendly ingredients that come together to create a classic flavor with a tender texture. Here’s what you’ll need:
- For the Cookie Dough:
- 2 ¾ cups (345g) all-purpose flour – Choose a trusted brand like King Arthur for best consistency
- 1 teaspoon baking powder
- ½ teaspoon salt
- 1 cup (227g) unsalted butter, softened – I prefer Plugrá for its creamy texture
- 1 ½ cups (300g) granulated sugar
- 1 large egg, room temperature
- 2 teaspoons pure vanilla extract
- ½ teaspoon almond extract (optional, adds a subtle nutty note)
- For the Royal Icing:
- 3 cups (360g) powdered sugar, sifted
- 2 tablespoons meringue powder
- 5-6 tablespoons warm water (adjust for consistency)
- Gel food coloring in graduation colors (navy, gold, white, or your school’s colors)
- Edible gold dust or shimmer (optional, for that special touch)
If you want to swap out for dietary needs, almond flour can replace some of the all-purpose flour for a gluten-free version, though the texture will be different. For dairy-free, use vegan butter sticks and egg replacer—I’ve tested this with good results, but the cookies might be a little less crisp. Remember, the goal is delicious and fun, not perfect!
Equipment Needed
- Mixing bowls – A medium and a large one work best for separating dry and wet ingredients
- Electric mixer – Handheld or stand mixer; I’ve found stand mixers make the process quicker but a hand mixer does just fine
- Rolling pin – A non-stick or lightly floured surface helps avoid sticking
- Graduation-themed cookie cutters – Caps, stars, or numbers (Class of 2026)
- Baking sheets lined with parchment paper or silicone mats – Essential for even baking and easy cleanup
- Cooling racks – For letting cookies cool completely before decorating
- Small piping bags or squeeze bottles – For precise royal icing application
- Food-safe brushes – Useful for applying edible gold dust or smoothing icing
If you don’t have silicone mats, parchment paper is a wallet-friendly alternative. I used to bake directly on greased pans (big mistake—cookies stuck badly!). Also, keep a damp cloth handy to wipe down your rolling pin if dough starts sticking. Trust me, that little trick saves a lot of frustration.
Preparation Method
- Mix Dry Ingredients: In a medium bowl, whisk together 2 ¾ cups (345g) all-purpose flour, 1 teaspoon baking powder, and ½ teaspoon salt. Set aside. (5 minutes)
- Cream Butter and Sugar: In a large bowl, beat 1 cup (227g) softened unsalted butter and 1 ½ cups (300g) granulated sugar on medium speed until light and fluffy—about 3-4 minutes. This step is key for that tender crumb. (7 minutes)
- Add Egg and Extracts: Beat in 1 large egg, 2 teaspoons vanilla extract, and optional ½ teaspoon almond extract until combined. The mixture might look a bit glossy here. (2 minutes)
- Combine Wet and Dry: Gradually add the flour mixture to the butter mixture, mixing on low speed until just incorporated. Don’t overmix — the dough should come together but stay soft. (3 minutes)
- Chill the Dough: Divide the dough into two disks, wrap tightly in plastic wrap, and chill for at least 1 hour or overnight. Chilling makes the dough easier to roll and helps maintain cookie shape during baking. (1 hour minimum)
- Preheat Oven and Prepare Sheets: When ready, preheat your oven to 350°F (175°C). Line baking sheets with parchment paper or silicone mats. (10 minutes)
- Roll and Cut: Lightly flour your work surface and rolling pin. Roll out one dough disk to about ¼-inch (6 mm) thickness. Cut out shapes using your graduation-themed cookie cutters. Transfer cookies carefully to baking sheets, spacing about 1 inch (2.5 cm) apart. (15 minutes)
- Bake: Bake the cookies for 8-10 minutes until edges are just beginning to turn golden. Be careful not to overbake; cookies continue to firm as they cool. (8-10 minutes)
- Cool Completely: Let the cookies cool on the baking sheets for 5 minutes, then transfer to wire racks to cool fully before decorating. Decorating warm cookies will cause icing to melt and run. (30 minutes)
- Prepare Royal Icing: Combine 3 cups (360g) sifted powdered sugar, 2 tablespoons meringue powder, and 5-6 tablespoons warm water in a bowl. Beat until stiff peaks form, adding water a tablespoon at a time until you reach piping consistency. Divide and tint as desired. (10 minutes)
- Decorate: Pipe borders and details using small round tips or squeeze bottles. Use brushes to add edible gold dust for that graduation sparkle. Let the icing dry completely (at least 4 hours or overnight) before stacking or packaging. (Varies)
A quick tip: If your dough feels too sticky when rolling, chill it a bit longer. Also, I’ve learned that a cracked bowl once caused a flour spill mid-roll, so keep your workspace tidy and have a broom nearby (you never know!). These small hiccups don’t ruin the fun—they make the final taste even sweeter.
Cooking Tips & Techniques
When it comes to baking and decorating sugar cookies for graduation, a few insider tips can make all the difference:
- Chill for Control: Dough that’s too warm will be sticky and hard to handle. Chilling not only makes rolling easier but also helps keep your cookie shapes sharp and defined.
- Don’t Overwork the Dough: Mix just until combined. Overmixing develops gluten, making cookies tough instead of tender.
- Roll Evenly: Aim for consistent thickness so cookies bake uniformly. I like using rolling pin guides or stacking toothpicks on each side of the dough to keep it level.
- Test Your Oven: Oven temperatures vary. Bake a test cookie first to avoid burning or undercooking the entire batch.
- Royal Icing Consistency: For outlining, use thicker icing; for flooding (filling in), thin it slightly with water. Practice on parchment before decorating cookies to get a feel for flow.
- Patience with Drying: Don’t rush the icing drying process—this ensures your designs stay intact and won’t smudge.
I once tried decorating immediately after baking, and the icing melted right off. Lesson learned the sticky way! Also, multitasking is key: bake one sheet while decorating another to keep the workflow moving without stress. And if your icing thickens too much while decorating, add a few drops of water to loosen it back up.
Variations & Adaptations
There’s plenty of room to personalize these Perfect Class of 2026 Decorated Sugar Cookies for Graduation to fit your style or dietary needs. Here are some ideas I’ve tried or recommend:
- Flavor Variations: Add lemon zest to the dough for a fresh twist, or swap vanilla for peppermint extract for a festive flair.
- Gluten-Free Version: Use a gluten-free all-purpose flour blend, but reduce baking powder slightly to avoid overly puffy cookies.
- Dairy-Free Option: Replace butter with a plant-based margarine and use flaxseed or commercial egg replacer instead of eggs.
- Decorating Styles: Skip royal icing and use colored sugar sprinkles for a simpler, crunchy finish. Or try edible markers for drawing personalized messages.
- Shape Alternatives: Besides caps and stars, try numbers (2, 0, 2, 6) or the school mascot for a fun twist.
Personally, I once made a batch with blueberry extract and it was surprisingly delightful, perfect for a school with navy colors. Adaptations can make the recipe uniquely yours, so don’t be shy to experiment!
Serving & Storage Suggestions
These sugar cookies are best served at room temperature, allowing their buttery texture and sweet icing to shine. Arrange them on a festive platter surrounded by other graduation party snacks for a celebratory spread.
Complement with beverages like sparkling lemonade, iced tea, or a rich hot chocolate for cooler days. They also pair beautifully with fresh fruit to balance the sweetness.
To store, place cookies in an airtight container at room temperature for up to 5 days. If you want to keep them longer, freeze undecorated cookies wrapped tightly in plastic wrap for up to 3 months. Decorated cookies freeze best after the icing has fully dried—wrap each cookie individually to prevent decoration damage.
Reheat frozen cookies by bringing them to room temperature before serving; microwaving may soften the icing undesirably. Flavors actually develop and mellow a bit if you let decorated cookies rest for a day or two, so if you can, make them ahead for the party.
Nutritional Information & Benefits
Each sugar cookie (about 3 inches in diameter) contains approximately 150-180 calories, with 7-9 grams of fat, 22 grams of carbohydrates, and 1-2 grams of protein. These are treats meant for celebration, so enjoy them in moderation!
Key ingredients like butter provide vitamin A and essential fats, while eggs contribute protein and nutrients like choline. Using real vanilla extract adds flavor without artificial additives.
For dietary considerations, it’s easy to customize this recipe to be gluten-free or dairy-free. Just note that the royal icing contains powdered sugar and meringue powder, which are generally allergen-friendly but check labels if sensitivities exist.
From a wellness perspective, sharing these cookies at graduation is about more than nutrition—it’s about community, joy, and marking milestones. Sometimes, that’s the best nourishment of all.
Conclusion
These Perfect Class of 2026 Decorated Sugar Cookies for Graduation are more than just a sweet treat—they’re a celebration of hard work, new beginnings, and shared moments. Whether you’re a seasoned baker or an enthusiastic beginner, this recipe offers a fun, approachable way to add a personal touch to your graduation festivities.
Feel free to tailor the decorations and flavors to your taste or school colors. I love these cookies because they bring smiles and spark conversations, reminding me of that hectic but joyful day in April 2026 when a rushed request turned into a favorite tradition.
If you try this recipe, I’d love to hear how you made it your own. Leave a comment below with your decorating tips or favorite flavor twists. And hey, don’t forget to share this with fellow graduation hosts who could use some sweet inspiration!
Here’s to celebrating the Class of 2026 with cookies that taste like success and memories baked right in.
FAQs
How far in advance can I bake these sugar cookies?
You can bake the cookies up to 3 days ahead and store them in an airtight container at room temperature. For longer storage, freeze undecorated cookies for up to 3 months.
Can I use store-bought royal icing instead of making my own?
Yes, store-bought royal icing works fine, but homemade icing tends to have a better texture and dries with a smoother finish, which is ideal for detailed decorating.
What if I don’t have graduation-themed cookie cutters?
No worries! Use star, circle, or square cookie cutters and decorate with piped graduation caps, diplomas, or the year “2026” to keep the theme.
How do I prevent royal icing from cracking once it dries?
Keep your icing at the right consistency—not too thick or thin—and allow it to dry slowly at room temperature away from drafts. Adding a small amount of corn syrup to the icing can also help keep it flexible.
Can I make these cookies vegan?
Yes, substitute vegan butter and use flaxseed meal or commercial egg replacer instead of eggs. The texture might be slightly different, but they’ll still be delicious and festive.
By the way, if you enjoy baking festive treats, you might appreciate the delicate flavors of my lemon poppyseed muffins or the cozy warmth of crispy garlic chicken for your next family meal.
Pin This Recipe!
Perfect Class of 2026 Decorated Sugar Cookies Easy Graduation Treats
These decorated sugar cookies combine the nostalgia of graduation day with fun decorating and a tender, buttery flavor. Perfect for celebrating the Class of 2026 with festive flair and delicious taste.
- Prep Time: 15 minutes
- Cook Time: 8-10 minutes
- Total Time: 1 hour 45 minutes to overnight (including chilling and drying time)
- Yield: About 24 cookies 1x
- Category: Dessert
- Cuisine: American
Ingredients
- 2 ¾ cups (345g) all-purpose flour
- 1 teaspoon baking powder
- ½ teaspoon salt
- 1 cup (227g) unsalted butter, softened
- 1 ½ cups (300g) granulated sugar
- 1 large egg, room temperature
- 2 teaspoons pure vanilla extract
- ½ teaspoon almond extract (optional)
- 3 cups (360g) powdered sugar, sifted
- 2 tablespoons meringue powder
- 5–6 tablespoons warm water (adjust for consistency)
- Gel food coloring in graduation colors (navy, gold, white, or your school’s colors)
- Edible gold dust or shimmer (optional)
Instructions
- Mix Dry Ingredients: In a medium bowl, whisk together 2 ¾ cups (345g) all-purpose flour, 1 teaspoon baking powder, and ½ teaspoon salt. Set aside. (5 minutes)
- Cream Butter and Sugar: In a large bowl, beat 1 cup (227g) softened unsalted butter and 1 ½ cups (300g) granulated sugar on medium speed until light and fluffy—about 3-4 minutes. (7 minutes)
- Add Egg and Extracts: Beat in 1 large egg, 2 teaspoons vanilla extract, and optional ½ teaspoon almond extract until combined. (2 minutes)
- Combine Wet and Dry: Gradually add the flour mixture to the butter mixture, mixing on low speed until just incorporated. Don’t overmix. (3 minutes)
- Chill the Dough: Divide the dough into two disks, wrap tightly in plastic wrap, and chill for at least 1 hour or overnight. (1 hour minimum)
- Preheat Oven and Prepare Sheets: Preheat oven to 350°F (175°C). Line baking sheets with parchment paper or silicone mats. (10 minutes)
- Roll and Cut: Lightly flour work surface and rolling pin. Roll out one dough disk to about ¼-inch (6 mm) thickness. Cut shapes using graduation-themed cookie cutters. Transfer cookies to baking sheets, spacing about 1 inch apart. (15 minutes)
- Bake: Bake cookies for 8-10 minutes until edges begin to turn golden. (8-10 minutes)
- Cool Completely: Let cookies cool on baking sheets for 5 minutes, then transfer to wire racks to cool fully before decorating. (30 minutes)
- Prepare Royal Icing: Combine 3 cups (360g) sifted powdered sugar, 2 tablespoons meringue powder, and 5-6 tablespoons warm water. Beat until stiff peaks form, adjusting water for piping consistency. Divide and tint as desired. (10 minutes)
- Decorate: Pipe borders and details using small round tips or squeeze bottles. Use brushes to add edible gold dust. Let icing dry completely (at least 4 hours or overnight) before stacking or packaging.
Notes
Chill dough for at least 1 hour to make rolling easier and maintain cookie shape. Avoid overmixing dough to keep cookies tender. Test oven temperature with a test cookie. Let royal icing dry completely before stacking or packaging. For sticky dough, chill longer. Use parchment paper if silicone mats are unavailable. Add a few drops of water to royal icing if it thickens during decorating.
Nutrition
- Serving Size: 1 cookie (about 3 in
- Calories: 150180
- Sugar: 1518
- Sodium: 80100
- Fat: 79
- Saturated Fat: 45
- Carbohydrates: 22
- Fiber: 1
- Protein: 12
Keywords: sugar cookies, decorated cookies, graduation treats, Class of 2026, royal icing, easy cookies, festive cookies, party treats