Love this? Save it for later!
Share the inspiration with your friends
“The power went out halfway through my Saturday baking session,” I remember telling my friend Claire as we sat surrounded by candlelight, flour dust everywhere. I had set out to make a simple batch of vanilla milk bread rolls, but when the lights flickered off, I found myself improvising with what I had on hand. With a few food coloring drops left from a forgotten craft project and a bit of curiosity, I began swirling the dough into a tie-dye pattern. Honestly, I wasn’t sure if it would work—or if anyone would even want to eat it. But when the oven timer finally dinged, what came out was these fluffy, colorful pull-apart rolls that looked like a mini celebration on a plate. Maybe you’ve been there, staring at a recipe halfway through and thinking, ‘Well, why not try something totally different?’
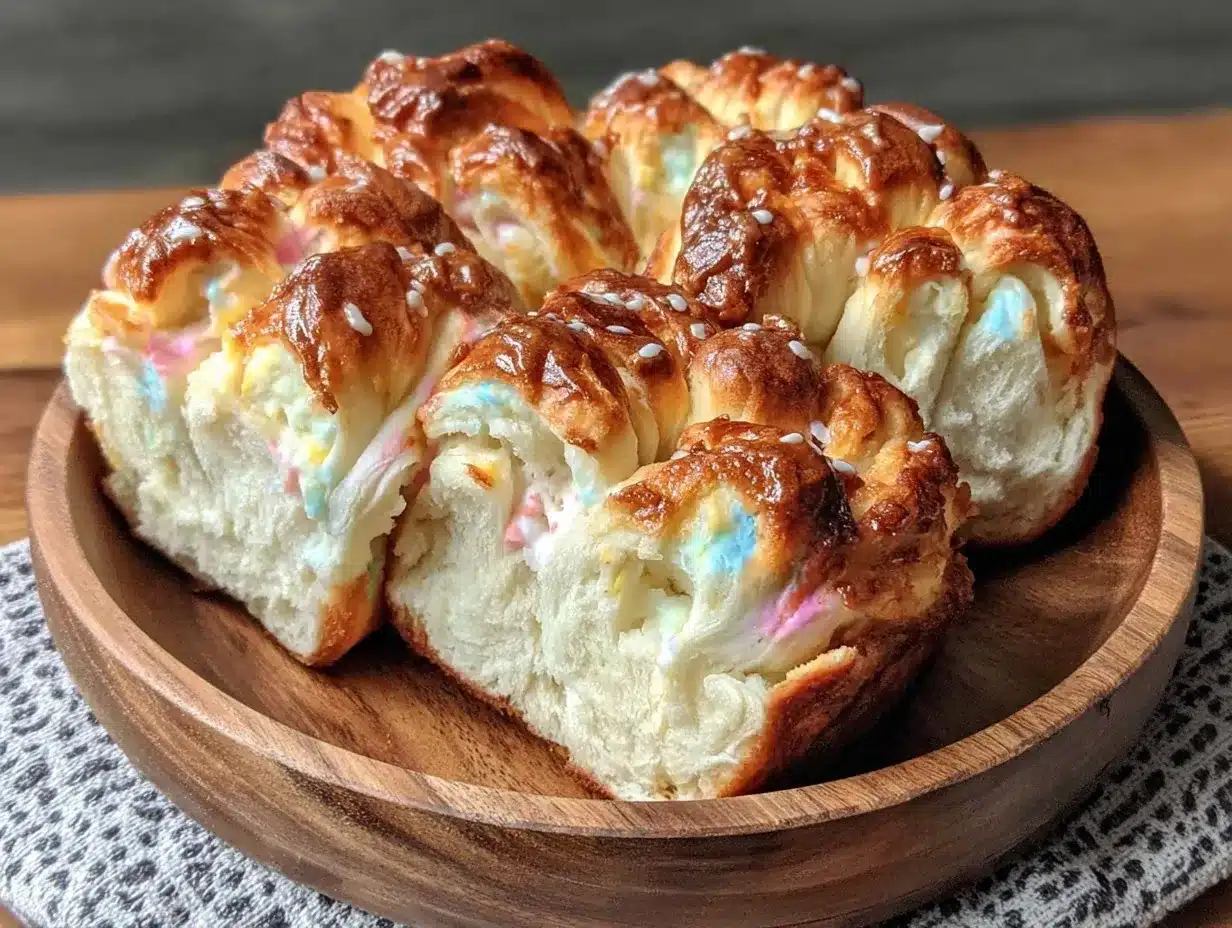
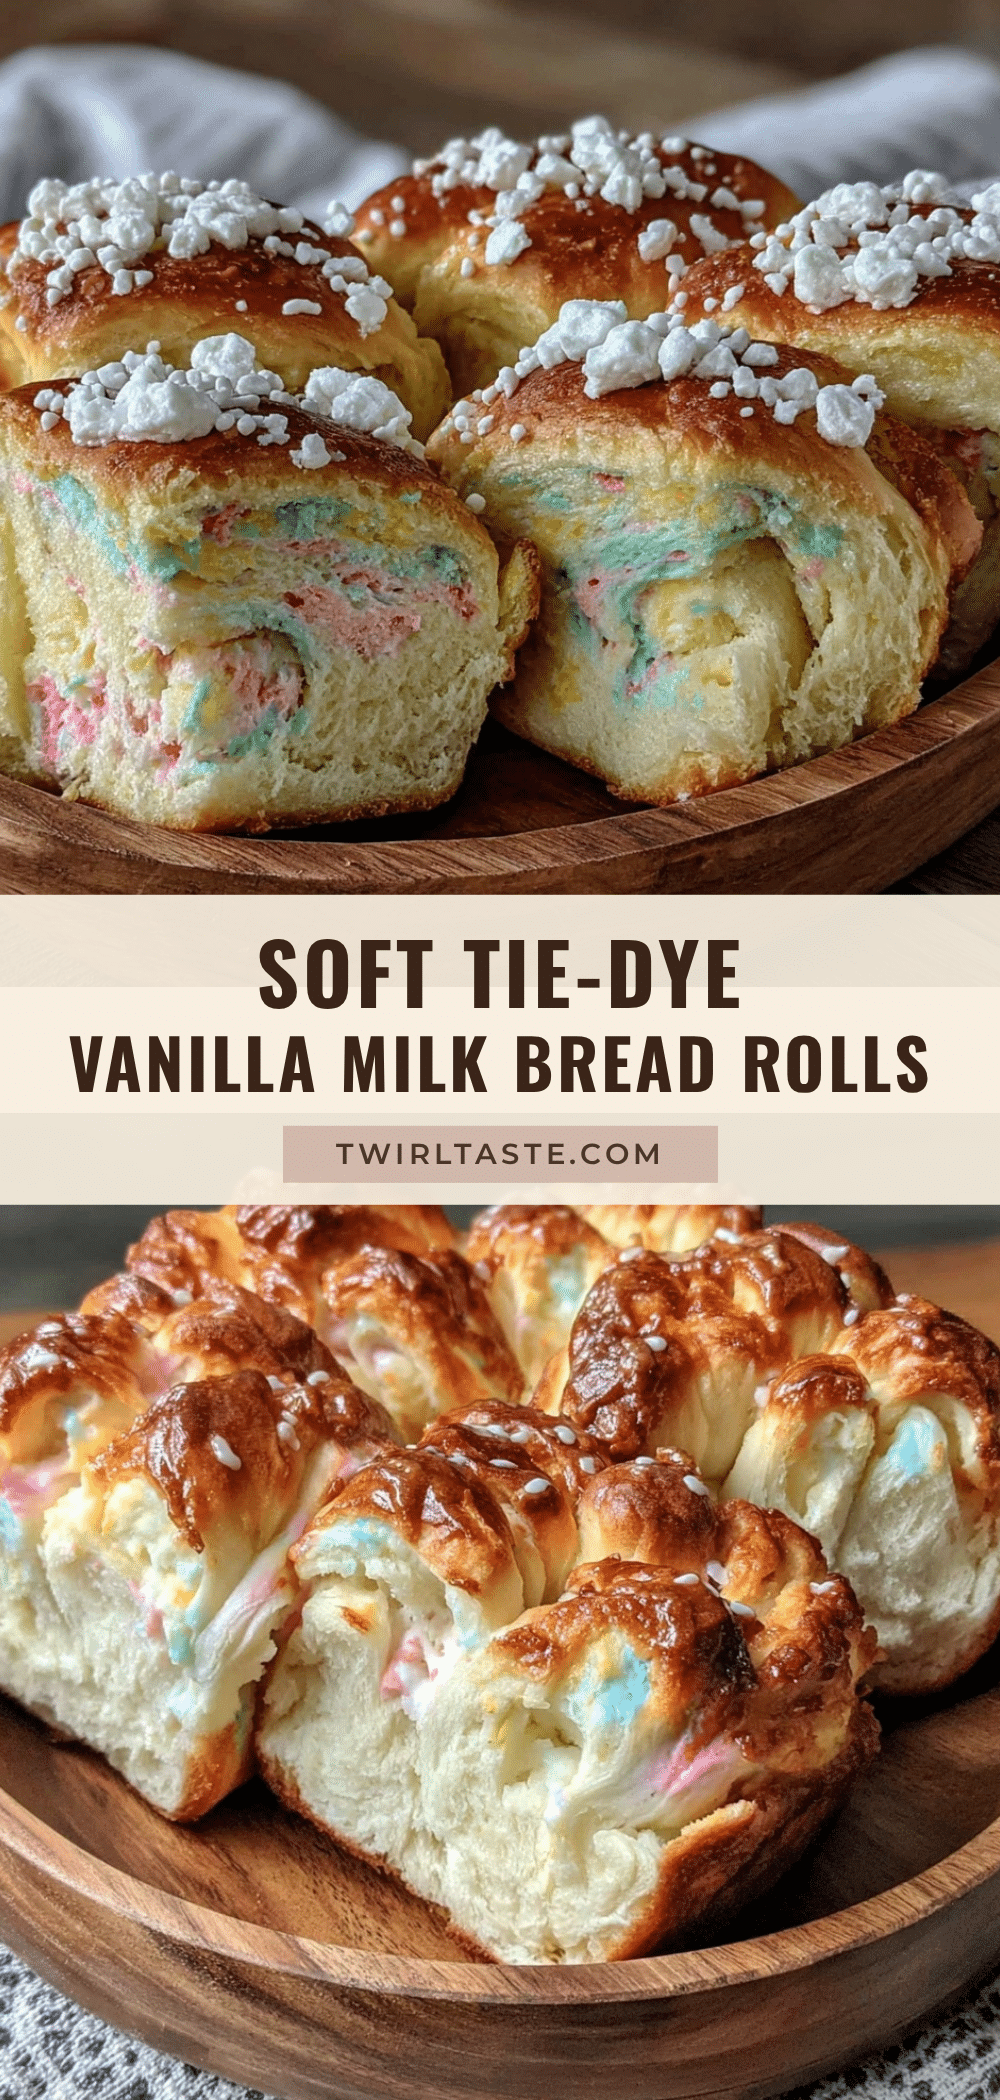
These Fluffy Tie-Dye Vanilla Milk Bread Pull-Apart Rolls became an instant favorite—not just because of their fun, vibrant look, but because that soft, sweet vanilla flavor paired with the light, pillow-like texture was pure magic. It’s funny how a kitchen mishap turned into one of my go-to recipes for brunch, cozy family dinners, or even when I just want to impress guests without breaking a sweat. Plus, their pull-apart nature makes sharing ridiculously easy—and trust me, you’ll want to share.
Let me tell you, the subtle vanilla aroma filling the kitchen while these rolls baked brought back some warm memories of old bakeries I used to visit on lazy weekend mornings. The cracked ceramic bowl I accidentally knocked over during the swirling process added a little chaos to the moment, but hey, that’s part of the charm, right? If you’re ready to bake something eye-catching and delicious that’s a little bit unexpected, this recipe is definitely for you.
Why You’ll Love This Recipe
After testing countless variations of milk bread, I can say these Fluffy Tie-Dye Vanilla Milk Bread Pull-Apart Rolls truly stand out. Here’s why I keep coming back to this one:
- Quick & Easy: The dough comes together in about 15 minutes, and with a bit of rising time, you’ll have fresh bread in under 3 hours—great for weekend baking or a special treat.
- Simple Ingredients: You probably already have everything in your pantry—flour, milk, sugar, yeast, and vanilla extract. No need for fancy or hard-to-find items.
- Perfect for Parties & Family Meals: These rolls are a hit at brunches, potlucks, or cozy dinners, and their pull-apart style makes serving a breeze.
- Crowd-Pleaser: Kids love the colorful swirls, adults appreciate the soft texture and balanced vanilla flavor. Everyone wants seconds!
- Unbelievably Delicious: The recipe’s special touch—using a rich vanilla milk base—gives the bread a tender crumb and subtle sweetness that feels comforting but fresh.
This isn’t just another milk bread recipe. The tie-dye technique is a playful twist that brings joy to the baking process and the table. You’ll see how the colors gently blend without overpowering the taste. I’ve made this for friends who usually shy away from homemade bread, and they ended up asking for the recipe. That’s the kind of magic this recipe carries.
What Ingredients You Will Need
This recipe uses simple, wholesome ingredients to deliver bold flavor and that soft, fluffy texture without the fuss. Most are pantry staples, and the food coloring adds that fun twist.
- All-Purpose Flour – 3 ½ cups (440g), for a tender yet sturdy dough. I prefer King Arthur for consistent results.
- Instant Yeast – 2 ¼ tsp (one packet), the magic that makes the dough rise beautifully.
- Granulated Sugar – ⅓ cup (65g), adds subtle sweetness, balancing the vanilla.
- Salt – 1 tsp (5g), enhances the flavor without overpowering.
- Whole Milk – 1 cup (240ml), warmed to about 110°F (43°C), creates a soft crumb and rich taste. You can swap with almond or oat milk for dairy-free.
- Unsalted Butter – 4 tbsp (56g), softened, adds moisture and tenderness.
- Vanilla Extract – 2 tsp, for that signature warm vanilla note.
- Food Coloring – Assorted gel or liquid, just a few drops per color. Gel colors work best to avoid altering dough consistency.
- Egg – 1 large, room temperature, used in the dough and for egg wash to give a shiny finish.
Optional: If you want a dairy-free version, swap butter for coconut oil and milk for any plant-based alternative. For a more natural color, you can experiment with beet juice or matcha powder instead of commercial food colors.
Equipment Needed
- Mixing Bowls: Large enough for kneading dough and dividing for coloring.
- Stand Mixer with Dough Hook: Helpful for kneading, but you can knead by hand if you prefer.
- Measuring Cups and Spoons: For precise ingredient amounts.
- Bench Scraper or Knife: To divide and shape the dough neatly.
- 8×8-inch (20×20 cm) Square Baking Pan: Perfect for the pull-apart shape.
- Plastic Wrap or Clean Kitchen Towel: For covering dough during rising.
- Pastry Brush: To apply egg wash for a gorgeous glossy finish.
If you don’t have a stand mixer, no worries—kneading by hand works fine; just expect to spend a few more minutes working the dough until smooth. I once used a wooden spoon and my hands when my mixer was out of commission, and it turned out just as fluffy. For budget-friendly baking, an old-school glass or metal pan works great too.
Preparation Method
- Activate the Yeast: In a small bowl, combine the warm milk (110°F/43°C) with sugar and instant yeast. Stir gently and let it sit for about 5 minutes until foamy. If it doesn’t foam, your yeast might be old—start over with fresh yeast.
- Mix Dry Ingredients: In a large bowl or stand mixer, whisk together the flour and salt.
- Combine Wet Ingredients: Add the yeast mixture, softened butter, vanilla extract, and the egg to the dry ingredients. Mix with the dough hook or wooden spoon until the dough starts to form.
- Knead the Dough: Knead for 8-10 minutes until smooth and elastic. The dough should be slightly tacky but not sticky. If it’s too sticky, add flour a tablespoon at a time. If too dry, add a splash of milk.
- First Rise: Shape the dough into a ball and place it in a lightly greased bowl. Cover with plastic wrap or a damp towel. Let rise in a warm spot for 1 to 1.5 hours, or until doubled in size.
- Divide and Color the Dough: Punch down the risen dough and transfer to a floured surface. Divide into 4 equal portions (about 260g each). Add a few drops of different food coloring to each portion and knead gently until the color is blended but still marbled—don’t overmix or the colors will blend completely.
- Shape the Rolls: Roll each colored dough portion into a rectangle about 8×6 inches (20×15 cm). Stack the rectangles on top of each other in any color order you like. Cut the stacked dough into 8 strips, then stack those strips and cut into 8 smaller squares.
- Arrange in Pan: Place each square piece upright in the greased 8×8-inch pan, slightly overlapping to create the pull-apart effect.
- Second Rise: Cover the pan loosely and let the dough rise again for 45 minutes to 1 hour, until puffy and nearly doubled.
- Preheat Oven: Heat your oven to 350°F (175°C).
- Apply Egg Wash: Beat an egg with a splash of water and brush gently over the dough surface for a shiny crust.
- Bake: Bake for 25-30 minutes or until golden brown and the rolls sound hollow when tapped. If the top browns too fast, tent with foil halfway through.
- Cool and Serve: Let cool in the pan for 10 minutes, then transfer to a wire rack. Enjoy warm or at room temperature.
If your dough feels tough during shaping, let it rest a few minutes to relax the gluten. Also, if your home is cool, rising might take longer—just be patient. The result is worth it!
Cooking Tips & Techniques
One trick I learned after a few tries is to use gel food coloring instead of liquid. It keeps the dough consistency perfect and creates those distinct, vibrant swirls without sogginess. When kneading, don’t rush—developing the gluten slowly gives you that soft, fluffy texture you want in milk bread.
Common mistakes? Overmixing the colored dough can cause the colors to blend into a muddy shade, so knead just enough to swirl the colors. Also, don’t skip the egg wash—it makes the rolls shine and look bakery-worthy. I once forgot it and the rolls looked a bit dull, which was a shame because the flavor was spot on.
Timing is key. Try to start your second rise when you can watch it, so you don’t overproof. If the dough rises too much, the rolls can collapse and lose their pull-apart structure. When multitasking in the kitchen, set a timer to help keep track.
Lastly, for a softer crust, cover the rolls with a towel right after baking. For a slightly crispier finish, let them cool uncovered.
Variations & Adaptations
- Flavor Variations: Add matcha powder to one dough portion for a green swirl, or cocoa powder for a chocolate twist. Both blend beautifully with the vanilla base.
- Dietary Adaptations: Swap all-purpose flour with a gluten-free blend designed for yeast breads to make them gluten-free. Use coconut milk and vegan butter for a dairy-free option.
- Cooking Method: If you don’t have an oven, try steaming the rolls for a soft, fluffy texture similar to Asian milk buns. Steam for about 20 minutes instead of baking.
- Sweet or Savory: For a savory spin, omit the sugar and vanilla, add herbs like rosemary or thyme to the dough, and swirl in some grated cheese.
- Personal Variation: I once added a swirl of homemade strawberry jam between the dough layers before stacking—turned out like a surprise fruity ribbon inside each roll. Totally worth trying!
Serving & Storage Suggestions
These Fluffy Tie-Dye Vanilla Milk Bread Pull-Apart Rolls are best served warm. The aroma and softness are irresistible fresh from the oven. I love pairing them with a smear of butter or a drizzle of honey for breakfast. They also make a fun side for soups or stews, adding a sweet contrast.
Store leftovers in an airtight container at room temperature for up to 2 days. For longer storage, wrap tightly and freeze for up to 3 months. To reheat, thaw at room temperature and warm in a 300°F (150°C) oven for 5-7 minutes to restore softness.
Flavors tend to mellow and blend after a day, so leftovers can be even better the next day. Just like with my crispy garlic chicken, sometimes a little patience makes all the difference in taste.
Nutritional Information & Benefits
Each roll (about 60g) contains approximately:
| Calories | 150 |
|---|---|
| Carbohydrates | 28g |
| Protein | 4g |
| Fat | 3.5g |
| Sugar | 5g |
Milk provides calcium and protein, while the vanilla extract offers antioxidants. This recipe is vegetarian-friendly and can be adapted for gluten-free or dairy-free diets with simple swaps. While it’s a treat, the wholesome ingredients make it a comforting choice that’s not overly processed.
Personally, I appreciate how this recipe satisfies my sweet tooth without feeling heavy—perfect for mindful indulgence.
Conclusion
These Fluffy Tie-Dye Vanilla Milk Bread Pull-Apart Rolls are more than just bread—they’re a little celebration baked right into your kitchen. Whether you’re making them for a family brunch, a casual get-together, or just to treat yourself, their fun look and soft vanilla flavor never fail to impress. Feel free to play with the colors or flavors to make this recipe truly your own.
I keep coming back to this recipe because it’s easy, forgiving, and always brings smiles. So go ahead, give it a try—then come back and tell me how your kitchen adventure turned out. I’d love to hear your color combos or any twists you try!
Happy baking, and remember, sometimes a little mess and experimentation in the kitchen lead to the best memories.
FAQs
Can I use regular active dry yeast instead of instant yeast?
Yes, you can. Just proof it in warm milk with sugar for about 10 minutes until foamy before adding to the dough.
What if I don’t have food coloring on hand?
You can skip the colors and make classic vanilla milk bread rolls—they’ll still be fluffy and delicious.
How do I store the rolls to keep them soft?
Store them in an airtight container at room temperature. For longer storage, freeze and reheat gently in the oven.
Can I make these rolls without a stand mixer?
Absolutely! Knead by hand on a floured surface for about 10-12 minutes until smooth and elastic.
Is it possible to make the dough ahead of time?
Yes, you can refrigerate the dough after the first rise for up to 24 hours. Let it come to room temperature before shaping and continuing with the recipe.
Pin This Recipe!
Fluffy Tie-Dye Vanilla Milk Bread Pull-Apart Rolls

These fluffy, colorful pull-apart rolls feature a soft vanilla flavor and a light, pillow-like texture, perfect for brunch, family dinners, or impressing guests with minimal effort.
- Prep Time: 15 minutes
- Cook Time: 25-30 minutes
- Total Time: 2 hours 45 minutes to 3 hours
- Yield: 16 rolls 1x
- Category: Bread
- Cuisine: American
Ingredients
- 3 ½ cups (440g) all-purpose flour
- 2 ¼ tsp instant yeast (one packet)
- ⅓ cup (65g) granulated sugar
- 1 tsp (5g) salt
- 1 cup (240ml) whole milk, warmed to about 110°F (43°C)
- 4 tbsp (56g) unsalted butter, softened
- 2 tsp vanilla extract
- Assorted gel or liquid food coloring, a few drops per color
- 1 large egg, room temperature
Instructions
- Activate the yeast by combining warm milk (110°F/43°C), sugar, and instant yeast in a small bowl. Stir gently and let sit for about 5 minutes until foamy.
- In a large bowl or stand mixer, whisk together the flour and salt.
- Add the yeast mixture, softened butter, vanilla extract, and egg to the dry ingredients. Mix with a dough hook or wooden spoon until dough starts to form.
- Knead the dough for 8-10 minutes until smooth and elastic. Adjust with flour or milk if too sticky or dry.
- Shape dough into a ball and place in a lightly greased bowl. Cover and let rise in a warm spot for 1 to 1.5 hours until doubled in size.
- Punch down the dough and transfer to a floured surface. Divide into 4 equal portions (~260g each). Add different food coloring drops to each and knead gently to swirl colors without fully blending.
- Roll each colored portion into an 8×6 inch rectangle. Stack rectangles in any color order. Cut stacked dough into 8 strips, stack strips, then cut into 8 smaller squares.
- Place each square upright in a greased 8×8-inch baking pan, slightly overlapping to create pull-apart effect.
- Cover pan loosely and let dough rise again for 45 minutes to 1 hour until puffy and nearly doubled.
- Preheat oven to 350°F (175°C).
- Beat egg with a splash of water and brush over dough surface for shiny crust.
- Bake for 25-30 minutes until golden brown and hollow sounding when tapped. Tent with foil if browning too fast.
- Cool in pan for 10 minutes, then transfer to wire rack. Serve warm or at room temperature.
Notes
Use gel food coloring to maintain dough consistency and vibrant swirls. Knead colored dough gently to avoid blending colors too much. Egg wash gives a shiny, bakery-quality crust. If dough feels tough during shaping, let it rest to relax gluten. Rising times may vary depending on room temperature. For softer crust, cover rolls with a towel after baking; for crispier crust, cool uncovered.
Nutrition
- Serving Size: 1 roll (about 60g)
- Calories: 150
- Sugar: 5
- Fat: 3.5
- Carbohydrates: 28
- Protein: 4
Keywords: vanilla milk bread, pull-apart rolls, tie-dye bread, fluffy bread, homemade bread, colorful rolls, easy bread recipe, brunch bread