Love this? Save it for later!
Share the inspiration with your friends
The faint scent of cocoa and vanilla drifted through the air last Sunday afternoon when I walked past the bakery aisle at my local grocery store — and suddenly I was eight years old again, sitting cross-legged on the scratched linoleum floor of Mrs. Callahan’s kitchen. Her tiny apartment smelled like a warm hug wrapped in cream cheese frosting and red velvet cake crumbs. I remember the cracked mixing bowl, the flour dusting the windowsill, and how she’d hum softly while carefully layering the cake into a perfect little flag pattern. It wasn’t just any cake; it was her way of celebrating the 4th of July with a twist that felt both special and comforting.
Honestly, I haven’t had a red velvet cake quite like that since. So I set out to recreate that exact feeling — not just the flavor but the rhythm of the process, the textures, and that unmistakable tang of cream cheese frosting spread just right. Maybe you’ve been there, chasing a recipe that’s as much about memory as it is about taste. The Perfect Red Velvet Flag Cake with Cream Cheese Frosting isn’t just a dessert; it’s an attempt to hold onto a moment, a kitchen, and a person who made that cake a quiet masterpiece. Let me tell you, it’s worth every crumb and little mess along the way.
Why You’ll Love This Recipe
This Perfect Red Velvet Flag Cake recipe is more than just a pretty dessert — it’s a tried-and-true way to bring something special to your table without the fuss. After countless kitchen experiments and feedback from friends and family, I can confidently say this version stands out for all the right reasons.
- Quick & Easy: Comes together in under 90 minutes, making it perfect for last-minute celebrations or cozy weekend treats.
- Simple Ingredients: No need for specialty stores — you probably have everything in your pantry or fridge already.
- Perfect for Holidays & Parties: The flag design makes it a showstopper for Independence Day, Memorial Day, or just a fun twist for birthday parties.
- Crowd-Pleaser: Kids and adults alike rave about the moist texture and the creamy frosting balance.
- Unbelievably Delicious: The subtle cocoa flavor paired with tangy cream cheese frosting creates a comforting but sophisticated taste.
What makes this cake different? Well, I swap in buttermilk and a touch of espresso powder for deeper flavor without bitterness, and the frosting is whipped just enough to be fluffy but still rich. Plus, the careful layering technique for the flag pattern isn’t just for show — it keeps each bite balanced and visually exciting. It’s the kind of cake that makes you close your eyes for a moment with the first forkful. Honestly, it’s comfort food that looks like a masterpiece without the stress.
What Ingredients You Will Need
This recipe uses straightforward, wholesome ingredients to create bold flavors and that signature velvety texture you expect from a red velvet cake. Most are pantry staples, with a few essentials that bring the cake to life.
- For the Cake Batter:
- All-purpose flour – 2 ½ cups (315g), sifted for smooth texture
- Granulated sugar – 1 ½ cups (300g)
- Unsweetened cocoa powder – 2 tablespoons (15g) (use a good-quality Dutch-processed cocoa for richest color)
- Baking soda – 1 teaspoon
- Salt – ½ teaspoon
- Buttermilk – 1 cup (240ml), at room temperature (adds moisture and tang)
- Vegetable oil – 1 cup (240ml)
- Large eggs – 2, room temperature
- Red food coloring – 2 tablespoons (I prefer gel for vivid color without thinning batter)
- Vanilla extract – 1 teaspoon
- White vinegar – 1 teaspoon
- Espresso powder – 1 teaspoon (optional, enhances cocoa flavor)
- For the Cream Cheese Frosting:
- Cream cheese – 16 ounces (450g), softened (I like Philadelphia brand for smoothness)
- Unsalted butter – ½ cup (115g), softened
- Powdered sugar – 4 cups (480g), sifted for lump-free frosting
- Vanilla extract – 1 teaspoon
- Pinch of salt (balances sweetness)
Feel free to swap buttermilk with a dairy-free milk plus 1 tablespoon lemon juice if needed. For a gluten-free option, almond flour works okay but expect a denser crumb. I’ve also tried coconut cream cheese for a dairy-free frosting alternative with decent results.
Equipment Needed
- Two 9-inch (23 cm) round cake pans – nonstick or well-greased
- Mixing bowls – medium and large
- Electric mixer or stand mixer with paddle attachment (makes frosting silky and batter smooth)
- Measuring cups and spoons – for accuracy
- Rubber spatula – for scraping bowls clean
- Wire cooling racks – essential to cool cakes evenly
- Offset spatula or butter knife – for spreading frosting neatly
- Parchment paper – optional, for lining pans to prevent sticking
If you don’t have a stand mixer, a hand mixer works fine but takes a bit longer to whip the frosting. I once tried frosting by hand and let’s just say it was a workout! For a budget-friendly option, simple glass bowls and wooden spoons do the job too, just with more elbow grease.
Preparation Method
- Preheat your oven to 350°F (175°C). Grease and flour your two 9-inch cake pans or line them with parchment paper. This helps the cakes release easily after baking. (5 minutes)
- Mix dry ingredients. In a large bowl, sift together the flour, cocoa powder, baking soda, and salt. Set aside. This ensures even distribution of leavening agents and prevents clumps. (5 minutes)
- Combine wet ingredients. In another bowl, whisk the sugar and vegetable oil until combined. Add the eggs one at a time, beating well after each addition. Stir in the buttermilk, red food coloring, vanilla extract, vinegar, and espresso powder. You’ll notice the batter turns a vibrant red — that’s the good stuff! (7 minutes)
- Mix wet and dry together. Slowly add the dry ingredients to the wet, mixing on low speed until just combined. Don’t overmix or the cake might be tough. The batter should be smooth and thick but pourable. (3 minutes)
- Divide batter evenly. Pour the batter evenly into the two prepared pans. I usually use a kitchen scale to be precise — it helps with even layers for the flag design later. (2 minutes)
- Bake the cakes. Place pans in the oven and bake for 25-30 minutes. Test doneness by inserting a toothpick—it should come out clean or with just a few moist crumbs. Resist opening the oven too often to keep the cakes moist. (25-30 minutes)
- Cool completely. Let the cakes cool in pans for 10 minutes, then turn out onto wire racks to cool fully before frosting. This step is critical; frosting warm cakes will melt and slide off. (At least 1 hour)
- Prepare the cream cheese frosting. Beat the softened cream cheese and butter together until creamy and smooth. Gradually add powdered sugar, beating on low speed to avoid a sugar cloud, then increase speed for fluffiness. Stir in vanilla and salt. Stop when light and spreadable. (10 minutes)
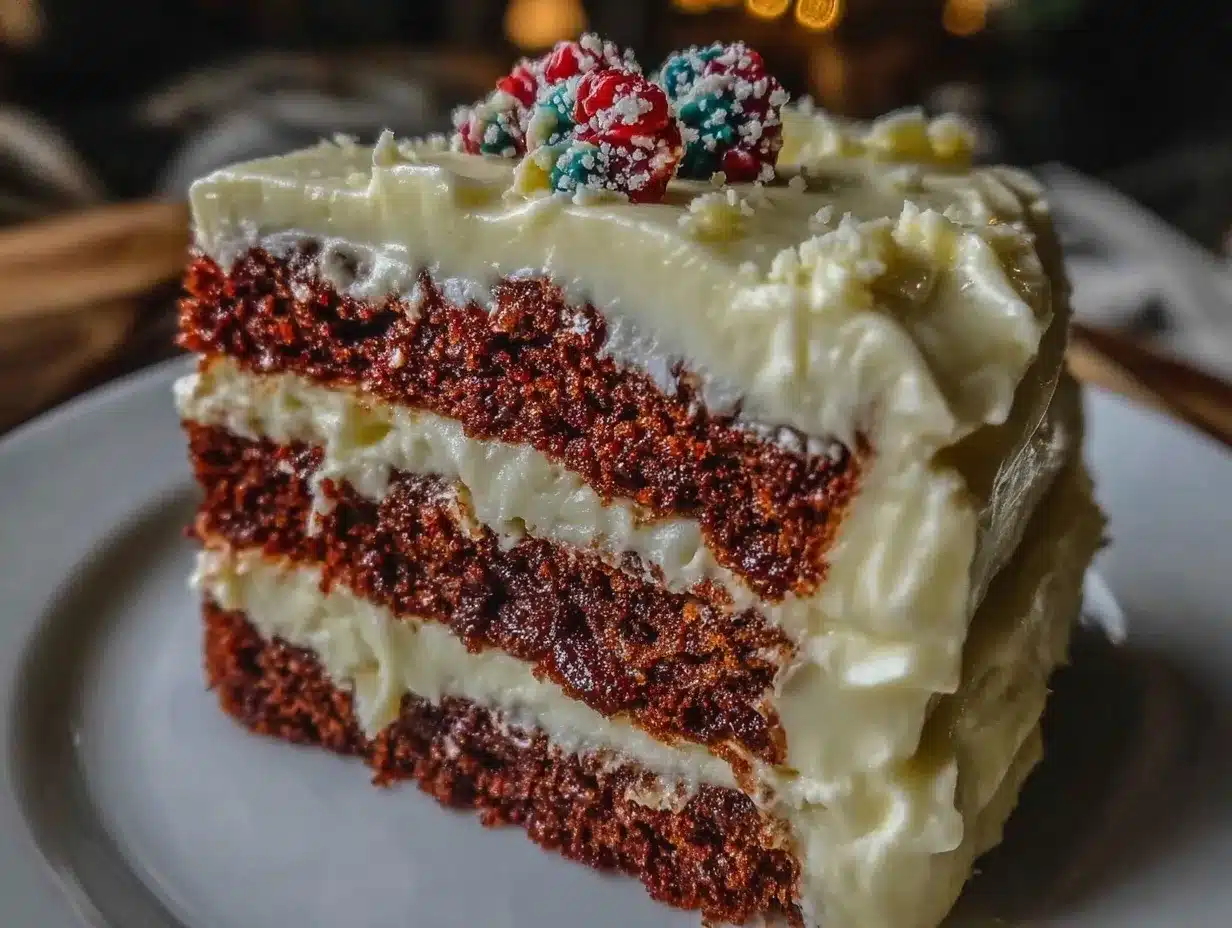
- Assemble the flag cake. Trim the cake layers if needed to level them. Cut one cake layer into three equal rectangles for the “stripes.” Use the other layer and part of the frosting to create the “blue field” by tinting a portion of frosting with blue food coloring. Layer and frost carefully to create the flag pattern. Don’t rush here — take your time for neat edges. (20-30 minutes)
- Chill before serving. Refrigerate the assembled cake for at least 30 minutes to set the frosting. This makes slicing cleaner and flavors meld better. (30 minutes)
Quick tip: If you notice the frosting is too soft while spreading, pop it in the fridge for 10 minutes. Also, I once forgot the espresso powder and thought the cake was missing depth — little details make a big difference!
Cooking Tips & Techniques
Getting the Perfect Red Velvet Flag Cake just right takes a few insider tricks, trust me. Here’s what I’ve learned after a few kitchen mishaps and happy accidents.
- Don’t skip the buttermilk and vinegar. These ingredients react with baking soda to give that tender crumb and slight tang that’s essential in red velvet. I’ve tried swapping them out, and the cake ends up flat or dry.
- Use gel food coloring. Liquid food coloring can thin your batter, so gel is my go-to for that bold red without messing with texture.
- Room temperature ingredients. Eggs and buttermilk at room temp mix more evenly, resulting in a consistent batter. Cold ingredients can cause lumps or uneven baking.
- Whip frosting slowly. Adding powdered sugar too fast creates a powder cloud and can make frosting grainy. Patience here makes it silky smooth.
- Layering the flag. Use a ruler or straight edge when cutting cake strips for crisp lines. I find chilling the cake layers for 15 minutes before cutting reduces crumbs.
- Timing matters. Bake cakes one after the other if your oven space is limited to avoid uneven heat distribution.
I once tried to frost the cake straight out of the oven — rookie mistake! The frosting melted, and the colors ran. Let the cakes cool fully and chill the frosting if your kitchen is warm.
Variations & Adaptations
While the classic Perfect Red Velvet Flag Cake is a star, you can easily tweak it to suit different tastes and occasions.
- Dietary Variation: Use gluten-free flour blend for a gluten-free version. I recommend Bob’s Red Mill 1-to-1 blend for best texture.
- Seasonal Twist: Swap the cream cheese frosting for a whipped coconut cream frosting in summer for a lighter feel.
- Flavor Adaptation: Add a teaspoon of orange zest to the batter for a subtle citrus note that pairs beautifully with the cream cheese.
- Cooking Method: Try baking cupcakes instead of layers for individual servings. Adjust bake time to 18-20 minutes.
- Allergen Substitutions: Use dairy-free cream cheese and butter alternatives to make the frosting vegan-friendly.
Personally, I once made a mini version using this recipe for a friend’s baby shower, switching the red food coloring with natural beet powder. It was a hit and looked stunning! Feel free to get creative, but keep the core technique for the best results.
Serving & Storage Suggestions
Serve this red velvet flag cake slightly chilled or at room temperature — both bring out the cream cheese frosting’s tang and the cake’s moist crumb. The colors look vivid when chilled, making it perfect for a festive centerpiece.
Pair it with a cup of strong coffee or a glass of cold milk to balance the sweetness. I’ve also seen it served alongside fresh berries to add a fresh contrast.
Store leftover cake in an airtight container in the refrigerator for up to 4 days. The frosting firms up nicely, and the flavors deepen. For longer storage, wrap tightly and freeze for up to 2 months. Thaw overnight in the fridge before serving.
When reheating slices, let them come to room temperature for the best texture. Avoid microwaving directly as frosting can soften excessively and become runny.
Nutritional Information & Benefits
Each slice of this cake (assuming 12 slices) contains approximately:
| Calories | 350-400 kcal |
|---|---|
| Fat | 18g (mostly from butter and cream cheese) |
| Carbohydrates | 45g |
| Protein | 5g |
| Sugar | 30g |
The cream cheese provides calcium and a bit of protein, while the cocoa powder contributes antioxidants. Using buttermilk adds a nice tang and tender crumb without excess fat. This cake is more treat than health food, but making it at home means you control the ingredients — no preservatives or artificial flavors.
Note: Contains dairy, gluten, and eggs. For allergen-friendly options, see the Variations section.
Conclusion
This Perfect Red Velvet Flag Cake with Cream Cheese Frosting is more than just a dessert recipe — it’s a little slice of history and comfort, wrapped up in a festive package. Whether you’re celebrating a holiday, a birthday, or just craving something special, this cake delivers on flavor, texture, and visual wow without stress.
Feel free to adapt it to suit your tastes or dietary needs, but know that the core of this recipe is tried and true — a balance of rich cocoa, tangy cream cheese, and tender crumb that keeps me coming back, again and again.
If you try it, I’d love to hear how it turns out or any twists you’ve made. Leave a comment below or share your version on social media — let’s keep this recipe’s story alive, one perfect slice at a time.
FAQs About Perfect Red Velvet Flag Cake
- Can I make this cake ahead of time?
Yes, bake the layers a day ahead and keep them wrapped tightly in plastic wrap. Assemble and frost the next day for best results. - What if I don’t have buttermilk?
You can make a quick substitute by adding 1 tablespoon of lemon juice or white vinegar to 1 cup of milk and letting it sit for 5 minutes. - How do I get the frosting to be less sweet?
Reduce the powdered sugar by ½ cup and add a pinch more salt to balance the sweetness. - Can I use natural food coloring?
Yes, beet powder or pomegranate juice can be used, but color intensity may vary and affect the final shade. - What’s the best way to cut clean slices?
Chill the cake in the fridge for at least 30 minutes before slicing. Use a sharp knife wiped clean between cuts.
Pin This Recipe!
Perfect Red Velvet Flag Cake Recipe Easy Homemade Cream Cheese Frosting
A moist and flavorful red velvet cake with a tangy cream cheese frosting, designed with a festive flag pattern perfect for holidays and celebrations.
- Prep Time: 25 minutes
- Cook Time: 25-30 minutes
- Total Time: 1 hour 30 minutes
- Yield: 12 servings 1x
- Category: Dessert
- Cuisine: American
Ingredients
- 2 ½ cups (315g) all-purpose flour, sifted
- 1 ½ cups (300g) granulated sugar
- 2 tablespoons (15g) unsweetened cocoa powder (Dutch-processed recommended)
- 1 teaspoon baking soda
- ½ teaspoon salt
- 1 cup (240ml) buttermilk, room temperature
- 1 cup (240ml) vegetable oil
- 2 large eggs, room temperature
- 2 tablespoons red food coloring (gel preferred)
- 1 teaspoon vanilla extract
- 1 teaspoon white vinegar
- 1 teaspoon espresso powder (optional)
- 16 ounces (450g) cream cheese, softened
- ½ cup (115g) unsalted butter, softened
- 4 cups (480g) powdered sugar, sifted
- 1 teaspoon vanilla extract (for frosting)
- Pinch of salt (for frosting)
Instructions
- Preheat oven to 350°F (175°C). Grease and flour two 9-inch cake pans or line with parchment paper.
- In a large bowl, sift together flour, cocoa powder, baking soda, and salt.
- In another bowl, whisk sugar and vegetable oil until combined. Add eggs one at a time, beating well after each addition.
- Stir in buttermilk, red food coloring, vanilla extract, vinegar, and espresso powder.
- Slowly add dry ingredients to wet ingredients, mixing on low speed until just combined. Do not overmix.
- Divide batter evenly between prepared pans.
- Bake for 25-30 minutes or until a toothpick inserted comes out clean or with a few moist crumbs.
- Cool cakes in pans for 10 minutes, then turn out onto wire racks to cool completely (at least 1 hour).
- Beat cream cheese and butter until smooth and creamy. Gradually add powdered sugar, beating on low then high speed until fluffy.
- Stir in vanilla extract and pinch of salt into frosting.
- Trim cake layers if needed. Cut one layer into three equal rectangles for stripes.
- Tint a portion of frosting blue with food coloring to create the blue field.
- Assemble the cake in a flag pattern using frosting to layer and decorate carefully.
- Chill assembled cake in refrigerator for at least 30 minutes before serving.
Notes
Use gel food coloring for best color without thinning batter. Let cakes cool completely before frosting to prevent melting. Chill cake layers before cutting for cleaner edges. If frosting is too soft, refrigerate for 10 minutes before spreading. Buttermilk and vinegar are essential for tender crumb and tang. Espresso powder enhances cocoa flavor but is optional.
Nutrition
- Serving Size: 1 slice (1/12 of cak
- Calories: 350400
- Sugar: 30
- Fat: 18
- Carbohydrates: 45
- Protein: 5
Keywords: red velvet cake, cream cheese frosting, flag cake, holiday dessert, easy red velvet, homemade frosting, 4th of July cake