Love this? Save it for later!
Share the inspiration with your friends
“You know that moment when you open the fridge and find a lonely beet staring back at you? Last Friday evening, that’s exactly what happened to me. I was prepping for a small get-together, and honestly, I wasn’t sure what to do with it. I’d tried roasting beets before, but that night, inspiration struck in a totally unexpected way. I grabbed some chickpeas, tahini, and a few pantry staples, and started blending a beet hummus that turned out shockingly vibrant and fresh. It was one of those happy kitchen accidents that you don’t plan but end up making a permanent spot in your recipe box.
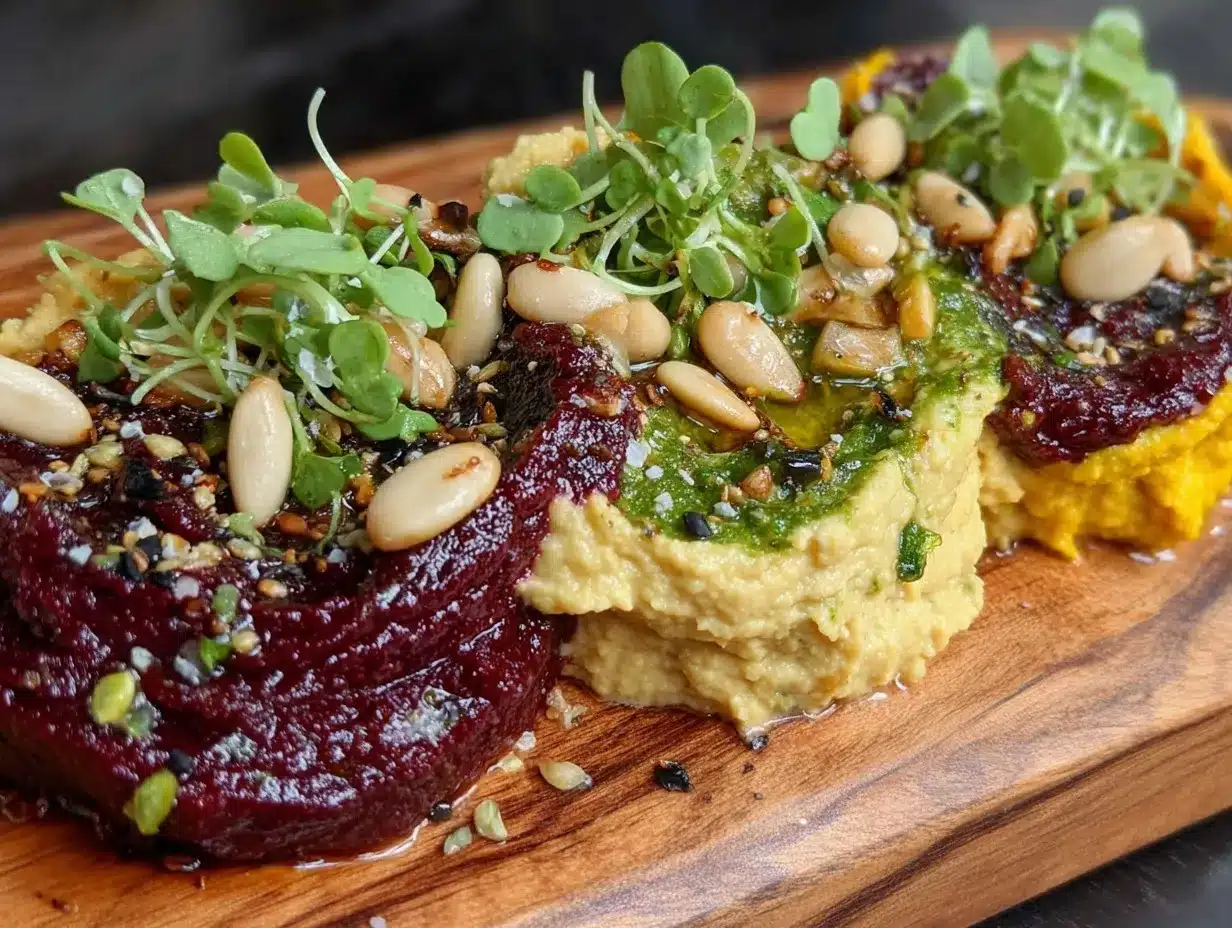
This Vibrant Naturally Dyed Beet Hummus Swirl Board isn’t just a pretty snack — it’s a conversation starter. The way the deep magenta beet blends into the creamy, golden hummus creates this gorgeous swirl that’s almost too beautiful to eat. Almost. I remember my friend Jess walking in, eyes wide, saying, “Is that beet hummus? It looks like art!” Honestly, it felt like I’d uncovered a secret ingredient for parties and quiet nights alike. Maybe you’ve been there—wanting something colorful, healthy, and super simple that still wows the crowd. This recipe ticks all those boxes.
Plus, there’s something so satisfying about making your own hummus from scratch, especially when you can play with natural colors and flavors. The beet gives it this earthy sweetness and a stunning hue that store-bought just can’t match. Let me tell you, once you make this vibrant beet hummus, you’ll find yourself returning to it again and again, whether it’s for a solo snack or a festive spread.
Why You’ll Love This Recipe
After countless tests in my kitchen, this beet hummus recipe has become a go-to for me, and here’s why you might fall for it too:
- Quick & Easy: Whip it up in under 15 minutes — perfect for those last-minute snack cravings or unexpected guests.
- Simple Ingredients: No need for fancy or hard-to-find items; everything is likely sitting in your pantry or fridge right now.
- Perfect for Entertaining: Whether it’s a casual brunch or a festive board for game night, this hummus adds a splash of color and flavor that impresses.
- Crowd-Pleaser: Kids, adults, picky eaters — everyone seems to love the subtle sweetness of beet paired with creamy chickpeas.
- Unbelievably Delicious: The natural earthiness of the beet marries beautifully with the tanginess of lemon and richness of tahini for a flavor combo that feels fresh and comforting.
What sets this recipe apart? The swirl technique I stumbled upon (purely by accident) creates a stunning visual that makes serving this hummus feel like a mini event. Plus, I’ve balanced the seasoning just right — not too garlicky, not too lemony, but perfectly harmonious. It’s the kind of recipe that makes you close your eyes after the first bite and just savor the moment.
Honestly, this beet hummus board isn’t just a snack; it’s a way to brighten your table and your day with something wholesome, homemade, and a little bit special.
What Ingredients You Will Need
This recipe uses simple, wholesome ingredients to deliver bold flavor and that vibrant color without fuss. Most items are pantry staples, and the beet brings in natural dye and sweetness.
- Chickpeas (1 can, 15 oz / 425 g, drained and rinsed) – the creamy base for the hummus
- Cooked Beetroot (1 medium beet, roasted or boiled, about 100 g) – for natural vibrant color and earthy sweetness
- Tahini (¼ cup / 60 ml) – adds a nutty, creamy richness (I usually go with Soom brand for smoothness)
- Fresh Lemon Juice (3 tbsp / 45 ml) – brings brightness and tang
- Garlic (1 clove, minced) – for a gentle kick
- Extra Virgin Olive Oil (3 tbsp / 45 ml) – smooths and enriches the texture
- Ground Cumin (½ tsp) – subtle warmth
- Salt (to taste, about ½ tsp) – enhances all flavors
- Water (2-4 tbsp / 30-60 ml) – for thinning out the hummus as needed
- Optional Toppings: toasted sesame seeds, chopped fresh herbs (parsley or cilantro), or a sprinkle of smoked paprika for extra flair
If you want to keep it allergy-friendly, you can swap tahini for sunflower seed butter, and if you prefer a vegan lemony twist, add a pinch of nutritional yeast. In summer, swapping the cooked beet for pickled beetroot adds a tangy punch that’s equally delicious. The ingredients are flexible but the beet is the star here, providing that gorgeous natural dye and flavor.
Equipment Needed
To make this vibrant beet hummus, you’ll need just a few basic kitchen tools:
- Food Processor or High-Speed Blender: Essential for smooth, creamy hummus. I’ve tried a basic blender before, but a food processor gives better texture without overworking the mixture.
- Measuring Cups and Spoons: For precise seasoning and balance.
- Mixing Bowls: To prep and serve your hummus swirl board.
- Spatula: Helps scrape down sides and create the swirl effect.
- Serving Board or Platter: A flat wooden or ceramic board works beautifully for presenting the hummus with dippers.
If you don’t have a food processor, a strong blender will do, but you might need to scrape and blend a couple of times for smoothness. For budget-friendly options, many kitchen stores offer mini food processors that work perfectly for dips like this. Also, keeping your food processor blade sharp and clean makes blending easier and the final texture silkier.
Preparation Method
- Prepare the Beet: Roast or boil your beet until tender (usually about 45 minutes roasting at 400°F / 200°C or 30-40 minutes boiling). Let it cool, then peel and chop into chunks. If you’re pressed for time, pre-cooked beets from the store can work just fine.
- Blend the Classic Hummus: Add chickpeas, tahini, lemon juice, garlic, cumin, salt, and 2 tablespoons of water to your food processor. Pulse until roughly combined, then process for 1-2 minutes until smooth and creamy. If it’s too thick, add water tablespoon by tablespoon until you reach a creamy consistency. (Tip: If hummus feels grainy, process longer and scrape the sides.)
- Prepare the Beet Hummus: Transfer about half of the classic hummus into a separate bowl. Add the chopped cooked beet chunks to the food processor with the remaining hummus and blend until smooth and vibrantly colored. Adjust salt and lemon to taste — the beet adds sweetness, so a little extra lemon juice often balances it perfectly.
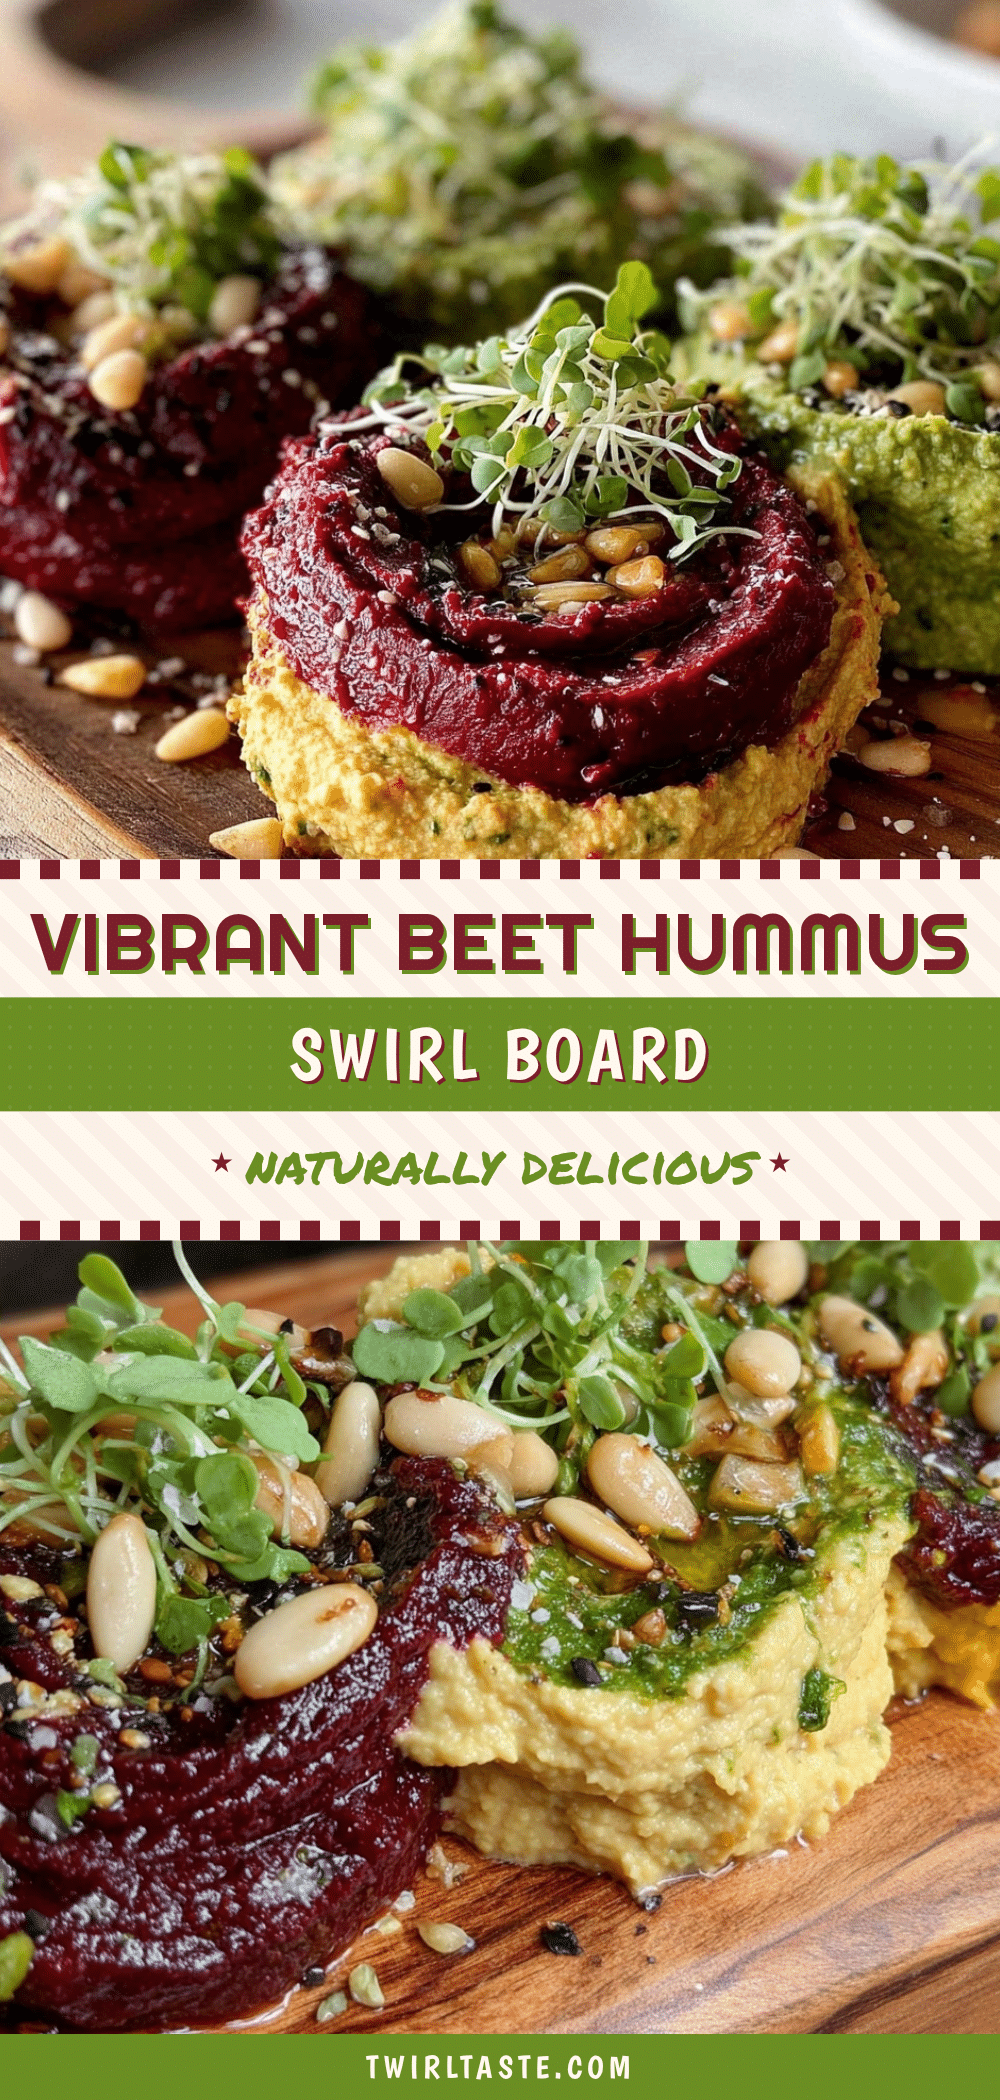
- Create the Swirl: On your serving board, spread the classic hummus in a wide, shallow oval shape. Next, dollop the beet hummus on top in blobs or lines. Using a spatula or the back of a spoon, gently swirl the two hummus layers together to create a marbled effect. Don’t overmix — you want the contrast to stay visible.
- Garnish and Serve: Drizzle olive oil over the top, sprinkle with toasted sesame seeds, fresh herbs, or smoked paprika if desired. Arrange pita chips, sliced veggies, or crackers around the board for dipping.
Prep time is about 10 minutes if you have cooked beets ready, or 1 hour including beet cooking time. The visual swirl is the real magic here, so take your time with that step. If the beet hummus seems too stiff, a splash of water or olive oil will loosen it without dulling the color.
Cooking Tips & Techniques
Getting that perfect hummus texture and color can feel tricky, but here are some tips I’ve picked up along the way:
- Use Room Temperature Ingredients: Chickpeas and tahini blend more smoothly when not cold straight from the fridge.
- Peel Your Chickpeas: This step is optional but makes a huge difference in silky hummus. Rubbing chickpeas between your fingers to remove skins can be tedious but worth it if you want ultra-smooth texture.
- Adjust Liquid Slowly: Add water or olive oil gradually to avoid runny hummus. You can always thin, but it’s hard to fix if too watery.
- Balance Flavors: Taste as you go. Beet adds sweetness, so a little extra lemon juice or salt might be needed to keep it bright.
- Swirling Technique: Use gentle, deliberate motions when mixing the two hummus colors. Overmixing will muddy the beautiful contrast.
- Multitasking: While your beets roast, prep other ingredients to save time. I usually measure spices and juice lemons first.
- Storing: Hummus thickens slightly when chilled; stirring in a teaspoon of olive oil or water before serving refreshes the texture.
I once ruined a batch by skipping the lemon juice, and it tasted flat despite being beautifully colored. Lesson learned: bright acid is key! Also, I recommend blending beet hummus separately to preserve its vibrant hue rather than mixing everything at once.
Variations & Adaptations
This recipe is super flexible and happy to fit into your kitchen style or dietary needs:
- Dietary: Use gluten-free dippers like rice crackers or veggie sticks for a gluten-free snack board.
- Flavor Twist: Add a pinch of smoked paprika or cayenne to the classic hummus for a smoky or spicy kick.
- Seasonal: Swap beet with roasted sweet potato or carrot for a different color and flavor profile (still naturally dyed and delicious!).
- Cooking Method: If you don’t want to roast or boil beets, try steaming them to retain more nutrients and a brighter color.
- Personal Variation: Once, I tossed in a handful of fresh basil to the beet hummus for a herby twist that was surprisingly fresh and crowd-pleasing.
For those allergic to sesame, sunflower seed butter or tahini-free hummus versions work well too. Honestly, the key is to keep the balance between creamy chickpeas and the natural sweetness of your colorful veggie base.
Serving & Storage Suggestions
Serve your beet hummus swirl board at room temperature to enjoy the fullest flavor and creamy texture. It pairs beautifully with warm pita bread, crisp cucumber slices, bell pepper strips, or even crunchy artisan crackers.
For a complete snack or light meal, add olives, roasted nuts, and a wedge of lemon on the side. A chilled glass of crisp white wine or sparkling water with a slice of lemon complements the earthy sweetness perfectly.
Store leftovers in an airtight container in the refrigerator for up to 4 days. The vibrant color may deepen over time but remains just as tasty. Before serving leftovers, stir hummus gently to restore that creamy texture.
You can also freeze hummus in small portions for up to 2 months. Thaw overnight in the fridge and stir well before serving. Note that texture might be slightly different after freezing, but flavor holds up well.
Nutritional Information & Benefits
This beet hummus isn’t just beautiful; it’s packed with nutrition. A ¼ cup (about 60 g) serving contains roughly:
- Calories: 120
- Protein: 4 g
- Fiber: 4 g
- Healthy fats: 7 g (mostly from tahini and olive oil)
- Carbohydrates: 10 g
Beets provide antioxidants like betalains which support inflammation reduction and heart health. Chickpeas are a great plant-based protein and fiber source, helping with digestion and satiety. Tahini contributes calcium and healthy fats, supporting bone and heart health.
This recipe is naturally gluten-free, dairy-free, and vegan-friendly. It’s a wholesome snack that feels indulgent but supports wellness goals. Personally, I love how it helps me sneak more veggies into my diet without feeling like a chore.
Conclusion
The Vibrant Naturally Dyed Beet Hummus Swirl Board has become a staple for me when I want something quick, healthy, and visually stunning. It’s proof that simple ingredients, a little creativity, and patience can transform an ordinary snack into something memorable. You can customize it to your taste, swap ingredients as needed, and still end up with a crowd-pleasing dip that’s as good to look at as it is to eat.
Honestly, I keep coming back to this recipe—not just for its flavor or color, but because it turns snack time into a moment of joy and connection around the table. I’d love to hear how you make it your own, so don’t hesitate to share your versions or questions in the comments below. Let’s keep bringing color and flavor to our kitchens, one beet hummus swirl at a time!
FAQs
Can I use raw beets for this hummus?
Raw beets are too firm and earthy for smooth hummus. Cooking (roasting, boiling, or steaming) softens them and brings out natural sweetness, which blends better.
How long will this beet hummus keep in the fridge?
Store in an airtight container for up to 4 days. Stir before serving to refresh texture.
Can I make this hummus without tahini?
Yes! Use sunflower seed butter or omit tahini altogether. You may want to add a bit more olive oil for creaminess.
What are good dippers for the beet hummus swirl board?
Try pita chips, sliced cucumbers, carrot sticks, bell peppers, or gluten-free crackers for tasty dipping options.
Is this recipe suitable for a vegan diet?
Absolutely! All ingredients are plant-based, making it perfect for vegan and dairy-free diets.
Pin This Recipe!
Vibrant Beet Hummus Swirl Board

A colorful and creamy homemade beet hummus that combines earthy sweetness of beets with classic chickpea hummus, perfect for entertaining or a healthy snack.
- Prep Time: 10 minutes (excluding beet cooking time)
- Cook Time: 45 minutes (for roasting beet)
- Total Time: 55 minutes
- Yield: 6 servings 1x
- Category: Snack
- Cuisine: Mediterranean
Ingredients
- 1 can (15 oz / 425 g) chickpeas, drained and rinsed
- 1 medium cooked beetroot (about 100 g), roasted or boiled
- 1/4 cup (60 ml) tahini
- 3 tbsp (45 ml) fresh lemon juice
- 1 clove garlic, minced
- 3 tbsp (45 ml) extra virgin olive oil
- 1/2 tsp ground cumin
- 1/2 tsp salt, or to taste
- 2–4 tbsp (30–60 ml) water, to thin hummus as needed
- Optional toppings: toasted sesame seeds, chopped fresh herbs (parsley or cilantro), smoked paprika
Instructions
- Prepare the beet by roasting at 400°F (200°C) for about 45 minutes or boiling for 30-40 minutes until tender. Let cool, peel, and chop into chunks.
- In a food processor, combine chickpeas, tahini, lemon juice, garlic, cumin, salt, and 2 tablespoons of water. Pulse until roughly combined, then process for 1-2 minutes until smooth and creamy. Add more water if needed to reach desired consistency.
- Transfer half of the classic hummus to a separate bowl. Add chopped cooked beet chunks to the remaining hummus in the processor and blend until smooth and vibrantly colored. Adjust salt and lemon juice to taste.
- On a serving board, spread the classic hummus in a wide, shallow oval shape. Dollop the beet hummus on top in blobs or lines and gently swirl with a spatula or spoon to create a marbled effect without overmixing.
- Drizzle olive oil over the top and sprinkle with optional toppings like toasted sesame seeds, fresh herbs, or smoked paprika. Serve with pita chips, sliced veggies, or crackers.
Notes
Use room temperature ingredients for smoother hummus. Peeling chickpeas is optional but improves texture. Add water or olive oil gradually to avoid runny hummus. Swirl beet and classic hummus gently to preserve color contrast. Store leftovers in airtight container up to 4 days; stir before serving. Can freeze up to 2 months.
Nutrition
- Serving Size: 1/4 cup (about 60 g)
- Calories: 120
- Fat: 7
- Carbohydrates: 10
- Fiber: 4
- Protein: 4
Keywords: beet hummus, homemade hummus, healthy snack, vegan dip, colorful appetizer, party snack, gluten-free, plant-based