Love this? Save it for later!
Share the inspiration with your friends
Sticky, sweet, and slightly crunchy, and that’s the whole point.
I remember standing in my kitchen in 2008, holding a plastic spider leg that was sticking to my thumb. It was 11:30 PM. The house was quiet. My kids were finally asleep, but the panic was just starting to set in. I had promised them “spider treats” for their class party the next morning, but I had forgotten to buy anything. The store was closed. The pantry was empty except for a jar of peanut butter and a bag of mini chocolate chips.
That’s when I made these No-Bake Peanut Butter Spider Bites. Honestly, I wasn’t trying to be a hero. I was just trying to survive the night. But when I rolled those little balls and pressed the chocolate legs into the sides, something clicked. The texture is the best part. You get that dense, salty-sweet peanut butter center, followed by the snap of the hard candy legs. It’s not elegant. It’s not fancy. But it works.
People always ask me for the “secret” ingredient. There isn’t one. It’s just the ratio. Too much flour and it’s dry. Too little and it falls apart. You have to feel it. Your hands tell you when it’s right. I’ve made these for every Halloween since. They are the first thing I grab when October hits. They are reliable, cheap, and they make kids scream with delight. Not because they taste like spiders, but because they look like them. And let’s face it, that visual is half the fun.
I still keep that same jar of peanut butter in my cupboard. It’s the one I bought that night. It reminds me that sometimes the best recipes are born from desperation, not design.
Why You’ll Love This Recipe
These No-Bake Peanut Butter Spider Bites are not just a quick fix for a forgotten party. They are a staple in my kitchen for a few specific reasons that come from years of testing and tweaking. I’ve tried dozens of versions, from ones that used graham crackers to ones that used marshmallows, but this simple combination of peanut butter, powdered sugar, and chocolate is the winner every time.
- Quick & Easy: You can have these ready in under 20 minutes. That includes prep and chilling time. It is perfect for last-minute Halloween plans or a quick snack when the craving hits.
- Simple Ingredients: You likely have everything you need right now. Peanut butter, powdered sugar, butter, vanilla, and chocolate chips. No fancy grocery trips needed.
- Perfect for Halloween: These are the ultimate spooky treat. They are fun to make with kids and scary enough to serve at a party.
- Crowd-Pleaser: Kids love the shape, and adults love the taste. It’s a peanut butter ball, after all. Everyone loves a good peanut butter ball.
- Unbelievably Delicious: The balance of salty and sweet is spot on. The crunch of the candy legs adds a texture you don’t get in regular truffles.
What makes these different from the rest is the attention to detail in the assembly. Many recipes just tell you to stick legs on. I recommend chilling the balls first so the legs stick better. It’s a small tip, but it makes a huge difference in the final presentation. This recipe is the kind that makes you feel like a genius in the kitchen, even if you are just rolling dough with your hands.
What Ingredients You Will Need
This recipe relies on pantry staples to create a rich, dense, and flavorful treat. The ingredients are simple, but quality matters. Since there are so few components, each one plays a huge role in the final taste and texture. I like to keep these on hand year-round, but they are especially useful in October.
- Peanut Butter: Use creamy, natural peanut butter. I recommend Jif or Skippy for consistency, but a good all-natural brand works if you stir it well. Avoid the “no-stir” varieties as they can be too oily. You need about 1 cup (250g).
- Unsalted Butter: This adds richness and helps bind the mixture. Soften it before you start. You will need 1/4 cup (55g).
- Powdered Sugar: This is the sweetener and the binder. It dissolves easily into the peanut butter. You will need about 2 to 2.5 cups (250-300g). Add it gradually to get the right consistency.
- Vanilla Extract: Just a teaspoon helps round out the flavors. Use real vanilla, not imitation, if you can find it.
- Mini Chocolate Chips: These form the body and the legs. Dark chocolate or milk chocolate both work. I prefer dark chocolate for a slightly less sweet bite. You will need about 1 cup (170g).
- Pretzel Sticks: For the legs, I use mini pretzel sticks. They are sturdy and salty. If you can’t find them, you can use regular pretzel sticks broken in half. You will need about 20-24 sticks.
If you have a peanut allergy, you can substitute the peanut butter with sunflower seed butter or soy nut butter. The texture will be slightly different, but it still works. For a gluten-free option, make sure your pretzels and chocolate chips are certified gluten-free.
Equipment Needed
You don’t need much for this recipe. A large mixing bowl is essential. I use a glass bowl because I can see the mixture clearly as I add the sugar. A rubber spatula is your best friend here. It helps you fold the ingredients together without making a mess. A baking sheet lined with parchment paper is needed for chilling the bites. If you don’t have parchment, wax paper works too, but parchment is better for sticking. I also recommend having a small microwave-safe bowl for melting the chocolate. If you don’t have a microwave, you can use a double boiler, but it takes longer. Finally, keep a pair of tweezers handy if you are particular about the leg placement. It sounds silly, but it helps you get them straight.
Preparation Method

Making these spider bites is straightforward, but there are a few tricks to get them just right. Follow these steps carefully for the best results.
- Prep Your Station: Line a baking sheet with parchment paper. This is crucial because the balls will be sticky. Set the sheet aside. You will need this later for chilling.
- Mix the Base: In your large bowl, combine the softened butter and the creamy peanut butter. Mix them together until they are smooth and well combined. This should take about 1-2 minutes. If the peanut butter is too cold, it won’t mix well. Warm it up slightly if needed.
- Add the Sugar: Gradually add the powdered sugar to the peanut butter mixture. Start with 2 cups. Mix thoroughly after each addition. You want a thick, dough-like consistency. If it is too dry, add a little more peanut butter. If it is too wet, add more sugar. This step is key. The dough should hold its shape when rolled.
- Flavor It: Stir in the vanilla extract. Mix until it is evenly distributed. The smell should be sweet and nutty.
- Roll the Balls: Scoop out about 1 tablespoon of the mixture. Roll it between your palms to form a smooth ball. Place it on the prepared baking sheet. Repeat until all the dough is used. You should get about 24 bites. If the dough gets too sticky, wet your hands slightly with water.
- Chill the Balls: Put the baking sheet in the refrigerator for at least 30 minutes. This step is non-negotiable. Cold balls are much easier to handle and the chocolate will stick better. If you skip this, you will end up with a mess.
- Melt the Chocolate: Once the balls are cold, melt the mini chocolate chips. You can do this in the microwave in 30-second intervals, stirring in between. Or use a double boiler. Melt until smooth. Be careful not to overheat it, or it can seize up.
- Assemble the Spiders: Take a cold ball and dip the bottom third into the melted chocolate. This will be the “body” attachment point. Immediately press 4 pretzel sticks into the chocolate on one side and 4 on the other. These are the legs. You can also dip the top of the ball in chocolate for a full coating, but I like leaving some peanut butter visible for contrast.
- Set Them: Place the assembled spiders back on the parchment paper. Put them back in the fridge to let the chocolate harden. This takes about 10-15 minutes.
- Store and Serve: Once set, they are ready to eat. Store them in an airtight container in the fridge.
Cooking Tips & Techniques
There are a few common mistakes people make when making these bites. First, they don’t chill the balls enough. I know it’s tempting to rush, but if the balls are warm, the chocolate will slide right off. It’s frustrating. Second, they use too much chocolate. You don’t need to drown them. A thin layer is enough to hold the pretzels. If you use too much, the legs will sink into the chocolate and fall off. Third, they use old pretzels. Stale pretzels will break when you press them in. Always use fresh, crunchy pretzels. Another tip is to work in small batches. Melt a little chocolate, make a few spiders, then melt more. This keeps the chocolate at the right temperature. If you melt it all at once, it might get too thick as you work. Also, if you are making these for a party, you can make them a day ahead. They actually taste better the next day as the flavors meld together. Just keep them cold until serving.
Variations & Adaptations
While the classic version is my favorite, there are ways to tweak this recipe. For a healthier version, you can use almond butter instead of peanut butter. It has a slightly more complex flavor. If you want a chocolate lover’s treat, dip the entire ball in chocolate. You can also add a pinch of sea salt on top of the wet chocolate before it sets. The salt enhances the peanut flavor. For a gluten-free version, use gluten-free pretzels and check your chocolate chips. Some brands have wheat starch in them. You can also use mini pretzel rods instead of sticks for longer legs. It changes the look slightly, but it works. I once made these with white chocolate and dried cranberries on top for a Christmas theme. They were a hit. The possibilities are endless.
Serving & Storage Suggestions
These spider bites are best served chilled. The cold temperature keeps the peanut butter firm and the chocolate crunchy. They are perfect for Halloween parties, movie nights, or just a Tuesday snack. Pair them with a cold glass of milk or a cup of coffee. For storage, keep them in an airtight container in the refrigerator for up to one week. If you freeze them, they will last for up to three months. Thaw them in the fridge before eating. Do not leave them out at room temperature for too long, as the peanut butter can go rancid and the chocolate can melt. If you make a batch for a party, bring them in a cooler bag to keep them cold until you get there.
Nutritional Information & Benefits
Each spider bite contains approximately 120 calories. They are a good source of protein from the peanut butter and calcium from the dairy. However, they are also high in sugar and fat, so enjoy them in moderation. They are not a health food, but they are a fun treat. If you are watching your sugar intake, you can use a sugar substitute, but the texture will be different. For those with nut allergies, sunflower seed butter is a good alternative, though it has a distinct taste. Always check labels for allergens. These bites are a great way to satisfy a sweet tooth without needing a full dessert course.
Conclusion
These No-Bake Peanut Butter Spider Bites are a Halloween tradition in my house. They are easy, cheap, and delicious. I hope you try them and make them your own. Feel free to change the chocolate color or the leg type. The most important thing is to have fun making them. If you make this recipe, please leave a comment below. I love hearing how your spiders turned out. Share your photos on social media and tag me. I want to see your creations. Happy Halloween, and happy baking!
FAQs
Can I use crunchy peanut butter?
Yes, you can use crunchy peanut butter. It will add a nice texture to the bites. However, the dough might be slightly harder to roll. You may need to add a little more powdered sugar to compensate for the extra thickness.
How do I keep the pretzel legs from falling off?
The key is to chill the peanut butter balls thoroughly before adding the chocolate. Cold balls are firmer and provide a better base. Also, make sure the chocolate is melted but not too hot. Dip the ball, press the legs in quickly, and let them set in the fridge.
Can I make these ahead of time?
Absolutely. You can make these up to a week in advance. Store them in the refrigerator in an airtight container. They actually taste better after a day as the flavors have time to meld together.
What can I use instead of pretzels?
If you can’t find pretzel sticks, you can use any sturdy, salty snack. Pretzel rods broken in half work well. You can also use chocolate-covered espresso beans or even small candy corns for a different look, though pretzels provide the best structural support.
Are these gluten-free?
Not by default, as standard pretzels contain wheat. However, you can easily make them gluten-free by using gluten-free pretzel sticks and ensuring your chocolate chips and peanut butter are certified gluten-free. Always check the labels on your ingredients.
Pin This Recipe!
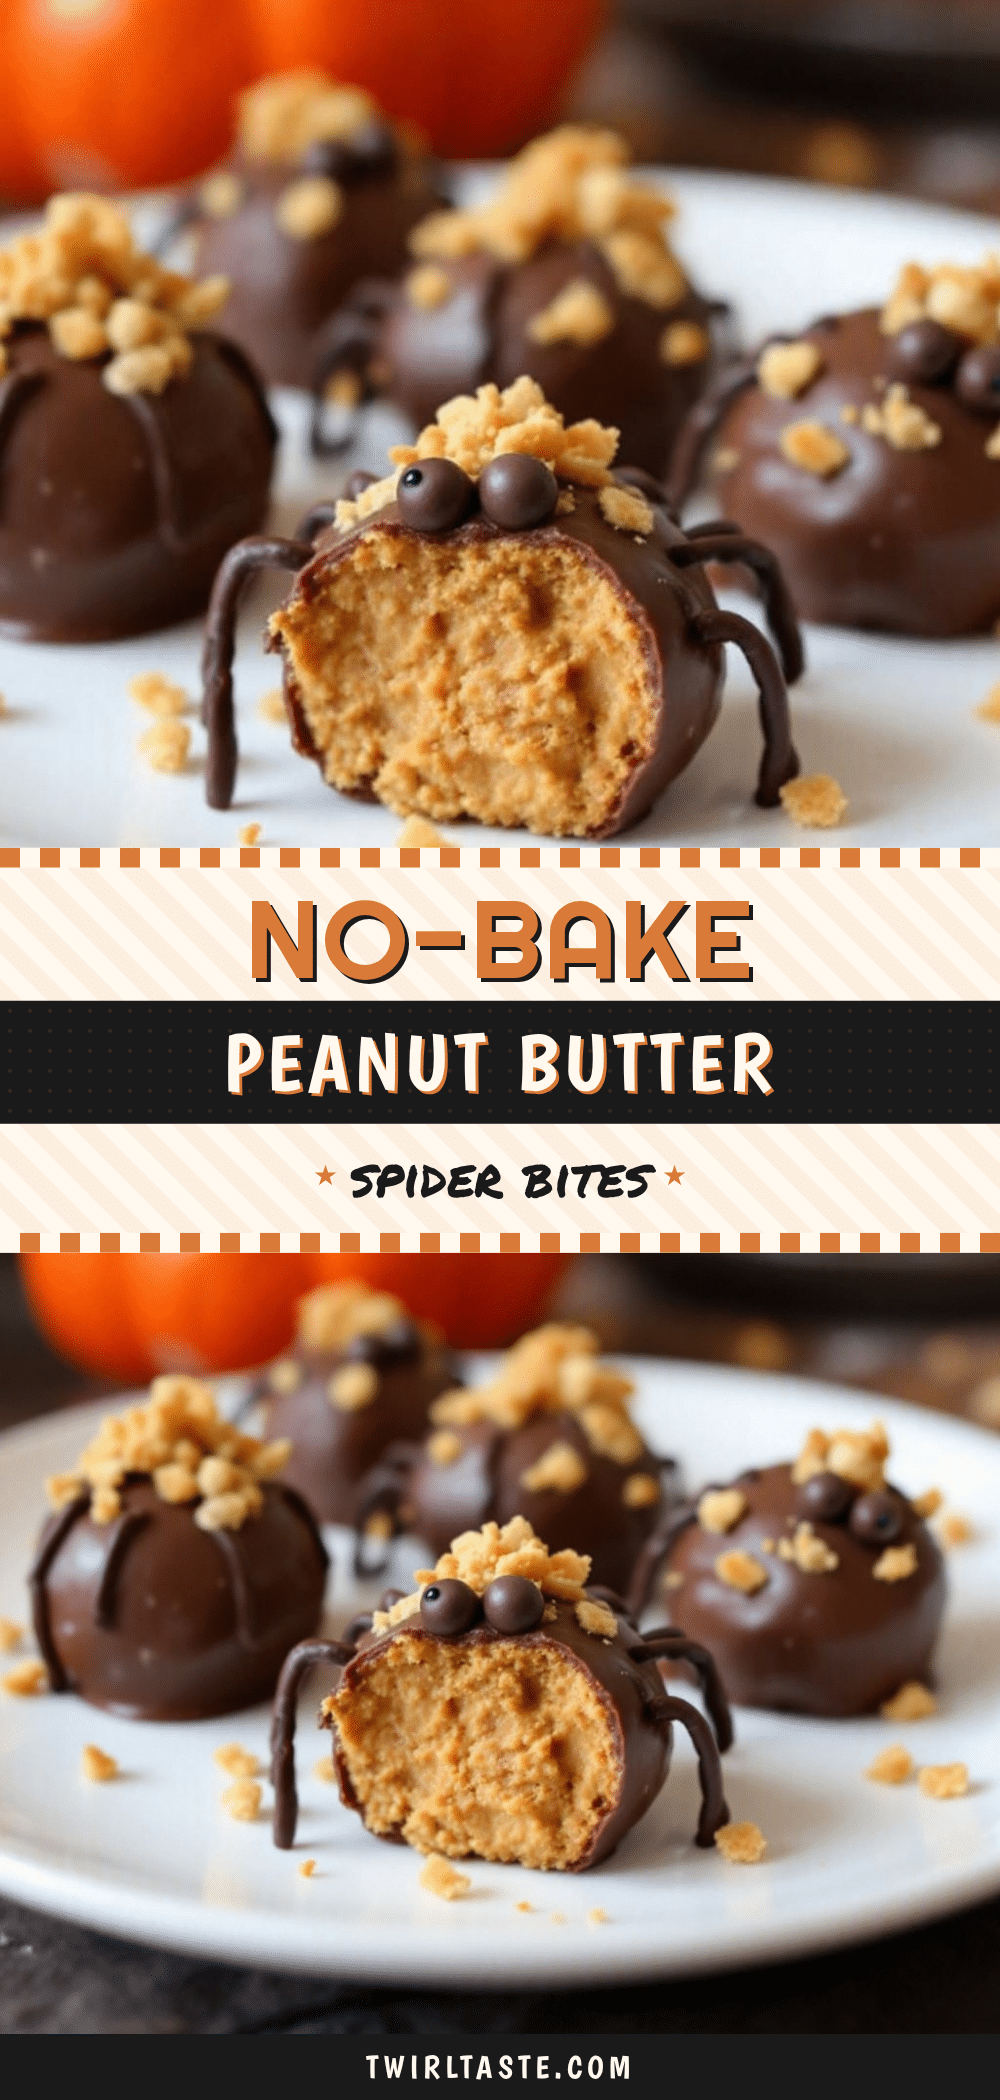
No-Bake Peanut Butter Spider Bites: 5-Minute Halloween Treats

A quick, no-bake Halloween treat made with peanut butter, powdered sugar, and chocolate, featuring pretzel stick legs for a spooky and delicious shape.
- Prep Time: 15 minutes
- Cook Time: 0 minutes
- Total Time: 45 minutes
- Yield: 24 servings 1x
- Category: Dessert
- Cuisine: American
Ingredients
- 1 cup (250g) creamy peanut butter
- 1/4 cup (55g) unsalted butter, softened
- 2 to 2.5 cups (250-300g) powdered sugar
- 1 teaspoon vanilla extract
- 1 cup (170g) mini chocolate chips
- 20–24 mini pretzel sticks
Instructions
- Line a baking sheet with parchment paper.
- In a large bowl, combine the softened butter and creamy peanut butter, mixing until smooth.
- Gradually add the powdered sugar, mixing thoroughly after each addition until a thick, dough-like consistency forms.
- Stir in the vanilla extract until evenly distributed.
- Scoop about 1 tablespoon of the mixture and roll into smooth balls, placing them on the prepared baking sheet.
- Chill the balls in the refrigerator for at least 30 minutes.
- Melt the mini chocolate chips in the microwave in 30-second intervals or using a double boiler until smooth.
- Take a cold ball and dip the bottom third into the melted chocolate.
- Immediately press 4 pretzel sticks into the chocolate on one side and 4 on the other to form legs.
- Place assembled spiders back on parchment paper and refrigerate for 10-15 minutes to set.
- Store in an airtight container in the refrigerator.
Notes
Chill the peanut butter balls thoroughly before adding chocolate to ensure the legs stick. Use fresh pretzels for structural support. For a gluten-free option, use certified gluten-free pretzels and chocolate chips. Can be made up to a week in advance.
Nutrition
- Serving Size: 1 spider bite
- Calories: 120
- Sugar: 9
- Sodium: 45
- Fat: 8
- Saturated Fat: 3
- Carbohydrates: 12
- Fiber: 1
- Protein: 4
Keywords: Halloween treats, no-bake, peanut butter bites, spider cookies, easy snacks, kid-friendly recipes


