Love this? Save it for later!
Share the inspiration with your friends
My neighbor’s seven-year-old took one bite of these spiderweb cookies last October and just stopped mid-chew. She looked at the cookie, looked at me, and said, “Did you actually make the web part yourself?” with this total disbelief in her voice. I laughed and told her yes, and she asked if she could watch me make the next batch. That’s when I knew these cookies were a keeper—not just because they taste good, but because they make people stop and pay attention. And honestly, that’s the whole point of a Halloween treat, right?
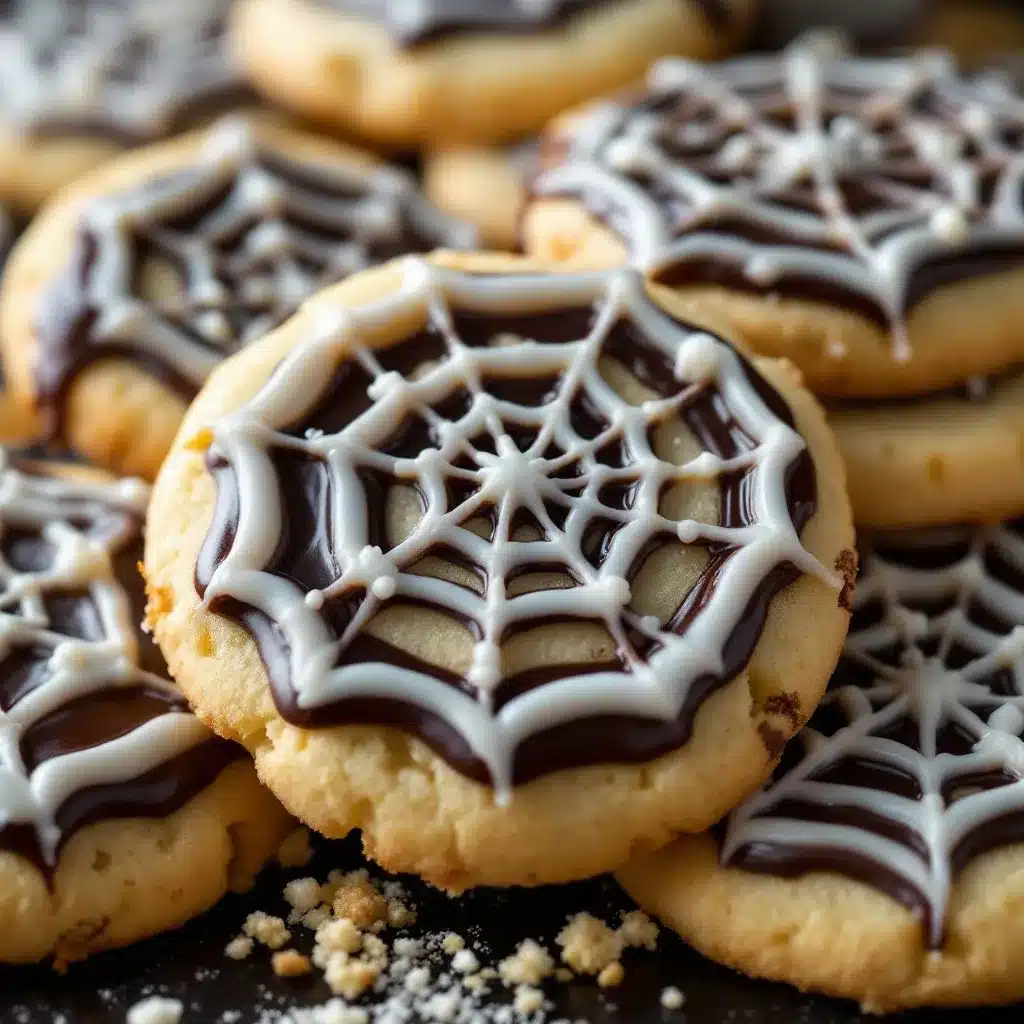
I’ve tested a lot of sugar cookie recipes over the years, and most of them either spread too much in the oven or taste like a bland sugar delivery system. These easy spiderweb Halloween sugar cookies fix both problems. The dough holds its shape perfectly, the icing dries with that glossy, crack-free finish, and the spiderweb design looks way more impressive than the effort it actually takes. Every time I bring these to a party or leave them out for trick-or-treaters, someone asks for the recipe.
These cookies have become my go-to for Halloween baking because they strike that perfect balance between fun and doable. You don’t need a piping bag or any special tools—just a toothpick and a steady hand. The first time I made them, I was nervous the webs would look messy, but the technique is so forgiving. Even the imperfect ones have a rustic charm that feels handmade and intentional. If you’ve ever wanted to make bakery-style Halloween cookies without the stress, this is the one.
Why You’ll Love This Recipe
I’ve made these cookies about a dozen times now, and I keep noticing new reasons to love them. Here’s what stands out:
- Quick & Easy : From start to finish, these come together in under an hour. The dough chills for just 20 minutes, and the decorating takes maybe 10 minutes total. Perfect for last-minute Halloween plans or when the kids suddenly announce they need treats for school tomorrow.
- Simple Ingredients : You probably have everything in your pantry right now. Butter, sugar, flour, eggs, vanilla—no specialty baking supplies required. The only thing you might need to grab is black gel food coloring, but even that you can find at any grocery store.
- Perfect for Halloween Parties : These cookies are the star of any Halloween spread. They look dramatic and spooky without being over-the-top gory, so they work for kids’ parties, office potlucks, or just a fun weekend baking project.
- Crowd-Pleaser : I’ve yet to meet someone who doesn’t love a good sugar cookie. The soft, buttery texture with that crackly icing is universally appealing. Kids love the design, and adults appreciate the nostalgia.
- Unbelievably Delicious : This isn’t one of those pretty cookies that sacrifices flavor for looks. The cookie itself is tender, slightly crisp on the edges, and perfectly sweet. The icing sets up firm but still has that soft bite when you eat it.
What makes this recipe different from the hundreds of other spiderweb cookie recipes out there? It’s the icing consistency. I spent way too many batches figuring out the exact ratio of powdered sugar to milk that gives you that smooth, spreadable texture without dripping off the edges. Plus, the dough uses a touch of cream cheese, which gives the cookies a subtle tang and keeps them soft for days. This isn’t just another version—it’s the one I’ll make every Halloween from now on.
What Ingredients You Will Need
This recipe uses simple, everyday ingredients to create something that feels special. Here’s what you’ll need and why each one matters:
For the Sugar Cookie Dough
- Unsalted butter, softened (1 cup / 226g) – I always use unsalted so I can control the salt level. Let it sit out for about 30 minutes until it’s soft but not melty.
- Cream cheese, softened (2 oz / 56g) – This is my secret ingredient. It adds a subtle tang and keeps the cookies soft even days later. Use full-fat for best results.
- Granulated sugar (1 cup / 200g) – Regular white sugar works perfectly here. No need for anything fancy.
- Large egg (1, room temperature) – Room temperature eggs incorporate more evenly into the butter mixture. Take yours out with the butter.
- Vanilla extract (1 teaspoon) – Pure vanilla makes a difference, but imitation works in a pinch. I’ve used both.
- All-purpose flour (2 ½ cups / 312g) – Spoon and level your flour—don’t scoop directly from the bag or you’ll end up with dry cookies.
- Baking powder (1 teaspoon) – This gives the cookies a slight lift without making them puffy.
- Salt (½ teaspoon) – Balances the sweetness and brings out the buttery flavor.
For the Spiderweb Icing
- Powdered sugar (2 cups / 240g) – Sift it if you can, but I’ll admit I skip that step half the time and it’s fine.
- Milk (2-3 tablespoons) – Whole milk gives the creamiest texture, but any milk works. Add it slowly—you might not need all of it.
- Vanilla extract (½ teaspoon) – Adds flavor to the icing so it doesn’t taste like just sugar.
- Black gel food coloring – This is crucial. Liquid food coloring won’t give you that deep, true black. Gel is concentrated and won’t thin out your icing. I like the Americolor brand.
Ingredient Tips
For the butter, I recommend using a brand like Kerrygold or Plugrà if you can find it—the higher butterfat content makes the cookies extra tender. But honestly, store-brand butter works perfectly fine. For the black gel coloring, Wilton and Americolor both make great options. I’ve tried cheaper brands and they tend to fade to gray as the icing dries, so spend the extra dollar or two.
If you need a dairy-free option, substitute the butter with a good vegan butter stick (not margarine) and use dairy-free cream cheese. The texture will be slightly different but still delicious. For a gluten-free version, swap the all-purpose flour with a 1:1 gluten-free baking flour blend. I’ve tested this with King Arthur’s measure-for-measure blend and it worked great.
Equipment Needed
You don’t need much for these cookies, which is part of why I love making them. Here’s the basic setup:
- Large mixing bowls – One for the dough, one for the icing. Glass or metal works best.
- Electric hand mixer or stand mixer – You can mix by hand, but a mixer makes creaming the butter and sugar much easier.
- Baking sheets – Two standard half-sheet pans work perfectly. Line them with parchment paper or a silicone baking mat.
- Round cookie cutter (2.5 to 3 inches) – Any round cutter works. I use a 2.5-inch one for smaller cookies that are easier to decorate.
- Cooling rack – Essential for letting the cookies cool completely before icing. If you don’t have one, a clean kitchen towel works in a pinch.
- Toothpicks – This is your main decorating tool. You’ll use the toothpick to drag the black icing into the web pattern.
- Piping bag or small zip-top bag – For piping the black icing circles. A zip-top bag with a tiny corner snipped off works just as well as a piping bag.
- Offset spatula or butter knife – For spreading the white base icing.
If you don’t have a cookie cutter, you can use a drinking glass with a thin rim. Just dip the rim in flour before cutting to prevent sticking. I’ve also used the top of a mason jar in a pinch—whatever works!
Preparation Method
Let’s get into the actual process. I’ve broken this down into clear steps so you can follow along without confusion.
Step 1: Make the Cookie Dough
In a large mixing bowl, beat the softened butter and cream cheese together until smooth and creamy—about 2 minutes on medium speed. Add the granulated sugar and beat for another 2 minutes until the mixture looks light and fluffy. Scrape down the sides of the bowl with a spatula.
Add the egg and vanilla extract, then beat on low until just combined. The mixture might look slightly curdled at this point—that’s totally normal, don’t panic.
In a separate bowl, whisk together the flour, baking powder, and salt. Gradually add the dry ingredients to the wet mixture, mixing on low speed until a soft dough forms. Stop mixing as soon as the flour disappears—overmixing will make the cookies tough.
Step 2: Chill the Dough
Turn the dough out onto a piece of plastic wrap. Flatten it into a disk about 1 inch thick, wrap it tightly, and refrigerate for at least 20 minutes. This step is non-negotiable—chilled dough holds its shape better during baking and prevents the cookies from spreading into sad, flat circles.
While the dough chills, preheat your oven to 350°F (175°C) and line your baking sheets with parchment paper.
Step 3: Cut and Bake
Lightly flour your work surface and rolling pin. Roll the chilled dough to about ¼-inch thickness. If the dough cracks at the edges, let it sit at room temperature for 2-3 minutes to warm up slightly.
Use your round cookie cutter to cut out as many cookies as possible. Gather the scraps, gently press them together, and reroll once. Don’t reroll more than once or the cookies will get tough.
Place the cookies on the prepared baking sheets, spacing them about 2 inches apart. Bake for 8-10 minutes, or until the edges are just barely golden. The centers will look slightly underdone—that’s what you want. Overbaked cookies will be dry and crumbly.
Let the cookies cool on the baking sheet for 5 minutes, then transfer them to a cooling rack to cool completely. This is important—if you try to ice warm cookies, the icing will melt right off.
Step 4: Make the Icing
In a medium bowl, whisk together the powdered sugar, 2 tablespoons of milk, and vanilla extract. The mixture should be thick but spreadable—think honey consistency. If it’s too thick, add the remaining tablespoon of milk a few drops at a time. If it’s too thin, add more powdered sugar.
Scoop out about ¼ cup of the white icing and set it aside. Add black gel food coloring to the remaining icing, starting with a small amount and adding more until you reach your desired shade of black. I usually end up using about 1 teaspoon of gel color. Stir thoroughly to distribute the color evenly.
Transfer the black icing to a piping bag or a small zip-top bag with a tiny corner snipped off.
Step 5: Decorate the Cookies
Using an offset spatula or butter knife, spread a thin, even layer of white icing over each cooled cookie. Work quickly—you want the icing to still be wet when you add the spiderweb.
While the white icing is still wet, pipe 3-4 concentric circles of black icing onto the cookie. Start with a small circle in the center and work your way outward, leaving about ½ inch between each circle.
Here’s the magic part: take a toothpick and drag it from the center of the cookie outward through all the black circles. Wipe the toothpick clean, then drag from the edge of the cookie inward toward the center. Repeat this process around the cookie, spacing the drags about 1 inch apart. You should see the web pattern forming immediately.
Let the decorated cookies sit at room temperature for about 30 minutes to allow the icing to set completely. The icing will develop a slight sheen as it dries—that’s normal and part of the finished look.
Cooking Tips & Techniques
I’ve learned a few things the hard way so you don’t have to. Here are my best tips for perfect spiderweb cookies every time:
Don’t skip the chill. I made the mistake of rushing this step once, and my cookies spread into flat blobs that looked nothing like circles. The cream cheese in the dough makes it softer than regular sugar cookie dough, so chilling is essential for maintaining shape.
Use gel food coloring, not liquid. Liquid food coloring will thin out your icing and make it runny. Gel coloring gives you that deep, opaque black without changing the consistency. I learned this after a disastrous batch of gray, watery icing.
Work in small batches. Only ice 2-3 cookies at a time. The white icing starts to set within a minute or two, and if you wait too long to add the black circles and drag the toothpick, the web won’t form properly. I usually ice one cookie, pipe the circles, drag, and then move to the next one.
Keep the icing covered. Both the white and black icing will develop a skin if left exposed to air. Cover the bowls with a damp paper towel or plastic wrap while you’re working.
Use a light hand with the toothpick. You don’t need to press hard—just a gentle drag through the black icing is enough. Pressing too hard will disturb the white icing underneath and create a messy look.
If the black icing is too thick to pipe, add a drop of milk and stir. If it’s too thin and runs everywhere, add a spoonful of powdered sugar. The perfect consistency is like thick toothpaste—it should hold its shape when piped but still be soft enough to drag with a toothpick.
Variations & Adaptations
One of the best things about this recipe is how easy it is to customize. Here are some variations I’ve tried and loved:
Chocolate Spiderweb Cookies
Replace ¼ cup of the all-purpose flour with unsweetened cocoa powder. The chocolate flavor pairs beautifully with the vanilla icing, and the dark cookies make the white spiderwebs pop even more. I made these for a Halloween party last year and they disappeared first.
Spooky Color Swaps
Instead of black on white, try orange icing with black webs, or purple icing with white webs. You can also use neon gel colors for a glow-in-the-dark effect under black lights—perfect for a Halloween dance party.
Gluten-Free Version
Substitute the all-purpose flour with a 1:1 gluten-free baking flour blend. I’ve tested this with King Arthur’s measure-for-measure blend and the texture was almost identical to the original. Add an extra tablespoon of milk to the dough if it seems too dry.
Extra Spooky Decorations
Add a small candy spider (like a gummy spider or a chocolate-covered raisin with pretzel legs) to the center of each web. Or sprinkle edible glitter over the wet icing for a magical, enchanted-forest vibe.
My personal favorite variation is adding a pinch of cinnamon and nutmeg to the dough for a subtle fall spice flavor. It’s not traditional, but it adds a warmth that feels perfect for October baking.
Serving & Storage Suggestions
These cookies are best served at room temperature. The icing sets up firm but still has a soft, melt-in-your-mouth texture when you bite into it. I like to arrange them on a platter with some witch finger breadsticks and mummy hot dog bites for a full Halloween spread.
For storage, place the cookies in an airtight container with parchment paper between the layers. They’ll stay fresh at room temperature for up to 5 days. Don’t refrigerate them—the cold air can make the icing sweat and become sticky.
You can also freeze the undecorated cookies for up to 3 months. Bake them, let them cool completely, then stack them in a freezer-safe container with parchment paper between layers. When you’re ready to decorate, thaw them at room temperature for about 30 minutes, then ice as directed. The frozen cookies taste just as fresh as the day you baked them.
If you want to make the dough ahead of time, you can refrigerate it for up to 3 days before rolling and baking. Just let it sit at room temperature for 5-10 minutes to soften slightly before rolling.
One thing I’ve noticed—these cookies actually taste even better the next day. The flavors meld together and the icing softens slightly, creating a texture that’s almost like a soft-baked bakery cookie. If you can resist eating them all on day one, you’re in for a treat on day two.
Nutritional Information & Benefits
Let’s be real—these are cookies, not health food. But here’s the estimated nutritional breakdown for one cookie (based on a 2.5-inch cookie with icing):
- Calories: 185
- Fat: 9g
- Saturated Fat: 5g
- Carbohydrates: 25g
- Sugar: 16g
- Protein: 2g
- Sodium: 95mg
While these aren’t something you’d eat every day, they do have a few redeeming qualities. The cream cheese adds a small amount of protein and calcium, and the butter provides vitamin A. Plus, there’s something to be said for the mental health benefits of baking and sharing treats with loved ones. Halloween only comes once a year, and a couple of cookies isn’t going to derail anyone’s healthy eating plan.
If you’re looking for a slightly lighter option, you can reduce the sugar in the dough to ¾ cup without affecting the texture too much. The icing will still be sweet, but the cookie itself will be less sugary.
For those with dietary restrictions, this recipe contains gluten, dairy, and eggs. The gluten-free and dairy-free substitutions I mentioned earlier work well, but I haven’t tested an egg-free version. If you try it, let me know in the comments!
Conclusion
These easy spiderweb Halloween sugar cookies have become a staple in my October baking rotation for good reason. They look impressive enough to serve at a party, but they’re simple enough to make with kids on a rainy weekend afternoon. The dough comes together in minutes, the decorating is genuinely fun, and the end result is a cookie that tastes as good as it looks.
I love that this recipe gives you room to play—you can keep it classic with black and white, or go wild with colors and extra decorations. Every batch I make turns out a little different, and that’s part of the charm. There’s something satisfying about pulling a toothpick through that black icing and watching a perfect spiderweb appear.
If you make these cookies, I’d love to hear how they turned out. Drop a comment below and let me know if you tried any variations, or tag me in your photos on social media. Happy Halloween, and happy baking!
Frequently Asked Questions
Can I use store-bought sugar cookie dough instead?
You can, but the texture won’t be quite the same. Store-bought dough tends to spread more and doesn’t hold the round shape as well. If you’re short on time, look for a refrigerated sugar cookie dough that specifically says “cut-out” on the package—those are formulated to hold their shape better.
Why did my spiderweb icing turn gray instead of black?
This usually happens when you use liquid food coloring instead of gel. Liquid coloring isn’t concentrated enough to achieve a true black, and it thins out your icing in the process. Stick with gel food coloring and add it gradually until you reach the desired darkness.
How far in advance can I make these cookies?
You can bake the cookies up to 3 days ahead and store them in an airtight container at room temperature. Decorate them the day you plan to serve them for the best appearance. If you need to make them further in advance, freeze the undecorated cookies for up to 3 months.
My cookies spread in the oven. What went wrong?
The most common culprit is dough that wasn’t chilled long enough. Make sure your dough chills for at least 20 minutes, and if your kitchen is warm, pop the cut cookies on the baking sheet into the fridge for 10 minutes before baking. Also, check that your butter wasn’t too soft when you started—it should be softened but still cool to the touch.
Can I use royal icing instead of this glaze icing?
Absolutely. Royal icing will give you a matte finish and a harder set, which works great if you’re stacking or shipping the cookies. Just use a standard royal icing recipe and thin it to a 10-second consistency for the base, then pipe the black circles and drag with a toothpick the same way.
Pin This Recipe!

Easy Spiderweb Halloween Sugar Cookies: Best Recipe

These easy spiderweb Halloween sugar cookies feature a soft, buttery dough with a subtle tang from cream cheese, topped with a glossy black-and-white spiderweb icing. The design looks impressive but requires only a toothpick and a steady hand.
- Prep Time: 20 minutes
- Cook Time: 10 minutes
- Total Time: 1 hour
- Yield: 24 servings 1x
- Category: Dessert
- Cuisine: American
Ingredients
- 1 cup (226g) unsalted butter, softened
- 2 oz (56g) cream cheese, softened
- 1 cup (200g) granulated sugar
- 1 large egg, room temperature
- 1 teaspoon vanilla extract
- 2 ½ cups (312g) all-purpose flour
- 1 teaspoon baking powder
- ½ teaspoon salt
- 2 cups (240g) powdered sugar
- 2–3 tablespoons milk
- ½ teaspoon vanilla extract
- Black gel food coloring
Instructions
- In a large mixing bowl, beat the softened butter and cream cheese together until smooth and creamy, about 2 minutes on medium speed. Add the granulated sugar and beat for another 2 minutes until light and fluffy. Scrape down the sides of the bowl.
- Add the egg and vanilla extract, then beat on low until just combined. The mixture may look slightly curdled.
- In a separate bowl, whisk together the flour, baking powder, and salt. Gradually add the dry ingredients to the wet mixture, mixing on low speed until a soft dough forms. Do not overmix.
- Turn the dough out onto plastic wrap, flatten into a 1-inch thick disk, wrap tightly, and refrigerate for at least 20 minutes.
- Preheat oven to 350°F (175°C) and line baking sheets with parchment paper.
- Lightly flour a work surface and rolling pin. Roll the chilled dough to about ¼-inch thickness. Cut out rounds with a 2.5 to 3-inch cookie cutter. Gather scraps, press together, and reroll once.
- Place cookies on prepared baking sheets, spacing about 2 inches apart. Bake for 8-10 minutes, until edges are just barely golden. Centers should look slightly underdone.
- Let cookies cool on the baking sheet for 5 minutes, then transfer to a cooling rack to cool completely.
- In a medium bowl, whisk together powdered sugar, 2 tablespoons milk, and ½ teaspoon vanilla extract until thick but spreadable (honey consistency). Add more milk if needed.
- Scoop out about ¼ cup of white icing and set aside. Add black gel food coloring to the remaining icing, starting with a small amount and adding more until desired shade is reached (about 1 teaspoon). Transfer black icing to a piping bag or small zip-top bag with a tiny corner snipped off.
- Using an offset spatula or butter knife, spread a thin, even layer of white icing over each cooled cookie. Work quickly so the icing stays wet.
- While the white icing is still wet, pipe 3-4 concentric circles of black icing onto the cookie, starting from the center and working outward, leaving about ½ inch between circles.
- Take a toothpick and drag it from the center of the cookie outward through all the black circles. Wipe the toothpick clean, then drag from the edge inward toward the center. Repeat around the cookie, spacing drags about 1 inch apart.
- Let decorated cookies sit at room temperature for about 30 minutes to allow the icing to set completely.
Notes
Chill the dough for at least 20 minutes to prevent spreading. Use gel food coloring for deep black color. Work in small batches (2-3 cookies at a time) to keep the white icing wet for the web pattern. Keep icing covered with a damp paper towel to prevent skinning. Cookies stay fresh in an airtight container at room temperature for up to 5 days. Undecorated cookies can be frozen for up to 3 months.
Nutrition
- Serving Size: 1 cookie
- Calories: 185
- Sugar: 16
- Sodium: 95
- Fat: 9
- Saturated Fat: 5
- Carbohydrates: 25
- Protein: 2
Keywords: Halloween cookies, spiderweb cookies, sugar cookies, easy Halloween treats, decorated cookies


