Love this? Save it for later!
Share the inspiration with your friends
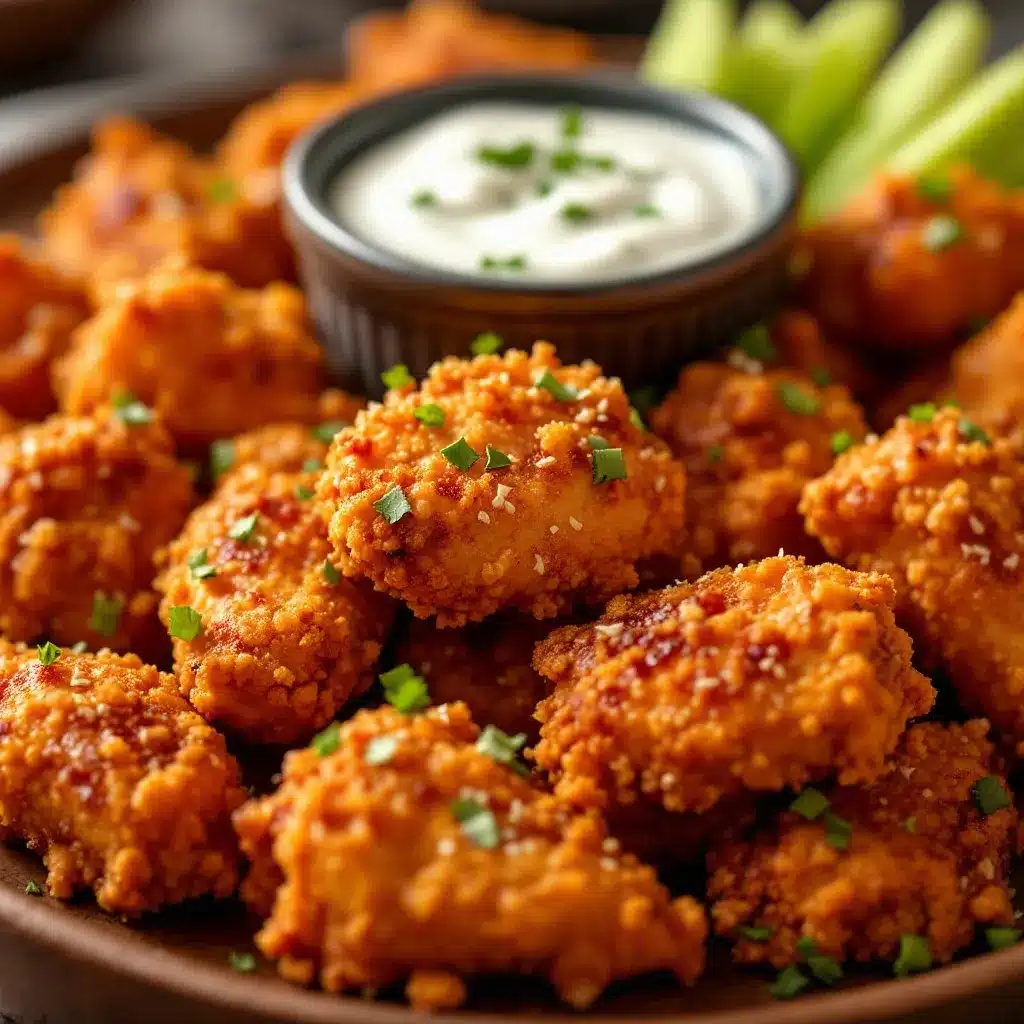
I set the tray down on the coffee table, and for a solid ten seconds, nobody said a word. Then my brother-in-law reached for a third wing bite without even looking up from the game. That was the moment I knew I had finally cracked the code on baked wings that actually taste fried.
For years, I chased that perfect crunch through trial and error. Baking powder experiments that left a weird aftertaste. High-heat attempts that set off the smoke alarm (twice). Wings that came out steamed instead of crispy, with sad, rubbery skin that made me want to apologize to everyone at the table. Honestly, I almost gave up on the whole idea of baked chicken wings altogether.
Then one random Tuesday—not a game day, not a party, just a regular weeknight when I needed something good—I threw together this method almost on a whim. The baking soda trick, the low-then-high oven dance, the little wire rack situation. And when I bit into that first wing bite, I actually laughed. It was that good. The skin shattered. The meat stayed juicy. And the ranch dip? I made it on autopilot, but it turned out to be the kind of thing you want to eat with a spoon.
These crispy baked chicken wing bites have become my go-to for everything now. Game days, lazy Sundays, even just a snack when I want something that feels like a treat without deep frying. They come together in about 45 minutes, and the ingredients are stuff you probably already have in your kitchen. No fancy equipment, no weird science—just good technique and a little patience.
So if you have been burned by soggy baked wings before (literally or emotionally), I promise this method is different. Let me show you how it is done.
Why You’ll Love This Recipe
I have tested this recipe more times than I care to count, and every single batch has confirmed what I suspected that first Tuesday night. These are not just good for baked wings. They are just good wings, period.
- Seriously Crispy Without Frying : The combination of a secret drying technique and a two-temperature oven method gives you skin that shatters when you bite into it. No deep fryer required, no greasy mess to clean up.
- Simple Pantry Ingredients : Chicken wings, baking powder, salt, pepper, and a few spices. That is it. You probably have everything right now except maybe the wings themselves.
- Perfect for Game Day or Any Day : These wing bites disappear fast at parties, but they are also perfect for a cozy night in. I have made them for football dip bites gatherings and quiet weeknight dinners alike.
- Customizable Heat Level : The base recipe is mild enough for kids, but you can crank up the spice however you like. I will show you how.
- Homemade Ranch Dip That Steals the Show : This is not that stuff from a packet. It is fresh, herby, tangy, and takes about two minutes to whisk together.
What makes these different from every other baked wing recipe? It is the little things. The way you pat the wings dry and let them air-chill for a bit. The precise amount of baking powder (too much leaves a bitter taste). The wire rack that lets hot air circulate all around each piece so every inch gets crispy, not just the top. I have made all the mistakes so you do not have to.
This is the recipe I send to friends when they text me asking for something that will impress without stress. It is the one I make when I want to feel like I am eating something indulgent but actually cooked it in my own oven with ingredients I feel good about. And honestly? It is just really, really delicious.
What Ingredients You Will Need
This recipe uses simple, wholesome ingredients to deliver big crunch and even bigger flavor. No weird stuff, no long trips to specialty stores. Just good ingredients that work together beautifully.
For the Crispy Baked Chicken Wing Bites
- 2 pounds chicken wingettes or drumettes (about 20-24 pieces) — I prefer buying party wings that are already separated into flats and drumettes. Saves a lot of knife work. If you buy whole wings, just cut through the joint with a sharp knife and discard the tips.
- 1 ½ teaspoons baking powder (NOT baking soda!) — This is the secret to crispy skin. It raises the pH of the skin, helping it brown and crisp up in the oven. I use aluminum-free baking powder to avoid any metallic aftertaste.
- 1 teaspoon kosher salt — Diamond Crystal is my go-to for its clean flavor and easy pinchability. If you use table salt, cut the amount by about half.
- ½ teaspoon black pepper — Freshly ground if you can, but pre-ground works fine in a pinch.
- 1 teaspoon garlic powder — Adds savory depth without burning like fresh garlic would at high heat.
- 1 teaspoon onion powder — Rounds out the savory profile nicely.
- ½ teaspoon paprika (smoked or sweet) — Smoked paprika adds a subtle campfire note that pairs beautifully with the ranch dip. Regular sweet paprika works great too.
- Optional: ¼ teaspoon cayenne pepper — For heat lovers. I sometimes add this, sometimes skip it depending on my mood. The ranch dip cools things down nicely if you go spicy.
For the Easy Homemade Ranch Dip
- ½ cup sour cream — Full-fat gives the best texture and flavor. Greek yogurt works as a lighter substitute but will be tangier.
- ¼ cup mayonnaise — Use a good quality one. Hellmann’s or Duke’s are my favorites. Do not use Miracle Whip—it is too sweet and tangy for this.
- ¼ cup buttermilk — This thins the dip to the perfect consistency. If you do not have buttermilk, stir 1 teaspoon lemon juice into ¼ cup regular milk and let it sit for 5 minutes.
- 1 tablespoon fresh lemon juice — Adds brightness that cuts through the richness of the wings.
- 1 teaspoon dried dill weed — The signature herb in ranch dressing. Fresh dill works too—use 1 tablespoon, finely chopped.
- 1 teaspoon dried parsley — Or 1 tablespoon fresh, chopped.
- ½ teaspoon garlic powder
- ½ teaspoon onion powder
- ¼ teaspoon kosher salt
- ⅛ teaspoon black pepper
For the ranch dip, I recommend making it at least 30 minutes ahead of time if you can. The flavors meld together and get even better. Overnight is ideal, but even 15 minutes makes a difference.
Equipment Needed
You do not need much for this recipe, which is part of why I love it. Here is what you will need:
- Large rimmed baking sheet — A half-sheet pan (18×13 inches) is perfect. The rim catches any drips, but the open surface lets air circulate.
- Wire cooling rack — This is the most important piece of equipment. It fits inside your baking sheet and lifts the wings up so hot air can crisp them all around. A standard oven-safe cooling rack works perfectly. If you do not have one, you can use a broiler pan, but the wings will not get quite as crispy on the bottom.
- Paper towels — Lots of them. Drying the wings thoroughly is non-negotiable for crispy skin.
- Large mixing bowl — For tossing the wings with the seasoning mixture.
- Small bowl or jar — For whisking together the ranch dip.
- Tongs — For flipping the wings halfway through baking.
- Instant-read thermometer (optional but recommended) — Chicken wings are done at 165°F, but I find they are best around 175-180°F, which allows the connective tissue to break down a bit more.
I bought my wire cooling rack for about eight dollars at a kitchen supply store, and it has paid for itself a hundred times over. If you bake chicken often, it is worth the tiny investment. You can also use it for cooling cookies, roasting vegetables, and even crisping up leftover pizza.
Preparation Method
Let me walk you through this step by step. I promise it is easier than it sounds, and the results are absolutely worth the tiny bit of extra effort.
- Preheat your oven to 250°F. I know, that seems low. Trust me on this. We are going to start low and slow, then crank up the heat at the end. Position your oven rack in the center of the oven.
- Line your baking sheet with foil (optional but makes cleanup way easier). Place the wire rack on top of the baking sheet. Spray the rack lightly with nonstick cooking spray so the wings do not stick.
- Pat the chicken wings completely dry. This is the most important step. Take each piece and press it firmly with paper towels until no moisture remains. Do not skip this. Do not rush it. Wet skin = steamed skin = sad, flabby wings. I usually go through about 8-10 paper towels for 2 pounds of wings.
- In a large bowl, whisk together the baking powder, salt, pepper, garlic powder, onion powder, paprika, and cayenne if using. Make sure there are no clumps—baking powder loves to hide in little lumps.
- Add the dried wings to the bowl and toss thoroughly with your hands until every piece is evenly coated. The mixture should look like a light dusting, not a thick paste. If it looks wet or clumpy, your wings were not dry enough.
- Arrange the wings in a single layer on the wire rack, leaving a little space between each piece. Crowding them will trap steam and prevent crisping. If they are touching, they will not get crispy where they touch.
- Bake at 250°F for 30 minutes. This low temperature renders out the fat under the skin and dries the surface out even more. You will see little beads of fat forming on the skin—that is exactly what we want. Do not open the oven door during this time.
- After 30 minutes, remove the baking sheet from the oven. Increase the oven temperature to 425°F. Let the oven come to temperature fully before the next step—this takes about 10 minutes.
- Using tongs, flip each wing over. This ensures even crisping on both sides. Do not skip this—the bottoms will be less crispy if you do not flip them.
- Return the baking sheet to the oven and bake at 425°F for 20-25 minutes, until the wings are deep golden brown and the skin is crackling-crisp. Check them at 20 minutes—ovens vary, and you do not want to overdo them.
- While the wings bake, make the ranch dip. In a small bowl, whisk together the sour cream, mayonnaise, buttermilk, lemon juice, dill, parsley, garlic powder, onion powder, salt, and pepper. Taste and adjust seasoning—I usually add a pinch more dill and another squeeze of lemon. Cover and refrigerate until ready to serve.
- Remove the wings from the oven and let them rest on the rack for 5 minutes. This lets the skin set up even more. Do not skip the rest—they will be noticeably crispier after a few minutes off the heat.
- Transfer to a serving platter and serve immediately with the ranch dip alongside. Garnish with fresh chives or parsley if you are feeling fancy, but honestly, they are perfect just as they are.
A few notes from my many batches: If you want extra heat, toss the baked wings in buffalo sauce (melted butter + hot sauce) before serving. Just know that will soften the skin a bit—trade-off between sauciness and crunch. For the crispiest results, serve the wings plain with the dip on the side.
Also, if you are making a larger batch, work in batches. Do not overcrowd the rack. Two pounds is the sweet spot for a standard half-sheet pan. If you need more, use two pans and swap their positions halfway through the high-heat stage.
Cooking Tips & Techniques
I have made these wings at least two dozen times, and I have learned a few things the hard way. Here are the tips that make the biggest difference.
The drying step is everything. I cannot stress this enough. Moisture is the enemy of crispy skin. I have started drying the wings, then letting them sit uncovered in the fridge for an hour before coating them. If you have the time, this extra step takes the crispiness from great to absolutely ridiculous. The fridge air dries the surface even more, and the cold temperature helps the fat render more slowly during the initial low-heat bake.
Baking powder, not baking soda. This is a common mistake. Baking soda is much more alkaline and will leave a bitter, soapy taste on your wings. Baking powder is the right choice. And make sure it is fresh—baking powder loses its potency over time. If it is more than six months old, buy a new can.
Do not skip the low-temperature stage. I tried skipping it once when I was in a hurry. I just cranked the oven to 425°F and baked the wings for 35 minutes. They were okay, but not great. The skin was crispy in some spots and chewy in others. The low-and-slow method renders the fat gradually, which gives you that all-over even crispiness. It adds 30 minutes, but the result is noticeably better.
Let the wings come to room temperature. If your wings are straight from the fridge, the initial 250°F bake will take longer to render the fat. Let them sit on the counter for 15-20 minutes after coating before they go in the oven. This is not a safety issue—chicken wings are small enough that they will come to temp quickly.
Use a thermometer for the oil if you are frying. This recipe is for baking, but if you ever adapt it for deep frying (which I have done for parties), keep the oil at exactly 350°F. Too low and the wings absorb oil and get greasy. Too high and they burn before the inside cooks. For baked wings, the oven thermometer is your friend—make sure your oven is actually reaching the temperatures you set.
One mistake I made early on: I used too much baking powder because I thought more would mean more crispiness. It did not. The wings had a weird, chalky coating that tasted awful. Stick to the measurements in the recipe. More is not better here.
If you are making these for a party, you can bake them a few hours ahead and reheat them in a 400°F oven for 5-7 minutes right before serving. They crisp right back up. Do not microwave them—please. That will ruin all your hard work.
Variations & Adaptations
One of the best things about this recipe is how easy it is to change up. Here are some of my favorite variations.
Buffalo Style: After baking, toss the hot wings in a mixture of ⅓ cup melted butter and ⅓ cup hot sauce (Frank’s RedHot is classic). This will soften the skin a bit, but the flavor is worth it. Serve with blue cheese dressing instead of ranch if you are a purist. I have made these for football chili gatherings and they disappear fast.
Honey Garlic Glaze: Whisk together ¼ cup honey, 2 tablespoons soy sauce, 2 cloves minced garlic, and a pinch of red pepper flakes. Brush onto the wings during the last 5 minutes of baking. The sugar in the honey caramelizes beautifully, but watch closely so it does not burn.
Lemon Pepper: Skip the garlic and onion powder. Add 1 tablespoon lemon zest and 1 teaspoon extra black pepper to the seasoning mixture. Squeeze fresh lemon juice over the baked wings before serving. This is my wife’s favorite version—light, bright, and incredibly addictive.
Dry Rub Variations: The base seasoning is very flexible. Try adding cumin and chili powder for a Southwest vibe, or curry powder and a pinch of cinnamon for something completely different. I once made a batch with za’atar and sumac that was incredible with a yogurt-based dip.
Air Fryer Adaptation: If you have an air fryer, you can use the same seasoning method. Cook at 380°F for about 20 minutes, flipping halfway through. The air fryer gets even crispier results than the oven, but you will need to work in batches depending on the size of your basket.
Gluten-Free: This recipe is naturally gluten-free as written. Just double-check your baking powder—some brands use wheat starch as an anti-caking agent. Most are gluten-free, but it is worth checking the label if you are serving someone with celiac disease.
Dairy-Free Ranch Dip: Use dairy-free sour cream and mayonnaise. For the buttermilk, use unsweetened almond or oat milk mixed with 1 teaspoon lemon juice. The flavor will be slightly different but still delicious.
I have tried all of these variations at one point or another, and honestly, I have never had a bad batch. The base technique is so solid that you can play around with flavors without worrying about ruining the texture.
Serving & Storage Suggestions
These wings are best served hot and fresh, right after that final high-heat bake. The skin is at its peak crispiness within the first 15 minutes off the rack. But I have plenty of tips for making them work for your schedule.
Serving: Arrange the wings on a large platter with the ranch dip in a small bowl in the center. Garnish with fresh chives, parsley, or a sprinkle of flaky sea salt. Celery and carrot sticks on the side are classic for a reason—the cool crunch contrasts beautifully with the hot, crispy wings. If you are serving these as part of a bigger spread, they pair wonderfully with loaded nacho bar or a big basket of grilled corn elote skewers.
Temperature: Serve the wings hot, but the ranch dip should be cold. I like to set the dip bowl on a small bed of ice if it is going to sit out for a while at a party. The contrast between hot wings and cold dip is part of the magic.
Storage: Leftover wings (if you have any) should be cooled completely, then stored in an airtight container in the refrigerator for up to 4 days. Do not stack them too high or the bottom ones will get squished and lose their crunch.
Reheating: This is the critical part. Do not use the microwave. It will turn your beautiful crispy wings into sad, rubbery things. Instead, reheat them in a 400°F oven for 5-7 minutes, spread out on a wire rack over a baking sheet. They will crisp right back up. An air fryer at 380°F for 3-4 minutes works even better if you have one.
Freezing: You can freeze baked wings for up to 3 months. Cool them completely, then arrange in a single layer on a baking sheet and freeze until solid (about 2 hours). Transfer to a freezer bag or container. To reheat, bake from frozen at 400°F for 12-15 minutes. They will not be quite as crispy as fresh, but they are still really good.
Make-Ahead Tip: You can prep the wings up to 24 hours ahead. Dry them, coat them with the seasoning, and arrange them on the wire rack over the baking sheet. Cover loosely with plastic wrap and refrigerate. The extra drying time in the fridge actually makes them even crispier. Just add about 5 minutes to the initial 250°F bake since they will be starting cold.
The ranch dip keeps in the fridge for up to a week in an airtight container. The flavors actually get better after a day or two. I usually make a double batch because it is also great on salads, as a veggie dip, or slathered on a sandwich.
Nutritional Information & Benefits
I am not a nutritionist, but I have done my homework on this recipe because I make it so often. Here is the breakdown per serving (about 6-7 wing bites with 2 tablespoons of ranch dip):
- Calories: Approximately 420-450
- Protein: 32g — Chicken wings are a solid source of lean protein, especially if you remove the skin (but why would you do that?).
- Fat: 28g — About half of this comes from the skin, which renders out significantly during baking. The ranch dip adds some fat from the sour cream and mayo, but you can lighten it up with Greek yogurt and light mayo if you prefer.
- Carbohydrates: 6g — Mostly from the buttermilk and seasonings. This recipe is naturally low-carb and keto-friendly.
- Sodium: 680mg — The baking powder and salt add sodium. You can reduce the salt slightly if you are watching your intake, but do not cut it completely—salt is essential for flavor and texture.
Health Benefits: Chicken wings are a good source of B vitamins, particularly B6 and B12, which support energy metabolism and brain function. They also provide selenium, an antioxidant that supports thyroid health. The homemade ranch dip uses real ingredients without the preservatives and stabilizers found in bottled dressings. Fresh herbs like dill and parsley add antioxidants and vitamins A and C.
Dietary Considerations: This recipe is naturally gluten-free, low-carb, and keto-friendly. For dairy-free, use the substitutions I mentioned in the variations section. For lower fat, you can remove the skin before eating (though you will lose the crispy texture that makes these so good).
I personally love that this recipe lets me enjoy something that feels indulgent without actually deep frying. The oven does all the work, and I get to eat wings that taste like they came from a bar but are made with ingredients I control. That matters to me, especially when I am feeding my family.
Conclusion
These crispy baked chicken wing bites have become a staple in my kitchen for good reason. They deliver everything you want from chicken wings—that satisfying crunch, the juicy meat, the endless flavor possibilities—without the hassle and mess of deep frying. The homemade ranch dip is the perfect finishing touch, creamy and herby and just tangy enough to cut through the richness.
What I love most about this recipe is how forgiving it is. Once you understand the basic technique—dry the wings well, use the right amount of baking powder, start low then go high—you can experiment with any flavor profile you like. I have made these for Super Bowl parties, casual dinners, and even just a snack for myself on a quiet Saturday afternoon. They never disappoint.
I would love to hear how yours turn out. Did you try a different seasoning blend? Did the ranch dip win over your family? Drop a comment below and let me know. And if you have a favorite wing variation I have not tried, please share it. I am always looking for new ideas to test in my kitchen.
Go ahead and preheat that oven. Your new favorite wing recipe is waiting.
Frequently Asked Questions
Can I use frozen chicken wings for this recipe?
Yes, but you need to thaw them completely first and pat them very dry. Frozen wings release a lot of moisture as they thaw, so give them extra time with paper towels. I recommend thawing them in the refrigerator overnight, then drying thoroughly before coating.
Why are my baked wings not crispy?
Most likely one of three things: they were not dried well enough before coating, you used too much or too little baking powder, or the oven temperature was not high enough. Make sure your wings are bone-dry, measure the baking powder precisely, and do not skip the high-heat finish at 425°F.
Can I make this recipe in an air fryer?
Absolutely. Follow the same drying and seasoning steps, then cook at 380°F for about 20 minutes, shaking the basket halfway through. You may need to work in batches depending on your air fryer size. The air fryer version is actually even crispier than the oven version.
How do I make the ranch dip thicker or thinner?
For a thicker dip, use less buttermilk or add an extra tablespoon of sour cream. For a thinner consistency (great for drizzling over salads), add more buttermilk a teaspoon at a time until it reaches your desired consistency.
Can I use chicken breast instead of wings?
You can, but the texture will be different. Cut boneless skinless chicken breasts into bite-sized pieces and follow the same coating and baking method. Reduce the high-heat baking time to 15-18 minutes since the pieces are smaller. They will be crispy on the outside but will not have the same juicy, fatty richness as wings.
Pin This Recipe!

Crispy Baked Chicken Wing Bites with Easy Ranch Dip

These crispy baked chicken wing bites deliver a shatteringly crunchy skin without deep frying, thanks to a secret drying technique and two-temperature oven method. Paired with a fresh, herby homemade ranch dip, they are perfect for game days, parties, or any night you crave indulgent, juicy wings.
- Prep Time: 15 minutes
- Cook Time: 50 minutes
- Total Time: 1 hour 5 minutes
- Yield: 4 servings 1x
- Category: Appetizer
- Cuisine: American
Ingredients
- 2 pounds chicken wingettes or drumettes (about 20–24 pieces)
- 1 ½ teaspoons baking powder (NOT baking soda)
- 1 teaspoon kosher salt
- ½ teaspoon black pepper
- 1 teaspoon garlic powder
- 1 teaspoon onion powder
- ½ teaspoon paprika (smoked or sweet)
- Optional: ¼ teaspoon cayenne pepper
- ½ cup sour cream
- ¼ cup mayonnaise
- ¼ cup buttermilk
- 1 tablespoon fresh lemon juice
- 1 teaspoon dried dill weed
- 1 teaspoon dried parsley
- ½ teaspoon garlic powder
- ½ teaspoon onion powder
- ¼ teaspoon kosher salt
- ⅛ teaspoon black pepper
Instructions
- Preheat your oven to 250°F. Position the oven rack in the center.
- Line a large rimmed baking sheet with foil (optional) and place a wire cooling rack on top. Spray the rack lightly with nonstick cooking spray.
- Pat the chicken wings completely dry with paper towels, pressing firmly until no moisture remains.
- In a large bowl, whisk together the baking powder, salt, pepper, garlic powder, onion powder, paprika, and cayenne (if using) until no clumps remain.
- Add the dried wings to the bowl and toss thoroughly with your hands until every piece is evenly coated.
- Arrange the wings in a single layer on the wire rack, leaving a little space between each piece.
- Bake at 250°F for 30 minutes. Do not open the oven door during this time.
- After 30 minutes, remove the baking sheet from the oven. Increase the oven temperature to 425°F and let it come to temperature fully (about 10 minutes).
- Using tongs, flip each wing over.
- Return the baking sheet to the oven and bake at 425°F for 20-25 minutes, until the wings are deep golden brown and the skin is crackling-crisp.
- While the wings bake, make the ranch dip: In a small bowl, whisk together the sour cream, mayonnaise, buttermilk, lemon juice, dill, parsley, garlic powder, onion powder, salt, and pepper. Taste and adjust seasoning. Cover and refrigerate until ready to serve.
- Remove the wings from the oven and let them rest on the rack for 5 minutes.
- Transfer to a serving platter and serve immediately with the ranch dip alongside.
Notes
For extra heat, toss baked wings in buffalo sauce (melted butter + hot sauce) before serving, but note this will soften the skin. For the crispiest results, serve wings plain with dip on the side. If making a larger batch, work in batches to avoid overcrowding. Wings can be baked a few hours ahead and reheated in a 400°F oven for 5-7 minutes. Do not microwave.
Nutrition
- Serving Size: 6-7 wing bites with
- Calories: 420450
- Sugar: 2
- Sodium: 680
- Fat: 28
- Saturated Fat: 8
- Carbohydrates: 6
- Protein: 32
Keywords: crispy baked chicken wings, baked chicken wing bites, homemade ranch dip, game day appetizer, crispy wings without frying, easy chicken wings recipe


