Love this? Save it for later!
Share the inspiration with your friends
The October wind was rattling the back door, and I had three pork chops thawing on the counter with absolutely no plan. My husband had texted that he was bringing a friend from work home—in about forty-five minutes. The fridge held half a carton of apple cider from a weekend trip to the orchard, a sad-looking onion, and some thyme that was starting to wilt. Not exactly dinner-party material.
I stood there, hands on my hips, staring at that cider. Pork and apples go together, obviously. But roasting felt too dry for a last-minute panic meal, and grilling was out because, well, it was freezing outside. Then it hit me—why not braise them? In one pan. With that cider. I mean, braising is basically the lazy cook’s secret weapon. You throw stuff in a pan, let it bubble away, and somehow it comes out tasting like you fussed for hours.
So I grabbed my heaviest skillet, seared those chops until they were golden, and deglazed the pan with a generous glug of cider. The smell that filled the kitchen was ridiculous—sweet and savory, with that warm apple scent wrapping around everything. I added a splash of broth, some garlic, and let it all simmer while I threw together a quick side. By the time the doorbell rang, the apartment smelled like a cozy farmhouse kitchen, and I was actually excited to serve what I’d thrown together in a panic.
That night, his friend asked for the recipe before he even finished his plate. I just laughed and said, “It’s an accident, really.” But honestly? Best accident I’ve ever made. These Easy Apple Cider Braised Pork Chops are now my go-to for those nights when I need to look like I have my life together—without actually having to try that hard.
Why You’ll Love This Recipe
Let me tell you why these pork chops are going to become a regular in your dinner rotation. I’ve tested this recipe at least a dozen times (my neighbors have benefited greatly), and every single time, it delivers.
- One-Pan Wonder : Everything happens in a single skillet. Less cleanup, more time for actually enjoying your evening. This is the kind of meal that makes weeknight cooking feel manageable.
- Incredibly Tender : Braising is magic for pork chops. The low, slow simmer in apple cider breaks down the meat until it’s fork-tender but not falling apart. No more dry, rubbery pork chops that taste like disappointment.
- Simple Ingredients : You probably have most of these already. Pork chops, apple cider, onion, garlic, broth, and a few pantry spices. No fancy grocery trips required.
- Perfect for Fall : But honestly? I make these year-round. The apple cider flavor is cozy enough for autumn but light enough for spring. It’s versatile like that.
- Crowd-Pleaser : I’ve served these to picky eaters, fancy dinner guests, and my mom (who is brutally honest about food). Everyone loves them. The sauce alone is worth the price of admission.
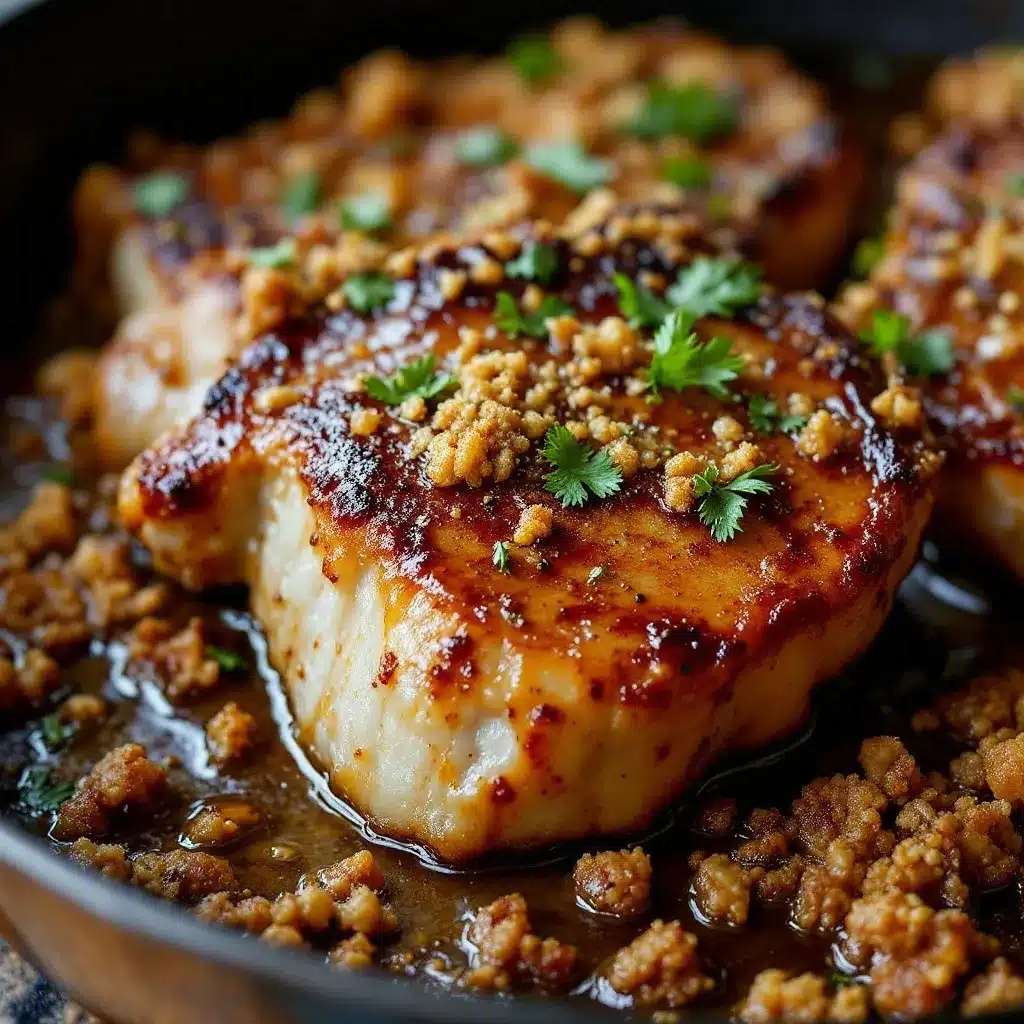
- Looks Impressive : The rich, golden-brown sauce with those tender chops looks like something from a restaurant menu. Your family will think you spent hours. You didn’t. That’s our little secret.
What makes this recipe different from all the other pork chop recipes out there? It’s the balance. The apple cider isn’t too sweet because we reduce it down with savory elements like garlic, thyme, and a touch of Dijon mustard. The pork stays juicy because we sear it first, then let it bathe in that flavorful liquid. It’s comfort food that feels special but requires minimal effort. Honestly, this is the kind of meal that makes you close your eyes after the first bite and just… sigh.
What Ingredients You Will Need
This recipe uses simple, wholesome ingredients that come together to create something truly special. Most of these are pantry staples, and the few that aren’t are easy to find at any grocery store.
- Pork chops (4 pieces, about 1 inch thick) — Bone-in or boneless both work, but I prefer bone-in for extra flavor and moisture. Look for chops with good marbling. If they’re too lean, they can dry out more easily. (I’ve learned this the hard way, trust me.)
- Apple cider (2 cups) — Not apple juice! Apple cider has a richer, more complex flavor that’s less sweet and more authentic. Fresh-pressed is best, but store-bought works perfectly. I like using local cider when I can find it.
- Chicken broth (½ cup) — Low-sodium is best so you can control the salt. If you only have regular, just adjust your seasoning accordingly. Vegetable broth works too if that’s what you have.
- Yellow onion (1 large, thinly sliced) — The onion melts into the sauce as it cooks, adding sweetness and depth. You could use a sweet onion like Vidalia if you want even more sweetness.
- Garlic (4 cloves, minced) — Fresh garlic is non-negotiable here. The pre-minced stuff in a jar just doesn’t have the same punch. Trust me on this one.
- Dijon mustard (2 tablespoons) — This adds a subtle tang that cuts through the sweetness of the cider. Don’t skip it! It’s the secret ingredient that makes the sauce so balanced.
- Fresh thyme (4-5 sprigs) — Thyme and apples are a classic pairing. If you only have dried, use 1 teaspoon. But fresh really makes a difference here.
- Butter (2 tablespoons) — Unsalted, for finishing the sauce. It adds richness and a silky texture that makes the sauce absolutely irresistible.
- Olive oil (2 tablespoons) — For searing the pork. Use a good quality oil with a high smoke point.
- Salt and black pepper (to taste) — Don’t be shy with the salt. It seasons the meat and helps build flavor in the sauce.
- Optional garnish — Fresh parsley, chopped, or a few extra thyme leaves for color. It makes the dish look beautiful for serving.
For the best results, I recommend using pork chops that are at least 1 inch thick. Thinner chops can work, but you’ll need to reduce the braising time significantly. Also, if you can find apple cider that’s unfiltered and unpasteurized, the flavor is incredible. I get mine from a local orchard in the fall and freeze it in smaller portions so I can make this recipe all year round.
Equipment Needed
You don’t need a lot of fancy equipment for this recipe, which is part of why I love it so much.
- Large, heavy-bottomed skillet or Dutch oven — A 12-inch skillet with a lid is ideal. Cast iron is my favorite because it holds heat beautifully and gives you that perfect sear. But any heavy pan will work. I’ve used my trusty enameled Dutch oven many times too.
- Tongs — For flipping the pork chops without piercing them. Piercing releases juices, and we want to keep all that moisture inside.
- Cutting board and sharp knife — For slicing the onion and mincing the garlic. A good chef’s knife makes prep so much faster.
- Measuring cups and spoons — For the cider, broth, and mustard. Nothing fancy needed.
- Wooden spoon or spatula — For stirring the sauce and scraping up the browned bits from the bottom of the pan. Those bits are pure flavor gold.
- Small bowl — For whisking together the mustard and a bit of the hot liquid before adding it to the pan. This prevents the mustard from clumping.
If you don’t have a lid for your skillet, you can use a piece of aluminum foil tightly sealed around the edges. It works in a pinch! And if you’re using a non-stick pan, just be careful not to use metal utensils that could scratch the surface.
Preparation Method
- Pat the pork chops dry — Use paper towels to remove any moisture from the surface of the pork. This is crucial for getting a good sear. Wet meat won’t brown properly, and browning equals flavor. Season both sides generously with salt and pepper. Let them sit at room temperature for about 15 minutes while you prep the other ingredients.
- Heat the oil — Place your skillet over medium-high heat and add the olive oil. Let it get hot until it shimmers. You want it hot enough that the pork sizzles immediately when it hits the pan.
- Sear the pork chops — Carefully place the pork chops in the hot skillet. Don’t overcrowd the pan—work in batches if needed. Cook for 3-4 minutes per side, until deeply golden brown. Don’t move them around! Let them develop that beautiful crust. Transfer the seared chops to a plate and set aside.
- Cook the onions — Reduce the heat to medium. Add the sliced onions to the pan (there should be enough oil remaining). Cook for 4-5 minutes, stirring occasionally, until the onions are soft and starting to brown around the edges. The browned bits on the bottom of the pan are going to flavor the sauce beautifully.
- Add the garlic — Stir in the minced garlic and cook for 30 seconds until fragrant. Don’t let it burn or it will become bitter.
- Deglaze the pan — Pour in the apple cider and chicken broth. Use your wooden spoon to scrape up all those browned bits from the bottom of the pan. This is called deglazing, and it’s where all the flavor lives.
- Add the mustard and thyme — Whisk the Dijon mustard into the liquid until it’s fully incorporated. Add the fresh thyme sprigs. Bring the liquid to a gentle simmer.
- Return the pork chops — Nestle the seared pork chops back into the skillet, along with any juices that have accumulated on the plate. The liquid should come about halfway up the sides of the chops. If it doesn’t, add a bit more broth or cider.
- Cover and braise — Reduce the heat to low, cover the skillet with a lid, and let it simmer gently for 25-30 minutes. The liquid should be at a gentle bubble, not a rolling boil. Check halfway through and give the chops a gentle turn.
- Remove the pork — After 25-30 minutes, the pork should be tender and cooked through. Use tongs to transfer the chops to a clean plate and tent loosely with foil to keep warm.
- Finish the sauce — Turn the heat up to medium-high and let the sauce simmer, uncovered, for 5-7 minutes until it has reduced and thickened slightly. Stir in the butter until it melts and the sauce becomes glossy. Taste and adjust seasoning with salt and pepper. Remove the thyme sprigs.
- Serve — Spoon the sauce and onions over the pork chops. Garnish with fresh parsley or extra thyme if desired. Serve immediately while hot.
A few things to watch for during cooking: If the sauce seems too thin after braising, let it reduce a bit longer. If it’s too thick, add a splash of broth. The pork should be fork-tender but still hold its shape. If it’s falling apart, it might have cooked a touch too long, but honestly, it’s still delicious.
Cooking Tips & Techniques
After making these pork chops more times than I can count, I’ve picked up a few tricks that make a real difference.
Don’t skip the sear. I know it’s tempting to just throw everything in the pan and let it cook, but that golden-brown crust is where so much flavor comes from. Plus, the browned bits left behind create the foundation for your sauce. I once tried to save time by skipping this step, and the result was noticeably less delicious. Never again.
Use a thermometer if you’re nervous. Pork should reach an internal temperature of 145°F. If you’re unsure, an instant-read thermometer takes the guesswork out. Insert it into the thickest part of the chop without touching the bone. I’ve overcooked more pork chops than I’d like to admit before I started using one.
Let the pork rest. After braising, let the chops rest for about 5 minutes before serving. This allows the juices to redistribute throughout the meat. If you cut into them too soon, all those delicious juices will run out onto the plate instead of staying in the meat.
Make the sauce ahead. You can prepare the sauce (without the pork) a day in advance and refrigerate it. When you’re ready to cook, just reheat the sauce, sear the pork, and proceed with the braising. This makes weeknight dinners even faster.
Watch your heat. Braising is a gentle cooking method. If your heat is too high, the liquid will evaporate too quickly and the pork might not cook through properly. Keep it at a low simmer, and check the liquid level halfway through cooking.
Double the sauce. I always make extra sauce because it’s that good. Serve it over mashed potatoes, rice, or crusty bread to soak up every last drop. You can also use it as a base for a quick gravy later in the week.
Variations & Adaptations
One of the best things about this recipe is how flexible it is. Here are some ways to make it your own.
Dietary Variations:
- Gluten-Free : This recipe is naturally gluten-free! Just make sure your chicken broth is certified gluten-free if that’s a concern.
- Dairy-Free : Skip the butter at the end, or use a dairy-free butter alternative. The sauce will still be delicious, just slightly less rich.
- Low-Carb/Keto : Replace the apple cider with a mix of chicken broth and a splash of apple cider vinegar. You’ll lose some sweetness but gain a tangy, savory sauce that’s still amazing.
Flavor Variations:
- Apple and Sage : Add 2-3 fresh sage leaves along with the thyme. Sage and apple are a classic fall pairing that works beautifully here.
- Spicy Apple Cider : Add a pinch of red pepper flakes or a small chopped jalapeño to the onions while they cook. The heat balances the sweetness perfectly.
- Herb-Forward : Swap the thyme for rosemary or add a bay leaf to the braising liquid. Each herb brings its own personality to the dish.
- Mustard-Lovers : Increase the Dijon to 3 tablespoons and add a teaspoon of whole-grain mustard for texture. The tangy mustard flavor really shines through.
Different Cooking Methods:
- Slow Cooker : Sear the pork and cook the onions in a skillet first, then transfer everything to a slow cooker. Cook on low for 6-7 hours or high for 3-4 hours. Thicken the sauce on the stovetop before serving.
- Instant Pot : Use the sauté function to sear the pork and cook the onions. Add the liquids, then pressure cook on high for 10 minutes with a natural release. Finish the sauce with butter as directed.
- Oven-Braised : After searing and adding the liquid, transfer the covered skillet to a 325°F oven and braise for 45-50 minutes. This gives you even, gentle heat.
I’ve tried the slow cooker version when I needed dinner ready the moment I walked in the door, and it was fantastic. The pork was incredibly tender, and the sauce had deepened in flavor over the long cooking time. If you love set-it-and-forget-it meals, this variation is for you.
Serving & Storage Suggestions
These pork chops are incredibly versatile when it comes to serving. Here’s how I like to enjoy them.
Serving Temperature and Presentation: Serve the pork chops hot, straight from the skillet. Spoon the sauce and caramelized onions generously over the top. A sprinkle of fresh parsley or thyme adds a pop of color. For a beautiful presentation, arrange the chops on a platter with the sauce drizzled over and around them.
What to Serve With It:
- Mashed potatoes — The classic choice. The creamy potatoes soak up every drop of that incredible sauce. My Easy One-Pan Maple Dijon Roasted Chicken Thighs has a similar sauce profile that works beautifully with potatoes too.
- Rice or quinoa — Fluffy rice is perfect for catching the sauce. I love serving this with a simple side of steamed green beans or roasted Brussels sprouts.
- Crusty bread — For sopping up every last bit of sauce. A good sourdough or baguette is ideal.
- Roasted vegetables — Carrots, parsnips, or butternut squash roasted with a bit of olive oil and salt complement the apple flavor perfectly.
- Simple salad — A crisp green salad with a tangy vinaigrette cuts through the richness of the pork. Try my Fresh Roasted Butternut Squash and Kale Salad for a seasonal side.
Storage Instructions: Store leftover pork chops and sauce in an airtight container in the refrigerator for up to 3-4 days. The flavors actually deepen and meld together overnight, making leftovers even more delicious.
Freezing: This recipe freezes beautifully. Place the cooled pork chops and sauce in a freezer-safe container or zip-top bag. Remove as much air as possible and freeze for up to 3 months. Thaw overnight in the refrigerator before reheating.
Reheating: The best way to reheat is gently on the stovetop. Place the pork chops and sauce in a skillet over low heat, cover, and warm for 5-7 minutes until heated through. You can also reheat in the microwave, but the pork might be slightly less tender. Add a splash of broth or water if the sauce has thickened too much during storage.
I actually love making a double batch and freezing half for those nights when I don’t feel like cooking. It’s like having a homemade meal in the freezer, ready to go. And honestly? The frozen and reheated version is almost as good as fresh.
Nutritional Information & Benefits
Here’s the approximate nutritional breakdown per serving (based on 4 servings, using bone-in pork chops and all the sauce):
- Calories: 420-450
- Protein: 35-40g
- Fat: 22-25g
- Carbohydrates: 18-20g
- Fiber: 1-2g
- Sugar: 12-14g (mostly from the apple cider)
- Sodium: 500-600mg (varies based on broth and added salt)
Health Benefits: Pork is an excellent source of high-quality protein, which is essential for muscle repair and growth. It’s also rich in B vitamins, particularly B12 and B6, which support energy metabolism and brain function. The apple cider provides antioxidants and a small amount of vitamin C. Onions and garlic are known for their immune-boosting properties and anti-inflammatory compounds.
Dietary Considerations: This recipe is naturally gluten-free and can be made dairy-free by omitting the butter. It’s also relatively low in carbohydrates compared to many comfort food dishes. If you’re watching your sugar intake, you can reduce the apple cider and add more broth. For a lighter meal, serve with a big green salad instead of potatoes or rice.
I personally love that this recipe feels indulgent but isn’t loaded with heavy cream or excessive butter. The richness comes from the natural sweetness of the apples and the savory depth of the braising liquid. It’s comfort food that you can feel good about eating.
Conclusion
These Easy Apple Cider Braised Pork Chops have become a staple in my kitchen for good reason. They’re simple enough for a busy weeknight but impressive enough for company. The tender, juicy pork, the sweet and savory apple cider sauce, the caramelized onions—every element works together to create something truly special.
What I love most about this recipe is how forgiving it is. You don’t need to be a professional chef to pull it off. It’s the kind of meal that makes you look like you know what you’re doing in the kitchen, even on nights when you’re just winging it. And honestly? That’s the best kind of recipe to have in your back pocket.
I’d love to hear how these turn out for you! Did you try any of the variations? Serve them with something unexpected? Drop a comment below and let me know. And if you’re looking for more cozy, one-pan meals, check out my Creamy Marry Me Chicken with Sun-Dried Tomato Sauce or my Easy One-Skillet Cheesy Taco Ground Beef and Rice Bake for more weeknight inspiration.
Happy cooking, friends! And remember—sometimes the best meals come from the most unexpected situations. Trust the process, and don’t be afraid to experiment.
Frequently Asked Questions
Can I use boneless pork chops for this recipe?
Absolutely! Boneless pork chops work perfectly. Just keep in mind that they tend to cook slightly faster than bone-in chops, so check for doneness a few minutes earlier. The cooking time might be closer to 20-25 minutes rather than 25-30. Use a meat thermometer to be safe—145°F is the target.
What if I don’t have apple cider? Can I use apple juice?
You can use apple juice in a pinch, but the flavor will be different. Apple juice is sweeter and less complex than cider. If you use juice, consider adding a splash of apple cider vinegar or lemon juice to balance the sweetness. The sauce might be slightly thinner too, so you may need to reduce it a bit longer.
How do I know when the pork chops are done?
The most reliable way is to use an instant-read thermometer. Insert it into the thickest part of the chop without touching the bone. The USDA recommends an internal temperature of 145°F, followed by a 3-minute rest. If you don’t have a thermometer, the pork should be fork-tender and the juices should run clear when pierced.
Can I make this recipe in advance for a dinner party?
Yes! You can cook the pork chops completely, then cool and refrigerate them in the sauce. When you’re ready to serve, gently reheat everything in a covered skillet over low heat. The flavors actually get better overnight. Just be careful not to overcook the pork during reheating. Add a splash of broth if the sauce has thickened too much.
What can I do with the leftover sauce?
The leftover sauce is pure gold! Use it as a gravy for mashed potatoes, rice, or roasted vegetables. It’s also amazing drizzled over roasted chicken or even used as a dipping sauce for crusty bread. I’ve even tossed it with pasta for a quick, flavorful meal. Store it in the refrigerator for up to a week or freeze it for longer storage.
Pin This Recipe!

Easy Apple Cider Braised Pork Chops: Best One-Pan Dinner

Tender, juicy pork chops braised in a sweet and savory apple cider sauce with caramelized onions. This one-pan wonder is perfect for busy weeknights yet impressive enough for company.
- Prep Time: 15 minutes
- Cook Time: 45 minutes
- Total Time: 1 hour
- Yield: 4 servings 1x
- Category: Main Course
- Cuisine: American
Ingredients
- 4 bone-in pork chops (about 1 inch thick)
- 2 cups apple cider
- ½ cup low-sodium chicken broth
- 1 large yellow onion, thinly sliced
- 4 cloves garlic, minced
- 2 tablespoons Dijon mustard
- 4–5 sprigs fresh thyme
- 2 tablespoons unsalted butter
- 2 tablespoons olive oil
- Salt and black pepper to taste
- Fresh parsley or extra thyme for garnish (optional)
Instructions
- Pat the pork chops dry with paper towels. Season both sides generously with salt and pepper. Let sit at room temperature for 15 minutes.
- Heat olive oil in a large heavy-bottomed skillet or Dutch oven over medium-high heat until shimmering.
- Sear the pork chops for 3-4 minutes per side until deeply golden brown. Transfer to a plate and set aside.
- Reduce heat to medium. Add sliced onions to the pan and cook for 4-5 minutes, stirring occasionally, until soft and starting to brown.
- Stir in minced garlic and cook for 30 seconds until fragrant.
- Pour in apple cider and chicken broth. Use a wooden spoon to scrape up browned bits from the bottom of the pan.
- Whisk in Dijon mustard until fully incorporated. Add fresh thyme sprigs. Bring to a gentle simmer.
- Return the pork chops to the skillet along with any accumulated juices. Liquid should come about halfway up the sides of the chops.
- Reduce heat to low, cover, and simmer gently for 25-30 minutes. Check halfway and turn chops gently.
- Transfer pork chops to a clean plate and tent loosely with foil to keep warm.
- Increase heat to medium-high and simmer the sauce uncovered for 5-7 minutes until reduced and slightly thickened. Stir in butter until melted and glossy. Season with salt and pepper. Remove thyme sprigs.
- Spoon sauce and onions over pork chops. Garnish with fresh parsley or extra thyme if desired. Serve immediately.
Notes
For best results, use pork chops at least 1 inch thick. Bone-in chops add extra flavor and moisture. If using boneless chops, reduce braising time to 20-25 minutes. The sauce can be made a day ahead and refrigerated. Leftovers keep for 3-4 days in the refrigerator or can be frozen for up to 3 months.
Nutrition
- Serving Size: 1 pork chop with sau
- Calories: 435
- Sugar: 13
- Sodium: 550
- Fat: 23
- Saturated Fat: 8
- Carbohydrates: 19
- Fiber: 1
- Protein: 38
Keywords: apple cider braised pork chops, one-pan dinner, easy pork chop recipe, fall dinner, braised pork chops, apple cider pork


