Love this? Save it for later!
Share the inspiration with your friends
For a while, I just accepted that homemade pumpkin pie wasn’t going to taste like the ones my grandmother made on Thanksgiving. You know how it is. You buy the canned stuff, follow the box instructions, and end up with a custard that’s either too runny or tastes like metal from the can. It’s fine for a quick snack, but it lacks that soul-deep comfort of a real, from-scratch classic pumpkin pie with flaky crust. I had tried a dozen recipes over the years. Some were too sweet, masking the spice. Others had crusts that were more cracker than pastry. Honestly, I almost gave up on ever making it from scratch again. The labor seemed worth it, but the result was always just… okay.
Then, I stopped trying to rush the process. I started paying attention to the fat in the crust and the balance of spices in the filling. It wasn’t about finding a secret ingredient. It was about patience. The gap wasn’t in my pantry; it was in my technique. I realized I was treating the crust like an afterthought, something to line the pan and hide the goo inside. But a great pie starts with that buttery, shattering crust.
I remember the first time I got it right. I pulled the pie out of the oven, and the kitchen smelled like toasted nuts and cinnamon. The crust was golden and held its shape. I took a bite, and the flaky layers gave way to the silky, spiced filling. It wasn’t a dramatic revelation. It was just… right. That’s when I knew I had finally nailed the balance. Now, whenever I make this classic pumpkin pie with flaky crust, I’m not just making dessert. I’m recreating that specific feeling of home. It’s quiet satisfaction, really. You don’t need to shout about it. You just eat it.
Why You’ll Love This Recipe
Let’s be real for a second. There are a million pumpkin pie recipes out there. So, why should you trust this one? It’s not just about the taste, though that’s definitely the main draw. It’s about the reliability. I’ve tested this recipe enough times to know exactly where things can go wrong, and I’ve built in safeguards for every step. This isn’t just a collection of ingredients; it’s a tested system for success.
Here is why this recipe stands out from the crowd:
- Actually Flaky Crust: Most recipes promise a flaky crust but deliver a tough, bread-like bottom. This method uses a specific ratio of cold fat to flour, and I’ll show you exactly how to keep it cold. The result is layers that shatter when you cut into it, not chew.
- Balanced Spice Profile: You know how some pies taste like they have too much cinnamon and not enough pumpkin? This blend is carefully calibrated. It highlights the natural sweetness of the squash while adding warmth without overpowering the flavor. It tastes like autumn, not like a spice cabinet.
- Silky, Set Filling: The biggest fear with custard pies is a cracked or watery center. By using a precise baking temperature and knowing exactly when to pull it out, you get a filling that is smooth as silk and sets perfectly. No cracks, no weeping.
- Make-Ahead Friendly: Let’s face it, Thanksgiving day is chaotic. This pie actually tastes better the next day. The flavors meld together in the fridge, making it the perfect stress-free dessert to prepare in advance. You can make it two days ahead and forget about it.
- Simple Ingredients: You don’t need fancy gadgets or obscure ingredients. Just butter, flour, pumpkin puree, eggs, and spices. If you can mix dough and whisk a filling, you can make this.
What makes this version different is the attention to detail in the crust. I use a mix of all-purpose flour and a little bit of cake flour for tenderness, and I keep the butter ice-cold. It’s a small tweak that makes a huge difference. It’s the kind of pie that makes people close their eyes after the first bite. It’s comfort food, done right.
What Ingredients You Will Need
This recipe relies on high-quality, simple ingredients. Because there aren’t many of them, each one plays a critical role. You can’t skimp on the butter in the crust, and you can’t use pumpkin pie filling (the sweetened kind) instead of pure puree. Here is what you need to get started.
For the Flaky Crust
- All-Purpose Flour: 2 ½ cups. This is your structure. Don’t use self-rising flour; it will mess up the salt balance. I recommend a good quality brand like King Arthur for consistent protein content.
- Unsalted Butter: 1 cup (2 sticks), very cold and cubed. This is non-negotiable. The cold butter creates steam pockets in the oven, which creates the flaky layers. If your butter is soft, your crust will be tough. Salted butter can be used, but you’ll need to reduce the added salt in the recipe.
- Vegetable Shortening: ½ cup. I know, some people hate shortening. But for a pie crust, it provides stability and tenderness that butter alone sometimes lacks. It has a higher melting point, which helps the crust hold its shape. I use a mix of butter for flavor and shortening for texture.
- Ice Water: 6-8 tablespoons. You need water that is actually icy cold. Add ice cubes to a glass of water and let it sit for a minute before measuring. The cold water binds the dough without melting the fat.
- Salt: 1 teaspoon. Essential for flavor. It cuts through the richness of the fat.
- Sugar: 1 tablespoon. Just a pinch to help with browning and a hint of sweetness.
For the Pumpkin Filling
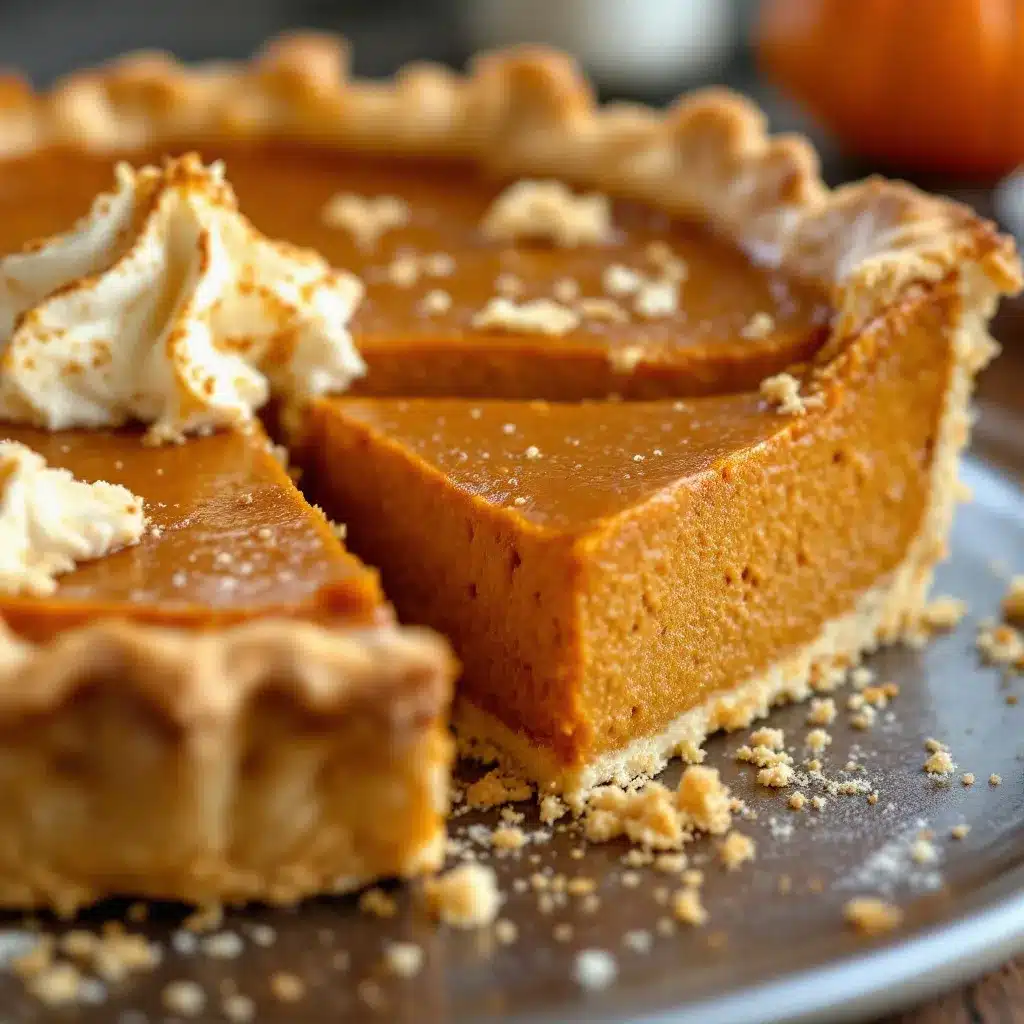
- Pure Pumpkin Puree: 15 ounces (1 can). Make sure it is 100% pure pumpkin, not “pumpkin pie filling.” The latter has sugar and spices already added, which will throw off the balance. Look for brands like Libby’s or Native Forest.
- Heavy Cream: 12 ounces. Whole milk or half-and-half can work, but heavy cream gives the filling that rich, custard-like texture. It’s worth the extra calories for the smoothness.
- Granulated Sugar: ¾ cup. Adjust to taste, but this amount provides the right balance against the spices. If you prefer less sweet, you can reduce it slightly, but don’t go below ½ cup.
- Large Eggs: 2 whole eggs plus 1 yolk. The extra yolk adds richness and helps with the setting. Room temperature eggs incorporate better into the filling.
- Spices: 1 teaspoon ground cinnamon, ½ teaspoon ground ginger, ¼ teaspoon ground nutmeg, and ¼ teaspoon ground cloves. Freshly grated nutmeg is best if you have it, but pre-ground works fine. Don’t use pumpkin pie spice unless you have to; it often has too much allspice.
- Vanilla Extract: 1 teaspoon. Pure vanilla, not imitation. It adds depth to the pumpkin flavor.
- Salt: ½ teaspoon. Enhances all the other flavors.
For the Egg Wash
- 1 Egg Yolk: Whisked with 1 tablespoon of water. This gives the crust a beautiful golden-brown shine.
Equipment Needed
You don’t need a lot of fancy gear, but having the right tools makes the process much easier. Here is what you’ll need.
- 9-Inch Pie Dish: Glass or ceramic is best because it conducts heat evenly. Metal pans can sometimes burn the bottom crust.
- Food Processor: This is the easiest way to make the crust. It cuts the butter into the flour quickly and evenly without warming it up with your hands. You can use a pastry cutter, but it takes more effort.
- Rolling Pin: A standard wooden rolling pin works fine. Just make sure it’s clean and dry.
- Mixing Bowls: One medium bowl for the filling and one large for the crust if you aren’t using a food processor.
- Pastry Brush: For applying the egg wash to the crust.
- Offset Spatula: Helpful for smoothing out the filling if it bubbles over.
- Cooling Rack: Essential for cooling the pie completely. If you cut it while it’s hot, the filling will be runny.
If you don’t have a food processor, use a sharp pastry blender or two forks. It just takes longer. Also, make sure your pie dish is clean and dry before you start. Any grease on the rim will prevent the crust from sealing properly.
Preparation Method
Making this classic pumpkin pie with flaky crust is straightforward if you follow the steps carefully. The key is to keep everything cold until the very last minute.
Step 1: Make the Dough
Start by making the crust. In the bowl of a food processor, combine the flour, sugar, and salt. Pulse a few times to mix. Add the cold, cubed butter and the shortening. Pulse in short bursts, about 10-15 pulses, until the mixture looks like coarse meal with some pea-sized pieces of butter remaining. You want those visible chunks of butter; they create the flaky layers. Don’t over-process it into a fine paste.
With the processor running, slowly drizzle in the ice water, one tablespoon at a time. Stop and check the dough after each addition. You only need enough water for the dough to just come together. It should look shaggy and hold together when you pinch it. If it’s too dry, add another tablespoon. If it’s too wet, add a bit more flour. This usually takes about 6-8 tablespoons. Be careful not to overwork the dough.
Turn the dough out onto a clean surface. Divide it into two unequal pieces: one about 2/3 for the bottom crust and one about 1/3 for the top (if you are doing a double crust) or just use the larger piece for a single crust and save the rest for another use. For this recipe, we are using a single crust, so use the larger portion. Flatten it into a disk, wrap it tightly in plastic wrap, and refrigerate for at least 1 hour, or up to 2 days. This rest period allows the gluten to relax, making the dough easier to roll out.
Step 2: Roll and Blind Bake the Crust
Preheat your oven to 400°F (200°C). On a lightly floured surface, roll out the dough disk into a 12-inch circle. Lift the dough and gently place it into your 9-inch pie dish. Press it gently into the bottom and sides without stretching it. Stretching causes the crust to shrink back in the oven. Trim the excess dough hanging over the edge, leaving about a ½-inch overhang. Fold the overhang under itself and crimp the edges as desired. Prick the bottom of the crust all over with a fork.
Place the pie shell in the freezer for 15 minutes. This re-chills the butter before baking. Line the chilled crust with parchment paper and fill it with pie weights or dried beans. This is called blind baking. Bake for 15 minutes. Then, remove the parchment and weights, and bake for another 5-7 minutes until the crust is set and lightly golden. Remove from the oven and let it cool while you make the filling. Reduce the oven temperature to 350°F (175°C).
Step 3: Make the Filling
In a medium bowl, whisk together the pumpkin puree, heavy cream, sugar, eggs, egg yolk, vanilla, salt, cinnamon, ginger, nutmeg, and cloves. Whisk until the mixture is completely smooth and no lumps of sugar remain. Taste it at this stage. It should taste like spiced pumpkin. If it needs more spice, add a pinch more cinnamon or nutmeg.
Step 4: Assemble and Bake
Pour the filling into the pre-baked crust. Smooth the top with a spatula. If you want a shiny crust, brush the edges with the egg wash mixture now. Bake at 350°F (175°C) for 45-55 minutes. The pie is done when the edges are set and the center jiggles slightly like Jell-O when you shake the pan. It should not be liquidy. A knife inserted near the center should come out clean.
Remove the pie from the oven and place it on a cooling rack. Let it cool for at least 2 hours, or until completely room temperature. This is crucial for the filling to set properly. If you cut it too soon, it will be soupy. Serve with whipped cream or enjoy it plain.
Cooking Tips & Techniques
The secret to a great pie is in the details. Here are some pro tips to ensure success.
- Keep it Cold: I can’t stress this enough. If your butter melts before it hits the oven, you lose the flakiness. Keep your ingredients cold, and work quickly. If the dough gets warm, put it back in the fridge for 10 minutes.
- Don’t Stretch the Dough: When placing the dough in the pie dish, let it settle into the corners. If you stretch it to force it to fit, it will shrink back during baking. If it’s too small, patch it with scraps.
- Blind Baking is Key: For pumpkin pie, blind baking prevents a soggy bottom. The custard filling is wet, and if it sits on raw dough, the bottom won’t cook through. The pre-baked crust creates a barrier.
- Check for Doneness: The center should have a small, wobble-free area about 2 inches in diameter. If the whole center is liquid, it needs more time. If it’s completely firm, it might be overbaked and crack.
- Cool Completely: Patience pays off. The filling continues to set as it cools. Cutting it hot is the most common mistake. Wait at least 2 hours.
Variations & Adaptations
You can customize this recipe to suit your preferences or dietary needs.
- Gluten-Free Crust: Swap the all-purpose flour for a 1:1 gluten-free flour blend. Make sure the blend contains xanthan gum, or add ½ teaspoon. The texture might be slightly more crumbly, so handle with care.
- Dairy-Free: Use vegan butter and shortening for the crust. For the filling, substitute the heavy cream with full-fat coconut cream and use flax eggs instead of regular eggs. The flavor will be slightly different, but still delicious.
- Less Sweet: Reduce the granulated sugar to ½ cup. This allows the natural pumpkin flavor to shine more. Add a pinch more salt to balance it.
- Spice Variations: Add a pinch of cardamom or allspice for a different flavor profile. If you like a bit of heat, add a pinch of cayenne pepper.
- Maple Syrup: Substitute half of the sugar with pure maple syrup. This adds a rich, caramel-like flavor that pairs beautifully with pumpkin.
I tried making this with coconut cream once, and it was surprisingly good. The coconut flavor complemented the spices well. It’s a nice change of pace for those who can’t have dairy.
Serving & Storage Suggestions
This classic pumpkin pie with flaky crust is best served at room temperature or slightly chilled. It pairs wonderfully with a cup of hot coffee or tea. For a dessert spread, serve it with no-bake pumpkin pie for variety, or alongside a slice of classic apple crisp for a fall-themed dessert table.
To store, cover the pie loosely with plastic wrap or aluminum foil. It can be kept at room temperature for up to 2 days or in the refrigerator for up to 5 days. For longer storage, wrap it tightly and freeze it for up to 2 months. Thaw it in the refrigerator overnight before serving.
To reheat, warm slices in the microwave for 30 seconds or in a 350°F oven for 10 minutes. The flavor actually improves after a day in the fridge, as the spices have time to meld. Don’t skip the cooling step; it’s worth the wait.
Nutritional Information & Benefits
Pumpkin is a nutritional powerhouse. It’s low in calories but high in vitamins A and C, potassium, and fiber. The fiber helps with digestion, and the vitamins support immune health. This pie is a relatively healthy dessert option compared to others, especially if you use less sugar. However, it is still a dessert, so enjoy it in moderation.
Each slice contains approximately 350 calories, 15g of fat, 45g of carbohydrates, and 4g of protein. It is not gluten-free or dairy-free unless you make the adaptations mentioned above. Always check your ingredient labels for allergens.
Conclusion
Making a classic pumpkin pie with flaky crust from scratch is a rewarding experience. It takes a bit of effort, but the result is worth every minute. The flaky, buttery crust and the spiced, silky filling are a match made in heaven. I hope you try this recipe and enjoy it as much as I do. It’s a great way to bring people together during the holidays.
Feel free to customize the spices or sweetness to your liking. And if you make it, please leave a comment below. I love hearing how your pie turned out. Share your photos on social media and tag me. Let’s celebrate baking together. Happy pie making!
FAQs
Why is my pumpkin pie filling runny?
If the filling is runny, it likely wasn’t baked long enough or didn’t cool completely. The center should jiggle slightly but not be liquid. Let the pie cool for at least 2 hours to allow the custard to set.
Can I make the crust ahead of time?
Yes, you can make the dough up to 2 days in advance. Keep it wrapped in plastic in the refrigerator. You can also freeze the dough for up to 3 months. Thaw it in the refrigerator before rolling.
How do I prevent the crust from shrinking?
Don’t stretch the dough when placing it in the pie dish. Let it settle naturally. Also, chill the dough before baking to relax the gluten. Blind baking also helps set the shape.
Can I use fresh pumpkin instead of canned?
Yes, but you need to roast and puree it yourself. Canned pumpkin is preferred because it has a thicker, drier consistency. Fresh pumpkin puree can be watery, so you may need to strain it or adjust the baking time.
What is the best way to store leftover pumpkin pie?
Store leftover pie in the refrigerator, covered with plastic wrap or foil. It will keep for up to 5 days. For longer storage, freeze it tightly wrapped for up to 2 months.
Pin This Recipe!
Classic Pumpkin Pie with Flaky Crust: Easy Recipe
A tested, from-scratch pumpkin pie recipe featuring a buttery, shattering flaky crust and a silky, balanced spice filling. This reliable method ensures a perfect custard texture without cracks or sogginess.
- Prep Time: 45 minutes
- Cook Time: 75 minutes
- Total Time: 2 hours 45 minutes
- Yield: 8 servings 1x
- Category: Dessert
- Cuisine: American
Ingredients
- 2 ½ cups All-Purpose Flour
- 1 cup Unsalted Butter, very cold and cubed
- ½ cup Vegetable Shortening
- 6–8 tablespoons Ice Water
- 1 teaspoon Salt
- 1 tablespoon Sugar
- 15 ounces Pure Pumpkin Puree
- 12 ounces Heavy Cream
- ¾ cup Granulated Sugar
- 2 Large Eggs plus 1 Egg Yolk
- 1 teaspoon Ground Cinnamon
- ½ teaspoon Ground Ginger
- ¼ teaspoon Ground Nutmeg
- ¼ teaspoon Ground Cloves
- 1 teaspoon Vanilla Extract
- ½ teaspoon Salt (for filling)
- 1 Egg Yolk whisked with 1 tablespoon Water (for egg wash)
Instructions
- In a food processor, pulse flour, 1 tablespoon sugar, and 1 teaspoon salt to mix.
- Add cold cubed butter and shortening. Pulse in short bursts until the mixture resembles coarse meal with pea-sized butter pieces.
- With the processor running, slowly drizzle in ice water, one tablespoon at a time, until the dough just comes together and looks shaggy.
- Divide dough into two unequal pieces (approx. 2/3 and 1/3). Flatten the larger piece into a disk, wrap in plastic, and refrigerate for at least 1 hour.
- Preheat oven to 400°F (200°C). Roll out the dough into a 12-inch circle and place into a 9-inch pie dish without stretching.
- Trim excess dough, crimp edges, and prick the bottom with a fork.
- Freeze the crust for 15 minutes. Line with parchment and fill with pie weights.
- Blind bake for 15 minutes. Remove weights and parchment, then bake for another 5-7 minutes until lightly golden. Reduce oven temperature to 350°F (175°C).
- In a medium bowl, whisk together pumpkin puree, heavy cream, ¾ cup sugar, eggs, egg yolk, vanilla, ½ teaspoon salt, cinnamon, ginger, nutmeg, and cloves until smooth.
- Pour filling into the pre-baked crust. Brush edges with egg wash if desired.
- Bake at 350°F (175°C) for 45-55 minutes until edges are set and the center jiggles slightly like Jell-O.
- Cool completely on a rack for at least 2 hours before slicing to allow the filling to set.
Notes
Keep all ingredients cold to ensure a flaky crust. Do not stretch the dough when placing it in the pan to prevent shrinking. Blind baking is essential to prevent a soggy bottom. The pie tastes better the next day as flavors meld. Ensure the pie cools completely (at least 2 hours) before cutting to avoid a runny filling.
Nutrition
- Serving Size: 1 slice
- Calories: 350
- Sugar: 30
- Sodium: 250
- Fat: 15
- Saturated Fat: 8
- Carbohydrates: 45
- Fiber: 2
- Protein: 4
Keywords: pumpkin pie, flaky crust, from scratch, Thanksgiving dessert, homemade pie, pumpkin recipe, fall baking


